Many are faced with the problem of lack of free space on the hard drive. The disk on which the operating system itself is installed is especially often clogged. This is due to the fact that there are a lot of folders on it, which the system itself fills with the information it needs. This problem is also relevant for Windows 7. You can clean system folders from unnecessary garbage both manually and using special programs.
Windows 7 system folders: the need for cleaning and possible consequences
Each of the system folders has its own purpose and stores information of a certain kind. Before cleaning the disk, carefully read what function this or that folder is responsible for, otherwise you may lose important data or severely damage the operating system, which will lead to its breakdown:
Video: what files can be deleted on the system drive
What not to do when cleaning system folders
Carefully read the features of the above folders. Before cleaning one of them, consider whether its contents will be useful to you in the future. Some folders, such as Windows or System32, should not be touched at all. And don't try to clean up folders by simply deleting their contents. This will lead to the fact that the remains of them will remain in the computer’s memory, which in the future will begin to litter and overload the system. There are only a few folders that you can manually clear:
In no case do not delete the folders themselves, this will lead to critical errors in the system, you only need to erase their contents. Also, before clearing system folders, make sure that you can free up memory in other ways, for example, by uninstalling third-party applications and games.
Windows 7 System Folder Cleanup Methods
If you still decide to clean your hard drive from accumulated third-party files, then the easiest way is to use the built-in functions of Windows. There are two initial options - standard and advanced cleaning.
Standard cleaning
Using the standard cleanup method, you will get rid of the following files and folders:
To perform a standard hard disk cleanup, follow these steps:
 Open the properties of the system drive
 Go to the "General" section
 Select the files we want to delete
 Click the "Clean" button in the "System Restore and Shadow Copy" section
Advanced cleaning
With the advanced cleanup option, you will remove the following folders and files:
To perform Advanced Disk Cleanup, follow these steps:
 Run "Command Prompt" as Administrator
 Write the cleanmgr command
 Select the drive you want to clean up
 Select the files to be deleted
Video: Windows Disk Cleanup
Disk cleanup using third-party programs
Before you start manually cleaning each folder separately, you should use special third-party programs designed to automatically search for and clean the disk from unnecessary files:
 Downloading the CCleaner app
 Go to the section "Cleaning"
 Select sections to clear
 Click the "Analyze" button
 Before deleting files, you can view information about them
Video: Deleting System Files with CCleaner
Features of cleaning individual system folders
If the previous cleaning methods did not solve your problem or you need to clean one of the folders selectively, then find it in the sections below and follow the instructions provided.
But many folders are hidden by default to prevent the user from accidentally corrupting them. To display hidden folders in the general list, do the following:
 Open File Explorer
 Expanding the "Tools" menu
 Go to the "Folder Options" section
 Go to the "View" section
 Changing the settings for hidden folders
winsxs
Cleaning up the Winsxs folder on Windows 7 is done through a standard disk cleanup. This method has already been described above. Before starting the cleanup, you are offered a list of files that can be deleted. Check the section "Backup files of the update package" in it.
 Check "Service Pack Backup Files"
Video: How to clean up the Winsxs folder in Windows 7
System Volume Information
To clear the System Volume Information folder, you must first access it:
 Open the properties of the System Volume Information folder
 Go to the "Security" tab
 Click the "Change" button
 Click the "Add" button
 Entering the username
 Give full access to the folder
 Go to computer properties
 Go to the "System Protection" section
 Click the "Setup" button
Click the "Apply" and "OK" buttons one after the other.
DriversStore
To remove obsolete drivers from a store called DriversStore, follow these steps:
 Open command line
 We write the command pnputil.exe -e
 Writing and executing a command
installer
The Installer folder may contain files necessary for the system or programs, but there is a special third-party PatchCleaner application that will automatically determine what can be removed from the content:
 PatchCleaner searches for outdated update files and allows you to move them to another medium or completely delete them
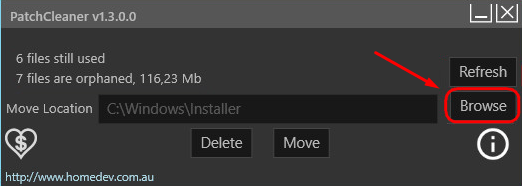 Click the Browse button
 Specify the path to the Installer folder
 Click the Delete button
 Confirm the action by clicking on the Yes button
Pagefile.sys
If you are sure that the computer will cope with the required tasks without the Pagefile.sys paging file, you can remove it by following these steps:
 Go to the "Advanced system settings" section
 Press the "Options" button
 Click the "Edit" button in the "Advanced" tab
 Set the required parameters
 We restart the computer
Folders with history, cache and browser cookies
Browser files can take up a lot of disk space. It is easiest and safest to remove them through the settings of the browser itself:  Marking files. to be removed from browser history
 Set the parameter "For all time" and clear the history
Disk Cleanup Issues
If after you have deleted any files from the system folder, errors appear or the computer starts to slow down, there is only one thing left to do - perform a system restore. This could happen if the disk was not cleaned correctly or the necessary files were deleted. System restore is possible only if the computer has restore points:
 Starting the computer in safe mode
 Open the System Restore app
 Click the "Next" button
 Choose a restore point
Video: Windows 7 Recovery
What to do if there is no "Clean up system files" button
If, when trying to free up disk space using the standard cleaning method, you are faced with the absence of the “Clean up system files” button, this means that you have disabled UAC (User Account Control), and the program immediately starts with the ability to clean up system files. That is, clicking the "Clean up system files" button gives you administrator rights and with them the ability to edit and clean up system folders. But if UAC is disabled, then you have access to changing system files right away and you don’t need to press any additional buttons.
 If the "Clean up system files" button is missing, User Account Control is disabled
If you want to clear disk space or are sure that part of the virus has been preserved in the system files, then in this case the operating system itself has a standard and advanced disk cleanup function. You can also use third-party programs or clear each folder separately. But you should not delete everything in a row, otherwise it will lead to a computer breakdown, and the only way out is to roll back the system to the last restore point.
Announced the release of the October update for Windows 10 during her conference in New York on October 2, 2018. Since then, users who ventured to install the update among the first, complain to numerous problems that appeared after installation. It is worth noting that each release of Windows 10 updates is accompanied by certain risks, and many users do not dare to upgrade the system due to fear of breakage. This time was no exception.
One of the most common problems is the sudden loss of personal documents of the owner of the computer. Some users complain about the loss of several files, others claim that Windows itself deleted hundreds of gigabytes that cannot be recovered in any way.
“Two months of my work was lost due to the update,” writes one of the victims, who lost files totaling 220 GB. - The most important thing is that these documents do not end up in the "Basket". They just disappeared."
“Apparently, my computer installed the latest Windows 10 update around 3 p.m. and during that process...it unpacked its own setup files, overwriting my documents. I'm so mad at Microsoft!" - said a Twitter user with the nickname @MakatiCub.
As far as I can tell, my computer downloaded the latest Windows 10 update around 3pm today and during that process it unlinked my Documents directory then unpacked its own setup files that overwrote my own files.
I am so angry at Microsoft right now - if this is the case.
— Flabby Cat (@MakatiCub) October 4, 2018
Deletion affects files in the "My Documents" and "Pictures" folders located in the user's personal directory. At the same time, it is not possible to return the files even after canceling the update and restoring the previous state of Windows.
Probably, the missing documents are related to the update of the Microsoft OneDrive cloud service, but there is no direct evidence of this.
Another issue with the Windows 10 October Update was the overload on some of the brand's processors, causing the battery on laptops to drain too quickly. This overload is caused by the Intel Display Audio driver, which the system suggests installing as part of the update. Microsoft has issued a recommendation asking you to ignore the prompt to install the driver and close the dialog box.
It is reported that for the general public, the automatic update was only supposed to start on October 9, and those who installed it earlier are a small group of advanced users who launched the update manually.
However, Microsoft has already taken the necessary measures to prevent casual users from updating Windows until the existing problems are resolved.
A company spokesman said the incident is under investigation.
Hole in the system
At the end of September, it became known about a critical zero-day vulnerability in Windows that allows hackers to gain access to the victim's system. The vulnerability was discovered four months ago, but has not yet been fixed. Some experts hoped that a patch fixing the "hole" would be released as part of the ill-fated October update.
The vulnerability was discovered in the JET Database Engine on Windows 7, but it is possible that newer versions of this operating system, including Windows 10, may also be at risk.
An attacker who wanted to exploit this vulnerability sent a .jet file to the victim, which, when launched, simultaneously gave the hacker access to her computer and could install malware and viruses on it.
Despite the fact that such a scenario looks scary, security experts assess the threat from this vulnerability as moderate, emphasizing the fact that infection is impossible without the active participation of the user himself.
“There is no other attack scenario through this vulnerability that would not involve user interaction. Personally, I would say that the level of risk in this case can be assessed as low or medium, ”said Avast security specialist Martin Hron in an interview with Gazeta.Ru.
When installing Windows operating systems of the seventh version and higher (for example, after XP), users saw a lot of innovations. In particular, this concerned the appearance of some incomprehensible directories that were not previously on the system disk. One of these is the PerfLogs directory. What kind of folder under this name is displayed in "Explorer" or in another file manager, and will be discussed further. To understand this, let's first consider why this directory was created in the system.
What is the PerfLogs folder on drive C?
This directory was first introduced into the file structure only in Windows 7. At the moment, it is present in all recent operating systems. But what is the PerfLogs directory used for? What is this folder in Windows 10, as well as in Windows 7 or 8?
To understand its purpose, you just need to decipher the abbreviation of the name. The first part (Perf) is derived from the English Performance, which can be interpreted as “design” or “performance”, and the second (Logs) means logs, or special system reports corresponding to the performance log.
What data is stored in the directory
Thus, speaking about the PerfLogs folder, it is easy to understand that it is a place to save special files that record the results of performance tests, if any.
Separately, it is worth noting that the more tests are carried out, the more files are stored there. And they, in turn, can be quite large, since the old reports do not disappear anywhere. In other words, new reports do not overwrite old ones. Ultimately, the amount of disk space occupied can increase significantly.
Default settings
What is the PerfLogs folder in Windows 7 or systems of a higher rank is a little clear. Now a few words about the nuances that every user of a computer system should know.

The fact is that initially there is no information in this directory (it is empty or occupies a minimal amount). Report data appears only after performance tests are carried out using the operating system tools. They are mainly used after some time, when the system starts to significantly slow down or cause failures at the system level, which entails an increase in the load on hardware resources. Thus, the more often you run tests, the larger this directory will be. However, all this applies only to the Windows toolkit. Therefore, in order not to litter the system partition, it is better to use third-party utilities for performance testing.
Viewing Log Files
Many users would like to view full reports, for example, to find out the reasons for system performance degradation. But just like that, it is not possible to open files located in the PerfLogs directory (no program is associated with their extensions by default in Windows).
So what is the PerfLogs folder if its contents cannot be opened? The problem here is that this directory belongs to the performance monitor service, but not the one that is in the Task Manager, but the one that is presented as a hidden standard application.

You can call it through the usual Run menu if you enter the perfmon command, that is, the abbreviated name of the performance monitor. In the monitor itself, you need to use performance counters, divided into groups, where you can see the results of all checks.

In this case, test files are loaded automatically, but the overall result of the report for all categories is stored not in the main directory, but in the Diagnostics subdirectory, which is located in the System folder of the main directory (PerfLogs). Thus, there is no need to open files one at a time.
Is it possible to delete the PerfLogs folder
Let's say a few words about the possibility or impossibility of this action. Since, as already noted, the files contained in the directory can take up too much disk space, many users have a completely natural question about whether this directory can be got rid of.
You can delete a folder with all files and subdirectories, but this will not affect the performance of the operating system. The user will only lose the ability to view the results of checks if he performed them. As for the folder itself, even after deleting it, the operating system will automatically create the directory of the same name upon restart, using its own automated tools for restoring settings (registry entries, folders and files). It will be located in the same place where the deleted folder was located. As in the default settings, this automatically created directory will initially be empty! As soon as you start to check the system for performance, you will immediately get an increase in its size. Conclusion: it is not worth doing checks too often, so as not to increase the amount of information in the PerfLogs folder, then it will not interfere.

If the decision to delete the folder is made, but it is impossible to delete it in Explorer using the standard method, you can use the Unlocker unlock program or log in with an administrator account. Even easier is to activate it to login via the command line in order to immediately assign yourself all the admin rights. But the command console itself should initially be launched only with administrator rights.
Finally
That's all for the PerfLogs directory. What kind of folder is on the system drive and what it is intended for, hopefully, now it has become clear. As for deleting a directory, the choice is up to the user. If you sometimes need to view report results to compare tests at different time points, it is better not to touch the catalog. If the space in the system partition is extremely limited, the directory can be deleted. And remember that for the normal operation of any system of the latest generations, it is necessary to keep at least 10-15% of the total volume of the system disk free. If you have powerful processors and large amounts of RAM, as well as to reduce the use of the system partition, you can simply disable virtual memory (deactivate the use of the paging file).
Lists of open files and USB connected devices, browser history, DNS cache - all this helps to find out what the user was doing. We have compiled step-by-step instructions on how to remove traces of your activities in different versions of Windows, Office and popular browsers. At the end of the article, you will find some scripts that will help you keep your machine clean automatically.
1. Clearing lists of recent places and programs
Let's start cleaning with lists of recent places and programs. The list of recent (in Windows 10 - frequently used) programs is in the main menu, and the list of recent places is in File Explorer.

How to turn off this mess? In Windows 7 - right-click on the "Start" button, select "Properties" and in the window that appears, uncheck both checkboxes in the "Privacy" section.

To clear the list of recent places and documents, you need to delete the contents of the %appdata%\Microsoft\Windows\Recent directory. To do this, open a command prompt and run two commands:
Cd %appdata%\Microsoft\Windows\Recent echo y | del *.*
It also doesn't hurt to delete the contents of the %appdata%\microsoft\windows\recent\automaticdestinations\ directory. It stores the latest files that appear in the jump list:
cd %appdata%\microsoft\windows\recent\automaticdestinations\ echo y | del *.*
To have recent files cleared automatically on exit, you need to enable the "Clear Recently Opened Documents History on Exit" policy, which is located in User Configuration\Administrative Templates\Start Menu and Taskbar.
Now let's move on to Windows 10. You can turn off the list of recently added and frequently used applications through the "Settings" window. Open it and go to the "Personalization" section, the "Start" item. Turn off everything in there.

It seems that the problem is solved, but, alas, this is not entirely true. If you enable these options again, then all lists in the same composition will appear again. Therefore, you will have to disable this feature through group policy. Open gpedit.msc and navigate to User Configuration\Administrative Templates\Start Menu and Taskbar. Enable the following policies:
- "Clearing the list of recently used programs for new users";
- "Clear the history of recently opened documents on exit";
- "Clear notification log on tile on exit";
- "Remove the list of programs pinned to the start menu."

Clearing recent places in Windows 10 is easier than in the "seven". Open File Explorer, go to the "View" tab and click the "Options" button. In the window that appears, turn off the options "Show recently used files in the Quick Access Toolbar" and "Show frequently used folders in the Quick Access Toolbar". Don't forget to click the "Clear" button.

As you can see, a task as simple as clearing the last objects has a rather difficult solution. Without editing group policies - nowhere.
2. Clearing the list of USB drives
At some secure facilities, only flash drives registered in the log are allowed to be connected to the computer. And, as usual, the magazine is the most common - paper. That is, the computer itself does not in any way restrict the connection of unregistered drives. Does not limit, but records! And if during the check they find that the user connected unregistered drives, he will have problems.
By no means do we advise you to try to steal military secrets, but the ability to clear the list of recently connected drives can come in handy in other life situations. To do this, look in the following registry keys:
HKEY_LOCAL_MACHINE\SYSTEM\CurrentControlSet\Enum\USBSTOR\ HKEY_LOCAL_MACHINE\SYSTEM\CurrentControlSet\Enum\USB\
Here they are - all the drives that you connected to your computer.

It would seem that you just need to take it and clean everything. But it was not there! Firstly, the permissions for these registry branches are set in such a way that you won’t delete anything even in the “seven”, not to mention the “ten”.

Secondly, assigning rights and permissions manually takes a long time, especially if there are a lot of drives. Thirdly, admin rights will not help. The screenshot above was created when I performed the delete operation with just admin rights. Fourth, in addition to these two partitions, there is a long list of partitions to clean up. Moreover, they must not only be deleted, but correctly edited.
If for some reason you need to do everything manually, then search for the keywords MountPoints, MountedDevices DeviceClasses and RemovableMedia. But it is much easier to use a ready-made program that will do everything for you. Some forums recommend USBDeview for this. However, I tested it and declare that it does not clean out information from all the necessary sections. USBSTOR and USB continue to contain information about connected media.
I can recommend the program. Run it, check the "Perform a real cleaning" checkbox. You can turn on the “Save .reg-file of cancellation” parameter or not, but if the goal is not to check the program, but to prepare for the upcoming computer inspection, then it is better to turn it off.

The program not only cleans the registry, but also displays a detailed log of its actions (see below). When it finishes, there will be no mention of connecting drives to the computer.

3. Clear cache and browser history
The third item in our tudu is clearing the cache and browser history. There are no difficulties here - each browser allows you to reset the list of recently visited sites.
Continued available to members only
Option 1. Join the "site" community to read all the materials on the site
Membership in the community during the specified period will give you access to ALL Hacker materials, increase your personal cumulative discount and allow you to accumulate a professional Xakep Score rating!
The article describes one of the cases of solving a problem in which Windows takes up a lot of hard disk space from session to session, and cleaning up temporary folders does not work and the problem constantly returns.
Trying to find where the free space on your hard drive has gone? The situation is sometimes complicated by the fact that nothing seemed to be installed, and tens and sometimes even hundreds of gigabytes of space were blown away ... But listen further.
Windows users sometimes, meanwhile, report strange system behavior. Using the methods for detecting “space absorbers” in the article “?” or, you can expect temporary positive results. However, by the end of the session, Windows takes up a lot of space again: Windows log files accumulate over and over again, sometimes taking up hundreds of gigabytes, generating individual files in batches of 100 MB each. The “harmful” folder seems to have been found - this C:\Windows\Temp, but nothing can be done: files with the extension .cab fill up temporary storage until the free space on the disk disappears completely. This action is similar to the maneuver, which by the end of the “session” will gobble up all the free space on the HDD.
Windows takes up a lot of space: the crux of the matter
Windows developers have known about this problem for a long time. It is known that the problem stems from the results of work Component Oriented Services systems ( Component Based Servicing), sometimes creating logs of incredible sizes. They are located in the folder C:\Windows\Logs\CBS. The current log is named as cbs.log. But as soon as it reaches a certain value in its size, the launched cleaning process immediately renames this file to a file of type .log and immediately tries to compress it in size, eventually assigning the extension to the resulting file .cab. using the system utility makecab.exe. But this is where the user sometimes traps a “bonus”: when the file cbs.log reaches a size of 2 GB before the cleaning process has time to turn to it for compression, the indicated utility .. cannot cope with it - and it is supposedly already too large: the utility makecab.exe frankly “stupid” when faced with files of such sizes. The log is renamed to C bsPersist-time-date.log and when makecab.exe trying to compress it, an error appears. The error loops and as a result: every 15 - 30 minutes. (everyone is different)
- the utility creates the first 100 MB of “compression” .cab
- runs into an error
- and the same thing is repeated.
Windows takes up a lot of space: a possible solution
So, if you are faced with a situation where every once in a while Windows takes up a lot of space on your hard drive, try this:
- during the work “brake” Windows Modules Installer via console

- looking for a folder C:\Windows\Logs\CBS and inside the folder we will rename all the files (as you like)
- looking for a folder C:\Windows\Temp and delete all files cab
- reboot
Now makecab.exe will not be able to process files incorrectly and disk clutter should stop. And if you don't need the Windows log files, you can delete them too.
Second option
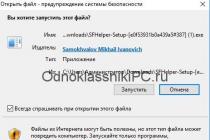
Download, unzip and run through Power Shell file as administrator
Unsubscribe how it worked for someone.