Yesterday on the forum I was asked about creating ZIP archives in PHP. I thought a little and realized that this topic would be of interest to a large number of people, because Zip archiving in PHP a very popular topic. And in this article I will show an example, How to create a ZIP archive using a PHP script.
Let me just give an example creating a ZIP archive, and then I will comment it carefully:
$zip = new ZipArchive(); //Create an object for working with ZIP archives
$zip->open("archive.zip", ZIPARCHIVE::CREATE); //Open (create) archive archive.zip
$zip->addFile("index.php"); //Add the index.php file to the archive
$zip->addFile("styles/style.css"); //Add the styles/style.css file to the archive
$zip->close(); //Complete work with the archive
?>
As a result of executing this script, ZIP archive, which will have a file at the root index.php, and a directory will be created styles, which will contain the file style.css. I think it's all obvious and logical. And now I comment on what we did with you:
- Created an object ZipArchive using the constructor.
- Created an archive using the method open() object ZipArchive. We passed the name of the archive ( archive.zip) and a constant ZIPARCHIVE::CREATE, which tells if the archive does not exist, then it must be created.
- Method addFile() adds files to the archive. First we added the file " index.php", which is located in the same directory as the script. Next, we added the file style.css, also indicating the correct path to it relative to the script.
- Method close() exits the archive. Always execute it to free up computer resources and avoid various problems associated with the operation of this script and other scripts that need access to this archive.
In this simple way, you can create ZIP archives automatically with PHP. In the next article, we will discuss how to extract zip archive via php.
When you need to quickly download the source of the site from the server, even a relatively fast SSH tunnel does not provide the required speed. And the wait is very, very long. And many hosting providers do not provide this access, but make them content with FTP, which is several times slower.
Personally for myself, I determined the way out. A small script is uploaded to the server and launched. After a while, we get an archive with all the sources. And one file, even using the ancient FTP, downloads much faster than a hundred small ones.
Earlier on the pages of this blog, the zipArchive library. However, then it was about unpacking the archive.
First, we need to find out if the server supports zipArchive. This popular library is installed on the vast majority of hostings.
The library is strictly limited by php and server parameters. Huge databases and banks of photos cannot be archived. Even the bases of the good old 1C program for accounting. It would seem that they should contain only textual data. But no.
I advise you to use the library only when archiving relatively small sites with a huge number of small files.
Check if the library is available
If (!extension_loaded("zip")) ( return false; )
If all is well, the script will continue its execution further.
A small offtopic, for such checks. Checks should be done this way, avoiding large structures with nested parentheses. This will make the code more atomic and easier to debug. Compare
If(a==b)( if(c==d)( if(e==f)( echo "All conditions met"; )else echo "e<>f"; )else echo "c<>d"; )else echo "a<>b;
and this code
If(a!=b) exit("a<>b); if(c!=d) exit("c<>d); if(e!=f) exit("e<>f); echo "All conditions met";
The code is nicer and does not grow into huge nested constructs.
Sorry for the offtopic, but I wanted to share this find.
Now let's create an object and an archive.
$zip = new ZipArchive(); if (!$zip->open($destination, ZIPARCHIVE::CREATE)) ( return false; )
where $destination is the full path to the archive. If the archive has already been created, the files will be added to it.
$zip->addEmptyDir(str_replace($source . "/", "", $file . "/"));
where $source is the full path to our category (which we originally archived), $file is the full path to the current folder. This is done so that the archive does not contain full paths, but only relative ones.
Adding a file works in a similar way, but you must first read it into a string.
$zip->addFromString(str_replace($source . "/", "", $file), file_get_contents($file));
At the end, you need to close the archive.
Return $zip->close();
How to run through all the files and subdirectories in a folder, I think it is not necessary to explain. Google something like Recursive traversal of folders in php
I got this option
Function Zip($source, $destination)( if (!extension_loaded("zip") || !file_exists($source)) ( return false; ) $zip = new ZipArchive(); if (!$zip->open( $destination, ZIPARCHIVE::CREATE)) ( return false; ) $source = str_replace("\\", "/", realpath($source)); if (is_dir($source) === true)( $files = new RecursiveIteratorIterator(new RecursiveDirectoryIterator($source), RecursiveIteratorIterator::SELF_FIRST); foreach ($files as $file)( $file = str_replace("\\", "/", $file); // Ignore "." and ".." folders if(in_array(substr($file, strrpos($file, "/")+1), array(".", ".."))) continue; $file = realpath($file ); $file = str_replace("\\", "/", $file); if (is_dir($file) === true)( $zip->addEmptyDir(str_replace($source . "/", "" , $file . "/")); )else if (is_file($file) === true)( $zip->addFromString(str_replace($source . "/", "", $file), file_get_contents($ file)); ) ) )else if (is_file($source) === true)( $zip->addFromString(basename($source), file_get_contents($source)); ) return $zip->close(); )
It is clear that it is easier for template creators to use the standard functions and tags of WordPress templates to display the standard views of all pages of the site, but this creates a uniform appearance and a sense of transition to the same pages of the site.
I'll show you what we get as a result.
View of wordpress archives: category archive before change  Category archive with removed thumbnails and a link to learn more.
Important! Since this task is solved by changing the template code, before work we do (database + site files). In addition, we make two copies of the working template, one for editing, the second for restoring the wrong editing.
Changing the Look of WordPress Archives
To change the look of WordPress archives, you need to find, or rather, determine which file in your working template outputs archives. In most templates, all archives are displayed in a single file, it is called (archive.php).
I repeat, for safety, to lose the site, do not use the editor in the site's administrative panel, but edit the pre-made backup copies of the template files.
In a text editor (such as Notepad++), open the archive.php file and start editing. In the archive.php file (at the end of the file) we are looking for a function that displays the archive blog:
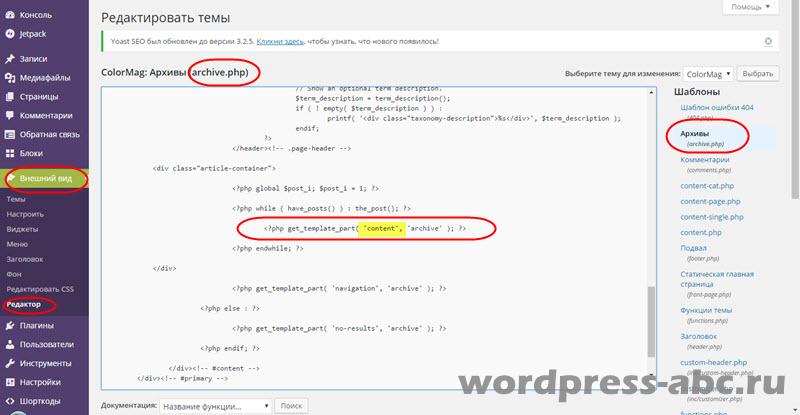
Name is the name of the file that is used to output the blog archives.
The first idea to complete the task is simple: we need to change the code of the file that outputs archives (content.php), namely, remove several functions from it, and thereby change the appearance of all site archives (categories, authors, dates, etc.).
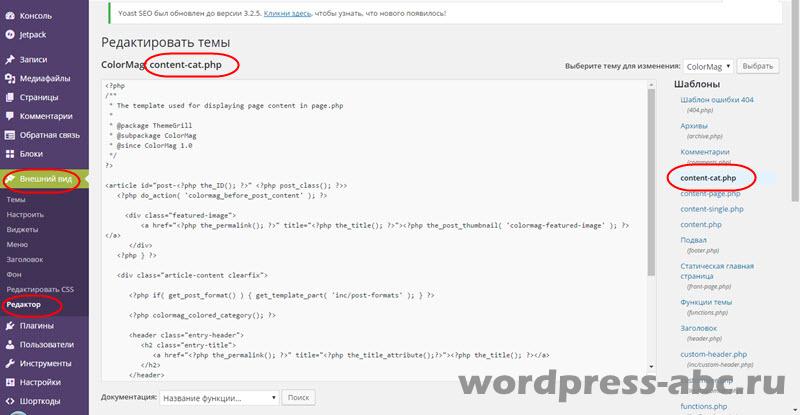
But the question arises, if we change the code of the template file, it will return to its previous state after the first update of the template, we do not need this. Therefore, we will not edit the content.php file, but copy it and create our own file, under a different name, for example content-cat.php and edit it.
We are looking for a function in the file that displays thumbnails. The thumbnail output function will be at the top. Remove thumbnail output.

orand remove the line with 'Read More', 'template name'.

The created and edited content-cat.php file is saved and uploaded to the site directory in the working template folder. This file will appear in the site administration panel on the Appearance→Editor tab.
Let's move on to the second step. In the file that outputs archives (archive.php), change the name of the content file to content-cat .

We save and look at the result. If those are wrong, the system will show the error, the error file and the error line. To correct the error, we return the saved template backup files to their place and repeat everything again.
Advice. If you want to read more about template tags and standard WordPress features, check out this site: https://wp-kama.ru . This is not an ad or even a link, this site is clearer than the official WordPress site in the template and feature tags section.
In the development of the theme
In my opinion, the topic of announcements on WordPress sites needs to be continued. In the next posts, I will talk about the topics: and.
WordPress Codex
Hidden text
the_post_thumbnail function
Function
the_post_thumbnail
Purpose
The_post_thumbnail function outputs the html code of the post thumbnail image, empty if there is no image.
Application
This template tag, the_post_thumbnail function, must be used inside
Usage
the_post_thumbnail(string|array $size = "post-thumbnail", string|array $attr = "")Source
File: wp-includes/post-thumbnail-template.php
Function the_post_thumbnail($size = "post-thumbnail", $attr = "") ( echo get_the_post_thumbnail(null, $size, $attr); )
Options
$size (string/array)
The size of the thumbnail to get. It can be a string with conditional sizes: thumbnail, medium, large, full or an array of two elements (image width and height): array(60, 60).
Default: 'post-thumbnail', i.e. the size that is set for the current topic by the set_post_thumbnail_size() function
$attr (string/array)
An array of attributes to add to the resulting html img tag (alt is an alternative name).
Default:
Example
"> !}get("layout", "imgwidth"), $SMTheme->get("layout", "imgheight")), array("class" => $SMTheme->get("layout","imgpos") . " featured_image")); if (!is_single())( ?>If I ask you what is the default WordPress page type you use the least, your answer would most likely be the archive template. Or, more likely, you haven't even heard of the archive pattern at all - it's so unpopular. The reason is simple. The standard way of using archives is far from "user friendly".
Let's fix it today! Let's create a WordPress archives page that is really useful. The best part is that you can use these archives in any modern WordPress theme installed on your site. However, let's first understand what we mean by "archives page"?
History of WordPress Archives
In WordPress, you work with a ton of different templates and structural elements that come with the standard configuration. If we look at the directory listing of the standard Twenty Fifteen theme, we will see the following:
- 404 error page
- Archives page (our guest today)
- Attached Image Page
- Index page (main page)
- Page template (for standard pages)
- Search results page
- Individual post and attachment pages
Despite their different purposes, these pages are all very similar in structure, and often differ only in a few areas or a few lines of code. The only visible difference between the index page and the archive page is the extra heading at the top, which changes depending on the page being viewed.
The idea behind the archive structure is to offer the blog administrator a convenient and easy way to display archives according to various criteria. After all, all these different archive pages are just versions of the index page; they display content published in a certain time period, by a certain author, with certain tags and categories.
Sounds good from a programmer's point of view, but it's not the most user-friendly approach. In this case, one important level is missing - the level that lies between the user's intent to find the content and the individual elements of the archives.
That's what I mean. Currently, the only built-in way to display archive links on a WordPress site is via a widget. Thus, if you want to allow users to drill down into archives, and you want to do it in a way that people can understand, you would have to dedicate the entire sidebar to archives alone (just to reveal different types of structuring: archives by date, archives of categories, archives tags, copyright archives, etc.).
We need some intermediary, some kind of page that will greet the visitor, explain to him that he is in the archive, and indicate the content that he is interested in, or offer popular content.
This is the reason why we decided to create a custom archives page.
How to Create a Custom Archives Page in WordPress
Here is what we are going to do. Our custom archive page will be based on a custom page template. This template will allow us to do the following:
- Add a custom message (can contain text, images, registration form, etc. - standard WordPress content).
- Display the last 15 entries (configurable)
- Display links to author archives
- Display links to archives by month
- Have additional widget areas (to display things like featured content, categories, tags).
Finally, the page will be responsive and can be used on any site.
However, we really need to take some theme as a basis. I used the Zerif Lite theme. I confess that this is one of our own themes. However, it is one of the 10 most popular themes published last year in the WordPress theme directory. So I hope you take advantage of it.
And yes, if you don't like the topic, no need to swear. You can use the approach presented in the article with any other theme.
Starting with the main file
The best model for creating an archive page is your current theme's page.php file, for several reasons:
- Its structure is already optimized for displaying arbitrary content within the main content block.
- This is probably one of the simplest page templates in your theme structure.
Therefore, we will use the page.php file of the Zerif Lite theme. I will make a copy of it and name it tmpl_archives.php.
(Make sure you don't name the page page-archives.php. All filenames starting with "page-" will be treated as new page templates within the main WordPress theme file hierarchy. This is the reason we used the tmpl_ prefix) .
Let's change it to the following:
All this line does is pass the appropriate content file for our archives page.
You can remove other elements that look redundant from your archive page (like comments, for example), but make sure you remove all elements that are related to the HTML structure. And, in general, don't be afraid to experiment. After all, if something suddenly stops working, you can always go back to the previous code and easily debug it.
Also, do not forget about the standard comment - the description of the template - which should be at the very beginning of your file (in our case, in the tmpl_archives.php file):
In the end, we are left with the following structure (some elements removed from it for convenience):
In this file, we will need to remove everything unnecessary, leaving only structural elements, as well as calls to basic WordPress functions:
The placeholder comment in the very middle of the code is where we will then insert our arbitrary elements.
Adding a custom greeting
WordPress itself has already taken care of this. We just need to insert the following line:
Adding new widget areas
Let's set up new widget areas in WordPress using the standard process. We'll do this with an additional feature file to keep things reusable from theme to theme. We will create a new file, archives-page-functions.php, in the main theme directory, and we will also register two new widget areas:
If(!function_exists("archives_page_widgets_init")) : function archives_page_widgets_init() ( /* First archive page widget, displayed to the LEFT. */ register_sidebar(array("name" => __("Archives page widget LEFT", "zerif -lite"), "description" => __("This widget will be shown on the left side of your archive page.", "zerif-lite"), "id" => "archives-left", "before_widget" => "
", "before_title" => "", "after_title" => "
",)); /* Second archive page widget, displayed to the RIGHT. */ register_sidebar(array("name" => __("Archives page widget RIGHT", "zerif-lite"), "description" => __ ("This widget will be shown on the right side of your archive page.", "zerif-lite"), "id" => "archives-right", "before_widget" => " ", "before_title" => "", "after_title" => "
",)); ) endif; add_action("widgets_init", "archives_page_widgets_init");If(!function_exists("archives_page_styles")) : function archives_page_styles() ( if(is_page_template("tmpl_archives.php")) ( wp_enqueue_style("archives-page-style", get_template_directory_uri() . "/archives-page-style. css"); // standard way of adding style sheets in WP. ) ) endif; add_action("wp_enqueue_scripts", "archives_page_styles");
This is a conditional enqueuing operation. It will only work if the visitor is viewing an archive page.
Don't forget to include our new archives-page-functions.php file by adding the following line to the very end of the current theme's functions.php file:
Require get_template_directory() . "/archives-page-functions.php";
Finally, the new block we'll be using in our main content-tmpl_archives.php file is fairly simple. Place the following code below the_content(); call:
All that's left for us now is to take care of the only missing file, archives-page-style.css. However, let's save it for later, since we'll use it as a repository for all the styles of our custom archive page, including the widgets.
Displaying the last 15 records
To do this, we need to do some manual PHP coding. Even though the post display can be implemented using a variety of widgets, let's avoid monotony and dive into writing code to demonstrate more different possibilities.
You are probably asking why exactly 15 entries? I don't know, I just took this number from the ceiling. Let's make it customizable with custom fields.
Here's what we'll do:
- We set the number of posts through an arbitrary field archived-posts-no.
- If the number is not valid, the template will use the default value in the last 15 entries.
Below is the code that does this. Place it below the previous section in the content-tmpl_archives.php file that handles the new widget areas.
ID, "archived-posts-no", true)); /* Here, we're making sure that the number fetched is reasonable. In case it's higher than 200 or lower than 2, we're just resetting it to the default value of 15. */ if($how_many_last_posts > 200 || $how_many_last_posts< 2) $how_many_last_posts = 15; $my_query = new WP_Query("post_type=post&nopaging=1"); if($my_query->have_posts()) ( echo "
"; echo "
- "; $counter = 1; while($my_query->have_posts() && $counter<= $how_many_last_posts) {
$my_query->the_post(); ?>
- ">
All this code does is get the value of the custom field, set the number of posts to display, and then fetch those posts from the database using WP_Query();. I also use some Font Awesome icons to add some charm to this block.
Displaying links to author archives
This section is only useful if you are running a multi-author blog. Skip it if you have one author.
This functionality can be implemented with a simple block of code that needs to be placed in our content-tmpl_archives.php file (below the previous block):
Our Authors
We'll move on to styles in a couple of minutes. For now, note that everything is done by calling the wp_list_authors() function.
Display links to archives by month
I added this element at the very end, as it is not the most useful component from the point of view of readers. However, it is important to have it on the archive page so that you do not have to use widgets to display monthly archives elsewhere on the site.
Here is how it will look in the content-tmpl_archives.php file:
By month
In this case, we'll output it as a single paragraph, with the entries separated by a forward slash (|).
Full archive page template
Let's take a look at the full content-tmpl_archives.php file, which is our main custom archive output file:
Last ".$how_many_last_posts." Posts
"; echo " "; $counter = 1; while($my_query->have_posts() && $counter<= $how_many_last_posts) {
$my_query->the_post(); ?>
Our Authors
By month
style sheet
Finally, let's look at the style sheet. Here's what the archives-page-style.css file looks like:
Archives-widget-left ( float: left; width: 50%; ) .archives-widget-right ( float: left; padding-left: 4%; width: 46%; ) .archives-latest-section ( ) .archives -latest-section ol ( font-style: italic; font-size: 20px; padding: 10px 0; ) .archives-latest-section ol li ( padding-left: 8px; ) .archives-authors-section ( ) .archives -authors-section ul ( list-style: none; text-align: center; border-top: 1px dotted #888; border-bottom: 1px dotted #888; padding: 10px 0; font-size: 20px; margin: 0 0 20px 0; ) .archives-authors-section ul li ( display: inline; padding: 0 10px; ) .archives-authors-section ul li a ( text-decoration:none; ) .archives-by-month-section ( ext-align: center; word-spacing: 5px; ) .archives-by-month-section p ( border-top: 1px dotted #888; border-bottom: 1px dotted #888; padding: 15px 0; ) .archives- by-month-section p a ( text-decoration:none; ) @media only screen and (max-width: 600px) ( .archives-widget-left ( width: 100%; ) .archives-widget-right ( width: 100 %; ) )
The styles are mostly about fonts and a few structural elements, with the exception of a couple of alignments, and a responsive design block at the end.
Let's see how this will look in practice. Here is a site that has a ton of archived content:

How to integrate this template into any theme
The custom archives page we created here is for the Zerif Lite theme, which is available in the official WordPress directory. However, as I said before, it can be used with any theme. Here's how to do it:
- We take the archives-page-style.css and archives-page-functions.php files that we created in the tutorial and then put them in the theme's main directory.
- Edit the theme's functions.php and add the following line at the very end: require get_template_directory() . ‘/archives-page-functions.php’;
- We take the page.php file of the theme, make a copy of it, rename it, change the get_template_part() function call to get_template_part('content', 'tmpl_archives');, after which we add a descriptive comment at the very beginning: /* Template Name: Archive Page Custom */.
- Take your theme's content-page.php file, make a copy of it, rename it content-tmpl_archives.php, and add all the custom blocks we created in the tutorial to it, just below the_content(); function call.
- We test and enjoy.
Here's how it would look in the default Twenty Fifteen theme:

-
 Your own weather forecaster or choose a weather station for your home
-
 Health Disk Trainer App for iOS
-
 Portable Wi-Fi router Let's move on to setting up
-
 Choosing an ACS access card: MIFARE vs Em Marin What do the numbers on the em marine card mean
-
 Music lovers choose wireless headphones
-
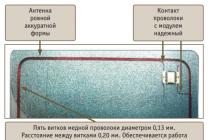
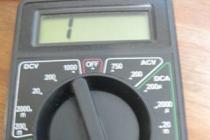 How to easily check the performance of infrared diodes
-
 How to set up permanent remote access to a computer using TeamViewer
-
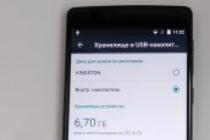 How to connect a USB flash drive to an Android tablet and smartphone - transfer files using an external flash drive Android program for reading a flash drive
-
 How to make direct3d acceleration