Hello dear readers. Today we are going to insert shapes into Word. For those who don't know, shapes are vector images that are used to draw various structures in a program. Circles, triangles, rectangles, etc. You can use one shape, or combine several. It all depends on the complexity of the final object.
Word has a gallery of preset shapes, by combining which, you can draw quite working diagrams, which, for example, cannot be done using the SmartArt diagram drawing tool.
How to insert a shape onto a sheet
To add a shape in Word, click on the ribbon Insert - Shapes... Explore the opened gallery of shapes and select the one you need.
Click on the shape thumbnail and you can now paste it onto the sheet. There are two ways to insert:
- Click the mouse on the sheet at the insertion point. The object will be pasted at its standard size.
- Stretch with the mouse shape on the sheet until you achieve the size and aspect ratio you want. If you hold down Shift while stretching, the program will observe the "correct" aspect ratio of the object
After completing this sequence, the shape will appear on the sheet and take the place where you outlined it. But it looks like this is not yet what we wanted to get. How else can you work with shapes? When it is inserted and selected, a Format tab appears on the ribbon. This is where the main functionality for working with shapes is assembled. We have already looked at some of the tab tools in the article about, so I will touch on them in passing. And here consider special features in more detail.
Shape Styles
The shape styles are almost identical to the image styles we covered in the last tutorial. But let's briefly go over them:
- Style gallery allows you to choose a ready-made shape layout for quick styling. Click on the Down arrow in the block Format - Shape Styles to select one of the predefined styles. Click on a suitable thumbnail to apply.

- Fill a shape- change the color and fill method of the object. You can, for example, make a gradient fill, or a texture. Click on the ribbon Format - Shape Fill to make the appropriate settings

- Shape outline- allows you to change the color, thickness, line type of the contour, add arrows. Perform on tape Format - Shape Outline, make your choice in the relevant paragraphs

- Shape effects- Add various effects to the shape to add volume: shadow, reflection, highlighting, anti-aliasing, etc. Click on the ribbon Format - Shape Effects to select additional effects

How to insert text into a Word shape
Shapes without text are almost meaningless. Therefore, we learn to add inscriptions to them. To do this, right-click on the shape and select Add Text from the context menu. A cursor will appear inside the shape, you can type text.
Formatting shape text
When you add text to a shape, you can customize it with it. By the way, everyone works here, not just specific ones. Let us dwell on the latter in more detail:
Position and flow around shapes
As with regular pictures, you can adjust the position of the shape in the text and how the text flows around it. To do this, click on the ribbon Format - Order - Position and Format - Arrange - Wrap... In the picture, the shape is set to "top right", and the flow is "along the contour".
The relative position of the figures
If there are several shapes on the sheet, they can overlap each other when they come into contact. This is how the star overlaps the ribbon in the picture.
But this state of affairs can be customized. To bring the ribbon to the front, highlight it and press Format - Arrange - Bring Forward... To, on the contrary, lower the level of an object relative to others - click Format - Arrange - Move Backward.
To align multiple shapes on a sheet- select them all (hold down Ctrl and click on them), and then press Format - Arrange - Align Objects... For example, if you select from this menu Align Left, Word aligns the shapes so that their left borders match. But most often they align to the bottom edge so that the shapes become in a row.
Also, you can Distribute vertically or Distribute horizontally... The program will arrange the objects so that there are equal vertical and horizontal distances between them, respectively.
Grouping shapes in Word
Several shapes can be grouped together as if they were one object. To do this, select the required shapes and press Format - Arrange - Group Objects - Group... This structure can now be moved, resized, wrapped, etc.
To ungroup objects - select this group and press Format - Arrange - Group Objects - Ungroup.
Rotating and flipping shapes
Like regular pictures, shapes can be rotated and reflected. And this is done the same way. Select objects for rotation, click on the ribbon Format - Arrange - Rotate Objects... In the menu that opens, select an action. 
Resizing a shape
The easiest way to resize a shape is to select it and drag it past the white handles at the corners and edges of the frame. True, sometimes you want to set the exact dimensions. Then find the fields on the ribbon Format - Size - Shape Height and the Width of the shape. Write down in them the values of the width and height that you need.
That's all about working with shapes. By composing different objects and combining their properties, you can create good illustrations for your documents. With their help, you can create diagrams, although there is a separate, excellent tool for this - SmartArt. I'll talk about it shortly, and the next article will be about another Microsoft know-how - WordArt lettering. Come in, read, get better!
One of the most unusual tasks that users set themselves when designing a document is how to change the direction of the text in the Word and make a mirrored text? This task is further complicated by the fact that its solution is unlikely to be found in various books about Word.
Here, of course, they will not help. The key to solving this problem lies in considering text not as letters, but as an object that needs to be rotated around an axis.
One of the objects in the Word, in which you can enter text, is a text field. You can find this menu item on the tab "Insert".
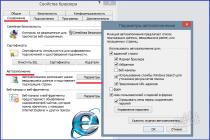
Now, in order to change the direction of the text in the Word and make the text mirrored, we need to rotate the text field, for which we go to the menu Shape Format in the tab "Format" that appears when the text box is selected.

On the menu Shape Format select a section Shape Options and in paragraph 3D Rotation the angle of rotation of the text. To mirror the text about the vertical axis, enter 180 degrees in the graph "Rotation around the X-axis", and the mirror image of the text about the horizontal axis, we also enter the value in the graph "Rotation around the Y-axis"... If the checkbox is checked Leave Text Flat, the text will not rotate with the shape.


After applying these settings, our text field will be assigned a material "Warm matte" and the text will be displayed on a gray background. To make the background transparent, select a material "Wire", and to hide the outline of the shape, select white, which matches the background of our page.

In Word, every day around the world, a huge number of text documents are created. Someone has a report on the work, thesis, essay, term paper. And every second user is faced with adding pictures to the document. Although many, to the extent of their capabilities or ignorance, omit this moment. After all, it only seems that the insertion of a picture takes a long time. And if you suddenly need to make a mirror image of the picture, then the older generation will probably ask a friend or close person for help, or maybe skip this step altogether, citing lack of time. Let's, together we will deal with the emerging problem.
Reflection of the picture "mirrored"
You can flip the pattern using the following steps. Initially, insert the picture into the Word document:
To mirror the image you need:

Flip the pattern horizontally
There are situations when it is necessary to change the direction of the drawing. In this case, it is necessary to change the direction of Santa Claus to the left. To flip a picture horizontally, you need to do the following:


Note. If you need to place two pictures next to the original result, as in the screenshot above, you need to copy the picture and then set the desired reflection.
Setting for mirroring the pattern
To achieve the desired effect when flipping a photo, you can adjust all the parameters manually. Clicking on the photo, go to the "Format" tab.

In the "Picture Format" window, set the desired type of "Blanks", for example, "Middle ... touch".

Note. You can flip a photo with an offset of a few points from the original picture, for this you need to select the option "Reflection in 4 pt or 8 pt".
Any shift can be observed even when the active window "Picture Format" is open. To do this, slide the options window to the left or right of the image on the Word document sheet.
The Drawing toolbar contains the button Autoshapes... It lets you add several categories of shapes: lines, connectors, basic shapes, flowcharts, stars and ribbons, and callouts.
The exercise 1. Blank page
1. Create a sequential series of folders on your Desktop:
folder Painting;
after opening it, create a folder in it Word;
after opening this folder, create a folder Actions with autoshapes.
1. Then close all folders and, opening Microsoft Word, create a new document in it. Save this document in the AutoShape Actions folder. It could be a file with the name of the next exercise ("Shapes"), but you don't need to draw anything yet: save a blank page.
1. Open the blank page you created earlier, or create a new one and fill its upper part with standard-sized shapes using the Basic Shapes palette. The result should be approximately similar to Fig. 2.1.
Figure 2.1. Exercise "Shapes". Step 1
2. Free up the empty space in the center of the completed page in the exercise, as in fig. 2.2.

Figure 2.1. Exercise "Shapes". Step 2
3. Select one of the shapes located at the edges of the sheet, move it to the center of the page and resize it to fill all the empty space. Do not change the proportions of the shape while increasing the size. Compare the result with Figure 2.3.

Figure 2.1. Exercise "Shapes". Step 3
4. Save the drawing in your folder called Shapes.
5. Close the file.
Creating AutoShapes
Click the AutoShapes button on the Draw toolbar, point to the Basic Shapes category, and then select the shape you want.
It is more convenient to work if you move the Basic Shapes outside the Drawing panel. To do this, move the mouse cursor over the horizontal bar at the top of the previously opened Basic Shapes palette. When the stripe changes its color, press the left mouse button and move the palette to any free place. In the same way, you can place and move most of the elements of the Drawing panel on the screen, adjusting the appearance of the program for texts or other visual tasks.
To insert a standard-sized shape, first click on the button of the selected shape, then hard-click with the left mouse button within the white page in the program window. If you click with a delay, the same AutoShape appears, but in a smaller size.
Selecting AutoShapes
Before you start any actions with autoshapes, you need to select them, that is, indicate with which shape or shapes you intend to perform the action. Selection is carried out by left-clicking on the selected object. Markers should appear around the selected object - small white rectangles.
Removing AutoShapes
Select the AutoShape you want to delete and press the Delete key on your keyboard.
Undoing Actions
Any actions taken before closing the document can be undone. To undo the last action, click the Undo button.
To revert the result of the last undone action, click the Revert button.
Moving
To move or copy an object, hover over it. The arrow cursor should change: a cross-shaped symbol appears under the arrow. press the left key while moving the mouse will move the object.
Pressing the right key followed by moving the mouse can complete both moving and copying the object, depending on which command from the list that appears will be selected: Move, Copy, Undo.
The selected object (when selected, 8 small square markers appear along its perimeter) can also be moved using the four arrow keys located on the keyboard.
If you hold down the Ctrl key while pressing the arrow keys, the movement will be more precise.
Resizing
When you select an autoshape (by clicking the left mouse button), resizing handles appear around the perimeter of the selection rectangle. The object is resized by dragging one of them, and a double-sided arrow appears above the marker. A distinction is made between corner and center markers.
1. Create a new document. Draw a row of squares adjacent to each other, as in fig. 2.4.
![]()
Fig.2.4.Exercise "Ladder". Step 1
2. By successively stretching the squares, turn their row into a staircase - fig. 2.5. Save the drawing.

Rice. 2.5. Exercise "Ladder". Step 2
Changing the proportion
To change the proportions of an object, select it by clicking the left mouse button, and then drag one of the center handles vertically or horizontally.
1. Create a row of five identical AutoShapes.
2. Consistently, without changing the proportions, reduce their size.
3. Compare the resulting drawing with fig. 2.6 and save the file as "Perspective".
Maintaining aspect ratio while resizing
While dragging the corner handle of the AutoShape while holding down the Shift key.

Rice. 2.6. Exercise "Perspective"
The exercise 5. Pyramid
1. Create two identical autoshapes, increase the size of one of them and place the small one in front of the large one; if the large shape is in front, move it to the back. In this way, compose a stack of five layers, as in fig. 2.7.
Rice. 2.7. Exercise "Pyramid". Step 1
2. Move all the shapes up, except for the bottom one. compare with fig. 2.8.

Rice. 2.8. Exercise "Pyramid". Step 2
3. Copy and flip the pyramid by moving the plans. in fig. 2.9 shows how an inverted pyramid should look like.

Rice. 2.9. Exercise "Pyramid". Step 3
4. Save the file as "Pyramid".
NSshifting plans
To change the stacking order of the shapes, click the Actions button on the Draw toolbar, click Order, and then click Send to Back or Bring to Front.
Select a group of shapes
Method 1: hold down the Shift key and select sequentially selected objects by clicking on them with the left mouse button.
Method 2: click the Select Objects button on the Drawing toolbar and, while holding the left mouse button and moving the mouse, select with the dotted square that appears all the grouping objects at once.
Copying
To copy an object (or a group of selected objects), move the cursor over it, press the right mouse button and, without releasing it, drag the object. In the menu that opens, select the copy command.
Precise movement
To move objects precisely with the arrow keys, hold down the Ctrl key. In addition, you can change the movement intervals specified in the grid window from the list of Actions commands.
1. Create four squares as in fig. 2.10.
![]()
Rice. 2.10. Exercise "Grid" Step 1
2. Connect all four squares into one large square - fig. 2.11. Group it up.
Rice. 2.11. Exercise "Grid". Step 2
3. Copy the resulting group three times, make a new square out of four groups - fig. 2.12. Group it up.
Rice. 2.12. Exercise "Grid". Step 3
4. Repeat this step again and create an 8x8 grid of squares. Compare the result with fig. 2.13.

Rice. 2.13. Exercise "Grid". Step 4
5. Save the drawing as Grid.
Grouping
With the group of shapes selected, open in the panel Painting menu Actions and select the command Group.
You can perform the same actions with a group of objects as with individual autoshapes, that is, move them, copy, change their sizes, proportions, and combine them into groups.
To ungroup objects, on the Actions menu, choose Ungroup. To shine a selection of many objects, left-click on an empty space on the page.
1. Create three equilateral triangles, flip one of them from top to bottom - fig. 2.14.

R is. 2.14. Exercise "Hexagon". Step 1
2. Connect the three resulting shapes and group
theirs is fig. 2.15.

Rice. 2.15. Exercise "Hexagon". Step 2.
3. Copy the group, flip the copy from top to bottom fig. 2.1.6.

Rice. 2.16. Exercise "Hexagon". Step 3
4. Connect and group the two symmetrical parts of fig. 2.17.

Rice. 2.17. Exercise "Hexagon". Step 4
5. Save the file under the name "Hexagon» .
Reflection
As a result of the "reflection" action, the appearance of asymmetric objects changes, as if being reflected in a mirror. There are two types of reflection: horizontal (left to right) and vertical (top to bottom). To reflect an object, you need on the panel Painting open the menu Actions and choose from the list Turn/reflect the desired action.
Create a standard sized circle, duplicate it, and reduce the horizontal dimensions to form an oval petal - fig. 2.18.
Make a copy of the petal. Place two petals on the same vertical above and below the core circle, select and group the petals - fig. 2.19.
Copy the group of two petals and rotate it to the right or left - fig. 2.2O.
Select, group, copy and rotate the four petals. Compare the result with fig. 2.21.
Save the file as "Flower".
Rice. 2.18. Exercise "Flower". Step 1
Rice. 2.18. Exercise "Flower". Step 2

Rice. 2.18. Exercise "Flower". Step 3
Rice. 2.18. Exercise "Flower". Step 4
Turn
To rotate an object, you need to on the panel Painting open the menu Actions and choose from the list Turn/reflect necessary action: Rotate Right, Rotate Left or Free Rotate.
When this button is pressed, round green handles appear in the corners of the selected object. By moving them with the mouse, you can rotate the object at an arbitrary angle.
Button Free rotation can also be installed directly on the panel Painting... For this in the menu Service click the Configure button. In the window that opens, select a category Painting then find the command Free rotation and drag to the panel Painting.
In the latest versions Microsoft Word a green rotation marker appears above any selected shape or group - in this case, press the button Free rotation not necessary.
1. Draw a flower with five petals in a new file. The stages of the drawing are shown in Fig. 2.22.

Rice. 2.19. Exercise "Flower Garden". Initial stages
2. Move the picture from the "Flower" file here. After copying the original drawings, create flowers of different sizes and differently expanded. Use the Rectangle or Oval autoshapes as a background for the picture (their buttons were located directly on the Drawing panel). To prevent the selected background shape from obscuring the flowers, move it to back. One of the possible variants of such a composition is shown in Fig. 2.23.
3. Save the drawing as "Flowers".

Rice. 2.23. Exercise "Flower garden". Completed drawing
Moving a picture to another document
Select all the details of the picture, group them and press the button Copy on the standard toolbar (top of the screen).
Then open the file you want and click the button Insert... If both files are already open, you can switch from one to the other using the menu Window.
In the process of preparing some material, we may need to mirror the images placed in the document. Today we'll talk about the possibilities and ways to make a mirror image of an image in Word.
The image we have selected is located on the sheet in the place where we placed or left the cursor. An image placed on a sheet is instantly captured by markers, and a special tab appears in the top menu, containing various options, tools and templates that allow this image to be edited.
So let's get started.
Place an image on the sheet (page):
As we said, the image was captured by markers, and the "Working with Pictures" functionality appeared in the top menu, containing the "Format" tab. This tab is collapsed, and we do not see the options it contains:

With a regular mouse click on the name of the tab, expand it:
Now we have at our disposal a large number of different options and tools with which we can edit the image this way and that.
Since today we are talking about a mirror image of an image, we will turn our attention to the section of the "Picture Styles" tab and the "Effects for Picture" tool contained in it:

By clicking on the name of this tool, we will expand its functionality and look at the effects that we can apply to the image. Among the many effects we need, in this case, the "Reflection" effect. Hovering the mouse cursor over the name of this effect, we will see the options for reflection:

And by hovering the mouse cursor over the reflection options, we can immediately see what the reflection of this or that option will be when we select it:

We can additionally edit the selected reflection option, that is, change at our discretion. We can make the reflection less or more transparent, or blur it, or both. Or we can move the reflection away from the image.
To start editing the reflection itself, you need to re-select the image - it must be captured by markers. Then go through the already known path to the reflection options offered by Word and below the list of these options, select the "Reflection Options" option:

As soon as we select this option, the "Image Format" window will immediately open, which contains, so to speak, levers of influence, well, or regulators of parameters:

Grabbing one or another slider with the mouse, and moving it left and right, we affect the reflection. Moving some kind of slider, for example "Blur", we immediately see the changes taking place. It may happen that the window with sliders opens in such a way that it completely obscures the image. In this case, you need to grab the window with the mouse by its upper part, where the name of the window is located, and move (move) it to any side convenient for work.
For example, I'll move the blur slider a little to the right and we'll see how the reflection becomes:

If we are satisfied with the selected option, the preset reflection, then it is, of course, unnecessary to change the additional parameters of the reflection. In the event that we changed our minds and decided not to make a reflection of the picture, then to remove it, we again go to the reflection options and select the "No reflection" option:

Let's look at the possibility of making a reflection ourselves, without using the stub options offered by Word. This process is simple. All we need to do is to copy the image and flip the made copy 180 degrees, and then place it below the original image.
Let's get started.
I propose this method of copying: Aim the mouse cursor at the center of the image, and then press the "Ctrl" key and hold it down. Then, press the left mouse button and, keeping it pressed, drag the copy of the image down a little:

You can "drop" a copy at this point:

If at the time of moving the copy it has shifted a little, then you can help yourself with the arrow keys of the computer keyboard.
Of course, you can make a copy of the image in another way convenient for you.
Let's continue.
Grab the upper middle marker of the copy with the mouse and drag it down. This action of ours is turning the copy of the image upside down (180 degrees):

When flipping a copy of an image, it is not necessary to try to visually match the original image size.
And when we saw the copy turned upside down and slightly narrowed in height, let go of the left mouse button - stop holding the marker and look at what we got:

Now, grabbing the copy with the mouse or using the arrow keys of the computer keyboard, place the copy on the original image approximately in the middle:

Then, grabbing one marker or another with the mouse, we will combine the copy with the original:


From now on, the copy of the image will be referred to as reflection.
We can apply appropriate effects to the reflection. In order to do this, we need to re-select the reflection, if it is not selected. We will do this by clicking the left mouse button while the cursor is on the body of the reflection. Reflection was captured by selection markers (editing), and the "Format" tab of the "Working with Pictures" functionality appeared in the top menu. Click to open the contents of the tab. Now we can take advantage of the options and tools that it contains.
For example, by selecting the "Artistic Effects" option, we can apply one or another suitable effect to the reflection:

Let's choose from the proposed options, for example, the "Blur" effect. Already when we hover the mouse over this effect, we can see the change in reflection:

To apply the selected effect to the reflection, left-click on the effect icon. We can enhance or weaken the applied effect, or, in other words, edit it. To do this, you need to reopen the window with the effects options and select the "Artistic effects parameters" option:

As a result of this selection, a window for setting the effect parameters with the name "Picture Format" will open. In this very window, we make our own parameter settings:

All we need to do to change the effect is to move the slider. You can not use the slider, but set some of your own parameter using the arrow buttons. To cancel the parameter set by us, press the "Reset" button. In the same window, we can change the originally selected effect to another effect:

And change its parameters in the same way.
To more quickly open the window for changing parameters (the window is called, as we remember, "Image Format"), we just need to right-click while the cursor is on the body of the reflection:

We can also open this very window by a normal mouse click on the small arrow in the lower right corner of the "Picture Styles" section:

We do not have to limit ourselves to just one artistic effect applied to the reflection. So applying the "Blur" effect: 
we, turning to the "Adjustment" tool, add one of the options with adjusted brightness and contrast to the already blurred reflection:

The parameters of the last applied option can also be changed, and we already know how to do this.
If we want the reflection not to have a clear lower border and smoothly merge with the sheet, then in this case the "Shapes" functionality will help us, which is located in the "Insert" tab of the top menu.
Let's expand the "Insert" tab with a normal mouse click and open the contents of the "Shapes" functionality with the same normal mouse click, where we select the tool for drawing a rectangle:

After such a choice, the mouse cursor will turn into a crosshair of two lines - now you can start drawing the shape.
Our task is to superimpose a rectangle on top of the lower part of the reflection, without going beyond the edges of the reflection, in other words, the rectangle should be in the foreground. This is not difficult to do.
Let's draw this same rectangle. For the convenience of drawing a rectangle, select the reflection by clicking the mouse. Markers captured him. These markers are our helpers in drawing the rectangle. Draw the rectangle as if we were connecting the middle left and right side markers, with the left and right bottom corner markers together.
As a result, we should have something like this:

In automatic mode, the rectangle turns blue. In our example, the Word sheet is white. For this reason, we need to color the rectangle with white. To achieve the desired effect, we will not just paint the rectangle with white, but fill it with a white gradient, and then make adjustments to the fill settings.
Let's get started.
As soon as we drew the rectangle, the "Format" tab of the "Drawing Tools" functionality immediately appeared in the top menu. If this tab is collapsed, and we do not see the options and tools it contains, then by a normal mouse click on the name of the tab, expand its contents and select the "Shape Fill" option:

From several fill options, we will choose the option "Gradient fill" that we need in this case, and inside the gradient fill, the very first option from the proposed light options:

You can choose any other fill option, since we will completely change all its parameters.
So, the rectangle is filled with the selected gradient. If we reset the selection with markers (a normal mouse click on a blank area of the sheet), then we will see the outlined outline of the rectangle. Select the rectangle again. We do not need a stroke of the path, we will delete it by selecting the option "Shape outline" in the top menu, and then the option "No outline":

We can get rid of the outline immediately after drawing the rectangle. We do it the way it suits us.
Let's continue with the gradient.
After we filled the rectangle with a preset gradient, again in the top menu, select the "Shape Fill" option, and then the "Gradient" option and then "Other Gradient Fills":

The "Shape Format" window will open in front of us, informing about the parameters (settings) of the gradient fill of the selected preset option. We need to change these parameters:

Major parameter changes include changes to the fill angle, color, and transparency. The sequence of the changes made can be changed at your discretion.
Let's get started.
The first step is to change the angle of the fill. By clicking the up arrow button, change the angle from 45˚ to 270˚. To change the parameter more quickly, the button can be kept pressed:

Now let's work with the gradient.
With a mouse click, select the middle ink tank to be deleted, and then press the button with the red cross:


In the same way, fill the right inkwell with white and look at the result - the rectangle is completely white:

The final step in achieving the desired effect is to increase the transparency of the right inkwell. Click to select the right inkwell, if we deselected it, and move the transparency slider to the right, setting the value to 100%:

So we have achieved the effect of smooth fusion with the leaf. To enhance this effect, you need to slightly move the left ink tank to the right:

We can further enhance the effect by changing the height of the rectangle.
Let's grab the middle top selection handle and drag it up, while watching the effect change:

By a normal mouse click on a free area of the sheet, we will reset the selection with markers and look at the final result:

While the process of creating a hand-made reflection can be considered time-consuming, there is still one big advantage over using blank templates. This advantage comes from the ability to work with reflection individually, applying different effects and simulating reflections on different surfaces without affecting the image itself.