Since Japanese language support is already built into Windows Vista, you will not have any problems installing the Japanese language, in particular, you will not need an installation disc, as Windows XP may require.
First we open Control Panel.
Then we open Language and regional standards.
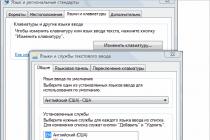
On the tab Languages and Keyboards choose Change keyboard and in the window that opens, click the button Add. We will add a Japanese keyboard called Microsoft IME:

The Japanese font is now installed on your computer!

To activate Hiragana or Katakana input mode, select it with the mouse in the menu (Hiragana, Katakana). To do this, click on the icon "A" and highlight the desired item.

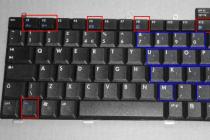
To quickly turn on hiragana, you can use the keyboard shortcut "Alt and ~". The "~" sign is located on the button with the letter "Ё".
If you need to write a word not in the alphabet, but in a hieroglyph, then after entering the desired word you need to press the spacebar.
After that, the word you entered will be converted into hieroglyphs. If for a given spelling there are several options for writing in hieroglyphs, then pressing the space key again will open a menu with a list of all possible options for writing this word in hieroglyphs, including katakana.
When you select the spelling you want from the list, press the Enter key.
If when writing words in hiragana you do not need to convert them to hieroglyphs, then just press "Enter" each time.
To quickly switch between hiragana and katakana, you can use the keyboard shortcut:
- Ctrl+Caps Lock for Hiragana
- Alt+Caps Lock for katakana.
Now you can write in Japanese! If everything worked out, write something in Japanese in the comments ^^. In order not to get confused in your own computer, we recommend that you take 5 free lessons on and.
P.S. to enter the accusative character, type wo on the keyboard.
It remains now to learn how to write in Japanese correctly. However, this is not so difficult to learn - would be a good teacher! For example, you can learn Japanese as part of our one-year program. In a year you will learn how to communicate freely with the Japanese on everyday topics - both in writing and orally, and you will be able to make friends from the Land of the Rising Sun.
Japanese keyboard layout, Japanese virtual keyboard online, how to install Japanese on a computer
Follow the instructions below to install Japanese language support on your computer. If you already have Japanese language support installed, but don't know how to type text, see the last five steps of the guide.
Step 1. Through the "start" go to the control panel.
Step 2. Choose the desired category.

Step 3. Select the control panel icon.

Step 4. On the "languages" tab, check the box as shown in the figure and click "apply".

Step 5. Click "ok".
Step 6. Wait for the file to load.

Step 7: Restart your computer.

Step 8. Return to the "languages" tab and select "details".

Step 9. Click "add".

Step 10. Choose Japanese.

Step 11. Choose a keyboard layout (preferably standard).

Step 12. Click "add".

Step 13. Now in the taskbar you have the option to choose between Japanese and previously installed languages.

Step 14. After selecting Japanese, a new menu bar will appear in which you first need to select an input method.
Step 15. Specify the "direct" parameter (keyboard input) and select one of the two syllabaries katakana or hiraganu. I advise you to choose haragana, since it is not necessary to switch to the appropriate layout to enter words in katakana: if, according to the rules of the Japanese language, a word must be written in katakana and you correctly entered this word in Latin, the program will convert it to katakana automatically. You only need to switch to katakana specifically to enter proper names.

Step 16. To write, for example, the word 日本語 (Japanese), type "nihongo" on the keyboard. As you enter letters, the program automatically converts them into hiragana characters.

Step 17. When the word is entered completely, you need to press the spacebar and the program will automatically replace the haragana with hieroglyphs. If it was not possible to fully recognize the word, the program will offer you a list of hieroglyphs with the same sound, so that you can choose the right one yourself.

Step 18 We get the desired result.

Japanese language setting in Windows March 25th, 2009
Hmm... Under the cut there is a small instruction on how to install Japanese language support in Windows and MS Office. I do not pretend to be complete, but it is possible that for someone it may be useful. :)
In order to work comfortably with texts in Japanese in Windows, you may need to do three things - set up the display of Japanese text, set up input tools, and enable support in Word for Asian languages. Let's see how you can accomplish each of these tasks.
A small note - further in the text I will, if necessary, give Japanese characters in Russian transliteration so that they are not displayed as incomprehensible characters in the absence of the necessary support in the system. However, first we will still check the readiness of the system to display Japanese text. Let's look at the following piece of text:
日本語のサポート
If you see something like this there:
...then your Japanese display is already set up, and you don't need to take any additional steps. However, instead we might see something like this:
or even this:
In this case, you need to enable support for Asian languages in Windows. For Windows Vista, these steps are not needed, so Windows XP (with classic skin) will be used as an example. So, you need to follow these steps:
Now let's add Japanese text input to the system. To do this, you need to follow the following steps - an example, again for Windows XP, in Vista everything looks about the same:
Now let's try to enter Japanese text. We start Word, switch to the Japanese layout, try to enter some text ... and find that we are only entering Latin letters. The fact is that Japanese keyboards allow you to directly enter kana signs (one key - one character, except for voicings) - this mode is called "Direct Input" ("Direct input"). This is where the system goes by default when switching to the Japanese layout. However, for our keyboards, we need to use a different mode - converting the English reading of kana characters into the corresponding characters. To switch to this mode, you need to press the Alt-` combination (the key in the upper left corner of the keyboard, in the Russian layout it contains the letter "ё"), or click on the language bar on the inscription "Input Mode" and select the item "Hiragana" in the drop-down menu ".
After that, the icon on the panel will change its appearance:
Now we type letters in Word: press "w", then "a" - once, and the Latin letters turn into the corresponding hiragana character:
Hiragana characters are introduced in this way. Input works specifically for syllables, so to enter the syllable "sya" you need to type "sha", and not "shi" + "ya" (however, this is also possible, but it will require additional efforts) - we do the same with doubling consonants (t .e. we type "tta", not "tsu" + "ta"). In a situation where a single character "n" can be confused with the consonant of the "na" series, you need to type "nn". Note that printed characters remain underlined even after they have been converted to kana - this means that at this point you can change their conversion mode to turn them, for example, into a character with the appropriate reading. Let's continue the example and type the word "watashi" to the end (when entering the character "si", liberties are allowed - it can be entered both as "shi" and as "si"):
Now we press the spacebar - and the system automatically replaces the reading recorded in hiragana with the corresponding hieroglyph:
Naturally, the same reading can have several different hieroglyphs - if we do not agree with the choice of the system, then we can press the spacebar again and see a list of suitable replacements:
You can switch between different options using the spacebar or the cursor keys. For many readings, there are enough replacements possible that they will span multiple screens - note the scroll bar. A nice addition is that for some words the system immediately gives a little help:
To select the desired option, just press "Enter" - this will complete the selection of the desired character (or simply "fix" the entered hiragana). In case of an attempt to convert long hiragana sequences, the system will try to break it into fragments corresponding to single hieroglyphs - you can move between these positions using the cursor keys.
Conversion via the select dialog is also suitable if you need to convert a small piece of hiragana to katakana, and for larger pieces it is more convenient to switch the input mode in the language bar from "Hiragana" to "Full-width Katakana". Also, single characters in input mode can be switched between alphabets using the combinations Ctrl-I (convert to katakana) and Ctrl-U (respectively, to hiragana).
Japanese dot and comma are entered naturally through the corresponding buttons, to enter Japanese quotes, press square brackets ("[" and "]"), when entering a midpoint, press "/", to enter the yen symbol, press "\" , and to enter the elongation character in katakana, just press the hyphen ("-").
For more convenient work with Japanese text, it is usually useful to increase the page scaling a little - this makes it easier to parse individual characters.
Let's look at two more useful tools that can come in handy for entering text. First you need to make sure that the appropriate support is included in Word. Further examples will be given for MS Office 2003 (English version - the other was simply not at hand).
First you need to run the language setup program for Microsoft Office. It can be found in "Start -> Programs -> Microsoft Office -> Microsoft Office Tools -> Microsoft Office 2003 Language Settings":
Close the "Language Settings" dialog with the OK button, then restart Word. After that, a new item should appear in the formatting menu - I have it called "Asian Layout":
The picture above shows how to get to the first tool of interest to us - "Phonetic Guide", which allows you to enter furigana - small inscriptions near the hieroglyph with its reading. Let's try to add such annotations to our text. So, first we need to enter a few characters (as described above):
Now select these hieroglyphs and select "Format->Asian Layout->Phonetic Guide" from the menu - the corresponding dialog will appear:
So, in its upper left part there are fields that allow you to enter readings for signs, below it there is a section with settings for the type of signatures, and even lower - a preview window. By default, readings are set for the entire group of hieroglyphs, however, we can separate them by clicking on the "Mono" button:
The "Group" button allows you to merge the characters back into one word. In this case, Word was immediately able to find suitable readings for us, but often they will have to be set manually (however, Word adapts to our choice, which makes it great to work when putting readings for the whole text). To improve the readability of the text, it can be useful to increase the indentation of the furigana from the main text - the "Offset" field is used for this. After editing is completed, it remains to click on OK - the readings we have selected will be added to the text:
The above method of setting the furigana is not the only one, but perhaps the easiest to master.
Another useful feature is the ability to set the direction of the text - traditional Japanese texts are written vertically and from right to left, so you need to be able to set this format. To change the text direction, use the "Text Direction" item in the "Format" menu:
In the dialog that appears, you can choose different options for the direction of the text, but now we are only interested in one of them - vertical:
If you need to specify this format for only a few pages, then be sure to select the correct section in the "Apply to" field. The resulting result might look something like this:
As you can see, the text began to be displayed vertically, starting from the right border of the page, and the furigana moved to its proper place in this format.
A couple of notes about Word 2007 - Japanese language support is included in it in almost the same way as in Office 2003, but the commands you need when working are located in a slightly different place. "Phonetic Guide" is available on the Home tab by default - in the screenshot below, its icon is marked with a red border on the left:
An icon is marked on the right, behind which other menu commands for working with Asian languages are hidden.
The direction of the text can, as expected, be set in the "Page Layout" tab:
Well, that's all I wanted to talk about in this short review. Hope this information is helpful. Good luck! ;)
Greetings, dear Habrousers!
I don't know how it is on other devices, but on my Motorola Milestone there is no Japanese support - there are no fonts. It's boring without it. The translator does not work, there are squares in the browser, some tweets are not readable. After spending 2 hours looking for a solution, I did not find a solution. Neither English nor Russian forums helped me find an answer to the question of how to add Japanese language support. But the Russians don't give up! Below is a description of how I got Japanese language support on my phone. And yes, it turned out to be easier than I thought.
We will need:
1.
A Japanese font specially designed for Android devices called "DroidSansJapanese.ttf". You can take it.2.
Installed Android SDK. You can download it, if anyone does not remember, on the Android Developers website by selecting the platform you need.3.
Unfortunately, you will most likely need root permissions on your device. From my own experience, I will say that the easiest way to do this is with the help of the program of one valiant Chinese comrade "Universal Androot". Here is his blog (naturally, in Chinese), and you can download the program. On the same page there is a list of supported devices. If your device is not listed, you may need to use another method to get root access.Let's get started!
1.
We connect the phone to the computer with the Android SDK. In the console we type$ adb devices
If all is well, you should see something similar to:
List of devices attached
04038B630E018006 device
We go to the directory where the downloaded files are located and copy the font to the /tmp folder on the phone:
$ adb push ./DroidSansJapanese.ttf /tmp/
Preparation completed. Left just a little bit.
2.
For those who did not have time to root the device. Install Universal Android. The software version may differ from the one below.$ adb install Universal_Androot_1.6.2_beta6.apk
The result of the installation should be similar to the one shown in the picture:
After successful installation, you need to go to the device, run the newly installed program and click the "Go Root" button (All pictures are scaled down by 2x):
3.
We go into the console of the device, get root and remount the folder /system in read-write mode:$
adb shell
$>
su #the following commands are executed as root
#>
mount -o rw,remount /dev/block/mtdblock6 /system
The partition number on your device may be different from the partition number on mine (mtdblock 6
). I recommend running the command mount without parameters to specify which partition is mounted in /system.
It remains to copy the font from the temporary folder to the folder with fonts and reboot the phone.
#>
cp /tmp/DroidSansJapanese.ttf /system/fonts/ #mv doesn't work for some reason...
#>
rm /tmp/*.ttf
#>
reboot
Everything! If you wish, you can remove root using Universal Androot ("Undoo Root") and remove Universal Androot itself (through application management in the phone).
Who needs a Japanese keyboard - I recommend Simeji, available for free in the Android Market. Very comfortable and fast. Her screenshot can be seen below.
What happened
What happened can be seen in the following screenshots:Instead of a conclusion
* The Universal Androot program is distributed by the author under the Attribution-Noncommercial-Share Alike 3.0 Unported license.* Getting Root occurs without changing the region.
* Yes, I know that you can install a shell on your phone and do without Android tools. But in my case, adb was already installed, and root access was needed once, so I didn’t see the point of installing additional software.
Thanks for attention!
Tags: Android, localization, Japaneseization