Microsoft Office Excel is designed to work with information in tables. It is presented in the form of a grid, which is formed by columns and rows. In some cases, the author of the "book" - an Excel document - has a need to protect data from changes. You can protect an arbitrary number of cells from entering incorrect data or editing. This is necessary in order to:
- restrict the rights of users or groups by setting a password for a specific list (or the entire book);
- prevent elements from changing the cell on their own and losing information.
The article discusses the options available in Excel.
This is how you can prevent interference in an Excel workbook from accidental or intentional interference by one or another user. This will avoid data loss when saving and closing the document, as well as attempts to restore values, which takes time and is not always possible.
Unfortunately, there is no button in Excel that will instantly restrict access to a particular area. Nevertheless, everything can be done using the program's capabilities without resorting to others. In order to set up such protection against the introduction of incorrect data or changes, use one of the following methods:
- restriction on entering incorrect information;
- protection of a selective quantity or a certain group of values from editing;
- setting different rights for different users or groups;
- restriction of rights to one or more pages of an Excel workbook.
You can also password-protect security features, making changes inaccessible to people who do not know the access code. For example, this allows you to break the book into areas, each of which has one person working. By combining different functions, you can achieve the type of editing permissions you want. The modification restriction can also be canceled (if a password has been set, it will be required to enter it).

The setting can be made for different types of protected data.
This method is the easiest to use. With it, you will be able to control what you (or another user) enters into the cell. You can filter out data that does not meet certain criteria, which can also be specified. In this way, you can prevent entering a negative price, a fractional number of people, or an incorrect date for a certain event. In order to install protection, you need:
- Select the elements to which the function will apply.
- Go to the Data tab in Excel, then in the Data Tools area, click Data Validation.
- A window will open - in the "Parameters" specify the type of data from the introduction of which you want to protect the cells.
- You can also set up notifications that Excel will display before editing and in case of incorrect data entry. This is done in the Input Message and Error Message tabs, respectively.
- Then you need to save the settings by clicking "OK" and they will take effect.

Adding automatic notifications for working with cells.
Restriction from editing
Using this function, you can clearly specify specific cells or groups that you want to keep from changing. This can be done for:
- All elements of the workspace - press Ctrl + "A";
- Specific - select them manually using Ctrl to add a cell to the list and Shift to include several at once horizontally, vertically or across;
- Certain groups of elements, for example, only cells with formulas, notes, or any other.
Restricting the entire workspace:
- Select all elements - press Ctrl + "A" or click on the area where the numbering of rows and columns intersects on the table frame (an empty cell without a number and a letter).
- Select "Format cells", in the window go to "Protection" and activate the items "Protected cell" (set by default, optional or instead), "Hide formulas".
- After that, you need to activate the page's saved feature.

By selecting the entire table or part of it, we restrict access.
Restriction of rights to cells selected manually:
- Select elements that you do not need to protect by clicking on them, holding Shift (to include a group in the list) and Ctrl (to include a specific, including non-adjacent cell).
- Right-click on the selected area to open the context menu.
- Select "Format cells", in the window go to "Protection" and uncheck "Protected cell" - all other checked elements will be limited in editing when sheet protection is activated.
- Click "OK" to apply the settings.
- After that, you need to activate the option.
Restricting access to certain groups of cells is necessary if it is necessary to restrict editing of one or more groups with specific content properties:
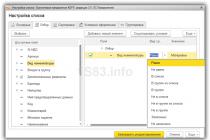
- Specify the elements belonging to one or more groups to be preserved. To do this, go along the path "Home" - "Editing" - "Find and select" - "Select a group of cells".
- Specify the required options and click "OK" for the changes to take effect.
- After that, you need to activate the protection function.

An example of selecting content with specific properties.
How to set sheet protection in Excel
It is not enough to simply uncheck or check the boxes in the paragraphs on the restriction of the rights to change data. Protected (or vice versa, if you unchecked) the cells will become after the function is activated for the entire page. Excel's default settings are "Protected Cell" enabled and "Hide Formulas" disabled, but you can check this or make adjustments if needed.
- Go to the "Review" tab, select "Protect sheet" - this way you will restrict the rights to all the cells that are ticked (the rest can still be changed).
- You can also make additional settings before applying the option to specify what exactly will be done with the checked items.
- Confirm the activation of the access restriction.
If you want to leave the ability to format all elements of the Excel page, check only the first three boxes.

Excel allows you to add a password when protecting a worksheet.
Limit different ranges for different users
If several people are working on a document, and only a certain area should be available to each of them, you must:
- Go to the "Review" tab, click "Allow ranges to be changed".
- In a new window, create an area - enter a list of values and a password to access them.
- Make the required number of arbitrary areas and allow access to any number of users.
- Install the function for the changes to take effect.
When utilizing such a system of functions, each user will be forced to enter a password before editing a certain section of the table. If he does not know the secret code, he will not be able to make changes.

We restrict or provide access to ranges of cells.
Restrict one or more sheets from editing and formatting
In most cases, it is not enough to restrict the rights to cells and their functional groups. It is advisable to prohibit editing the entire Excel page or several. For this you need:
- Go to "Review", select "Protect Sheet" in the "Changes" area.
- Enter a password if necessary.
- Save changes.
Using this function, you can avoid not only changing certain values, but also editing the title, "header" (pinned rows and columns), formatting and resizing in the Excel window.
How to set a password for editing protection
Restrictions set in an Excel document can be overridden by anyone with rights (default). In order to make it impossible for other users to disable the function of protection from editing or entering incorrect data, you can set a password. For this:
- Specify the cells or sheets to which you want to restrict access.
- Go to "Review" and click "Allow ranges to change".
- In the new window, create a range or specify an existing one.
- Enter a password, save the settings.
After activating the function, the document cannot be modified by a person who does not know the file access code. Be careful, because the Excel password cannot be recovered - it will be lost with all the data.
How to remove protection
This algorithm is suitable for returning rights to the entire sheet, as well as to some of its elements, if they are the only ones blocked. For this:
- Specify the list of cells to which you want to restore access (press Ctrl + "A" to select all).
- Call the Format Cells window by right-clicking on the element area.
- Go to "Protection" and configure the "Hide formulas" and "Protected cell" items.
- Save your changes.
After using these functions, the Excel document will again become available to all users. To unprotect only part of the book, first do it for the whole book, and then select the elements whose rights should be restricted again.
Outcome
Knowing what kind of safe features Excel offers, you can fine-tune access restrictions quite fine. This way you can prevent yourself from accidentally entering unwanted data, as well as editing the book by a third-party user. You can password-protect cells, as well as remove protection from unwanted access or amendments in whole or in part. These are the simplest rights restrictions that can be configured in Excel itself.
Periodically during work, it becomes necessary to set or remove a password for an Excel file. In this article, we will look at how this can be done in different versions of Excel.
If you need to set a password in Excel, then you can do it in a special dialog box. The location of this window varies in different versions of Excel.
The password must be set after all changes to the file before saving it. To do this, go to the section Service→ Options
This will open the Excel workbook options dialog box, you need to select the tab Safety where you can enter either password to open fileexcel, or password to change it in the corresponding field
After entering the password, you must click OK, and a window will open in which you need to confirm the password you entered. This is necessary so that you can be sure that you entered the password correctly the first time and remember it. Changes will take effect after saving the file.
You can also set or remove a password in Excel using the method discussed below.
Set or remove password in Excel 2007 and 2010
Setting a password in Excel 2010 is slightly different from 2003, and now we'll look at how you can do it. You can set a password just before saving the file. To do this, select the dialog box for saving the file: File→ Save As
After that, a window will open where you need to select the item Service→ Common parameters

It happens that when creating Excel spreadsheets, you need to protect some cells with entered formulas or constants from unauthorized changes. I hope the reader knows how to do it! So, after a certain time, it becomes necessary to change formulas or other protected data.
And suddenly it turns out that the password is irretrievably forgotten, and I don’t really want to create tables again and remember the formulas. In addition, it turns out just when everything is needed urgently, right now, or even better - yesterday ... And then - this article will come to the rescue!
Excel Format
The method is suitable only for documents (files) saved in Excel 2007-2013 format, i.e. with ".xlsx" extension. You can open Excel 97-2003 files with the ".xls" extension in the new Microsoft office suites and save them in the desired format.
Attempt to access a secure cell
The following figure shows the message that is displayed when an attempt is made to access a protected cell:
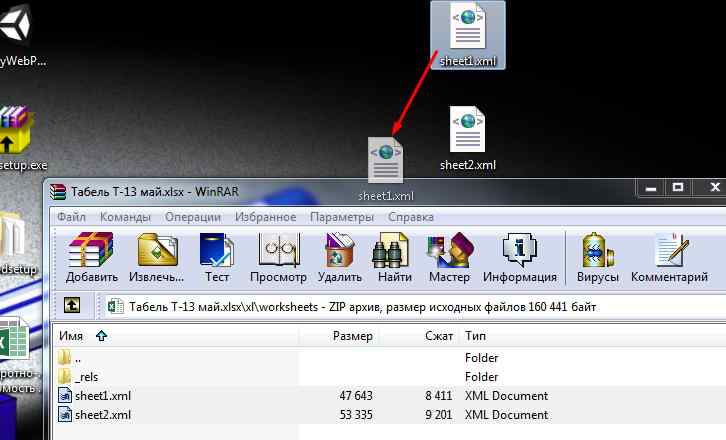
The arrow at number 1 shows the button, when pressed, you can enter a password. But the password is forgotten, what should I do? There is such an option to get rid of the password. Close the open file. We click on the file with the right mouse button and open it using the WinRar archiver:

The result will be:
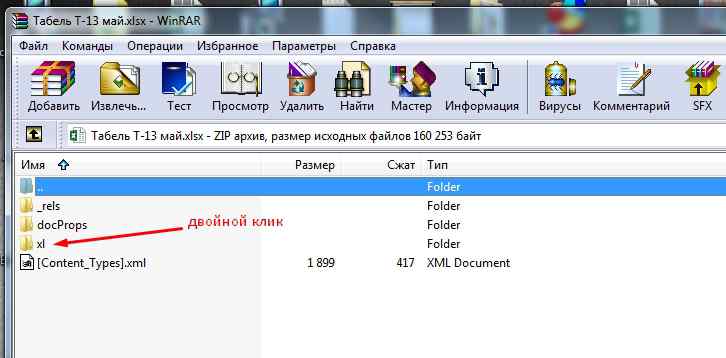
Opening the folder we see:
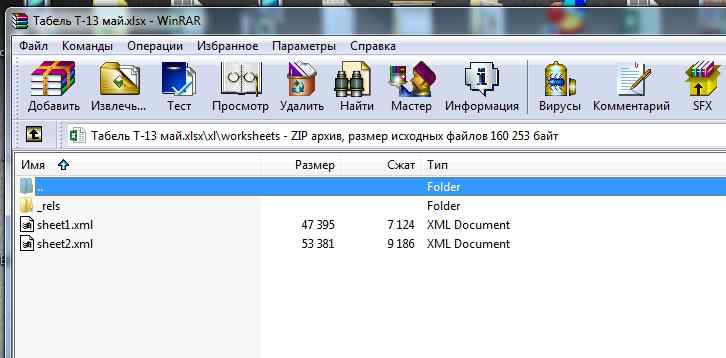
Archive in excel
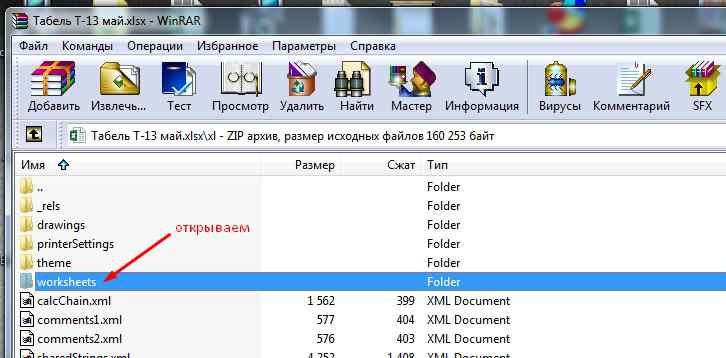
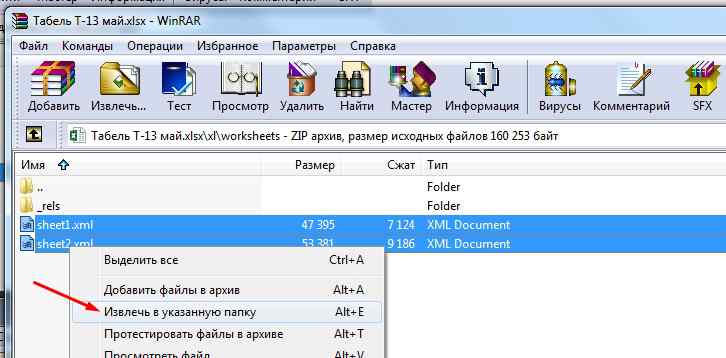
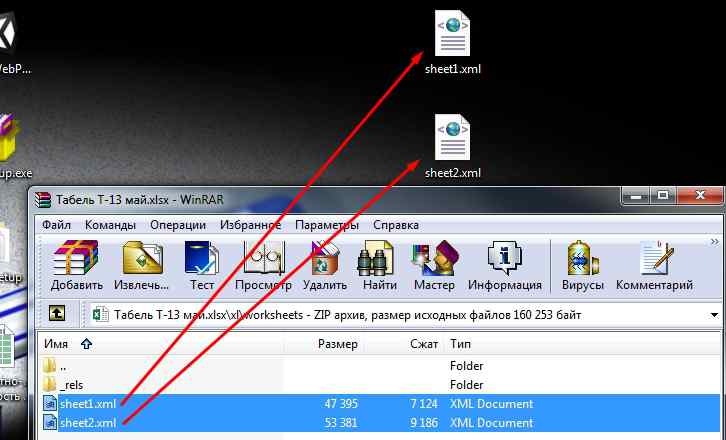
There are two page files here: sheet1.xml and sheet2.xml. The number of files depends on the number of sheets in the Excel document. You need to unzip the password-protected pages. To do this, select the desired files by pressing the "Ctrl" key and clicking on the desired file. Further, either by simple dragging to the “desktop”, or by right-clicking —> context menu, extract to the specified folder —> select “desktop”. After completing these steps, do not close the archive!
As a result, it should turn out like this:
From notepad to excel
Open a saved file - right-click on the file, in the context menu -\u003e open with -\u003e select "Notepad".
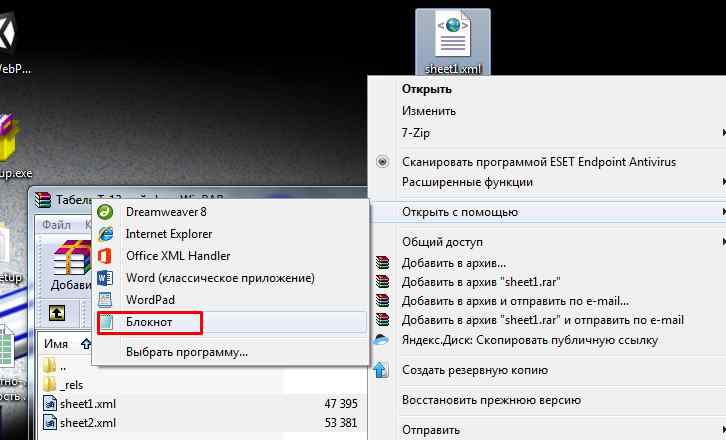
When the file opens, follow these steps:

sheetProtection
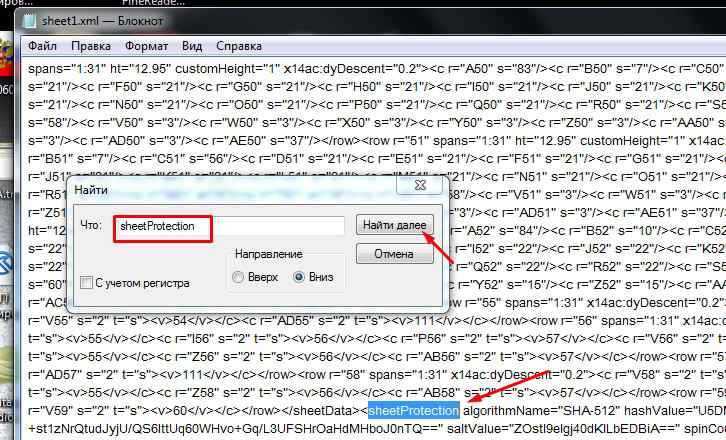

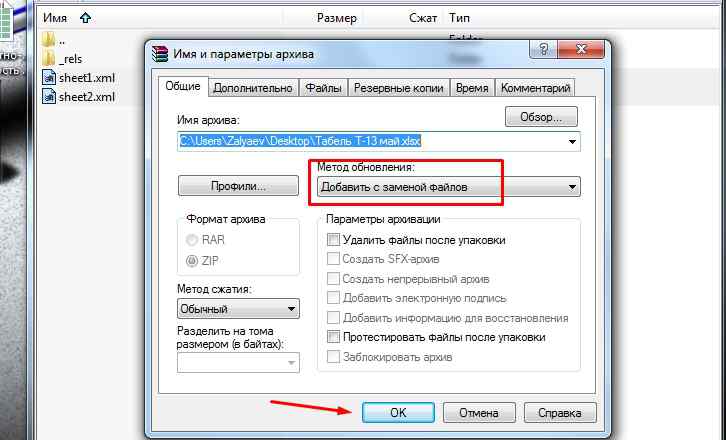
Next, delete the selected text by pressing the “Delete” key and save the file by pressing the “Ctrl + S” key combination. Or in other known ways. Next, you need to return to the open archive by clicking its icon on the taskbar, and simply drag and drop the previously saved file in the archive window. It is hoped that everyone knows how it is done. A dialog box will appear (as in the figure), where you need to click on the “OK” button.
This inscription indicates that the sheet is not protected and the values in its cells can be changed. And in the formula bar, the entered formulas became visible, which can be changed.
remember password in excel
Here is such an opportunity to "remember the password". Of course, this is not a 100% way - but with many files, in this way, you can remove the protection of the sheet. And, most importantly, this method is only suitable for files with the *.xlsx extension. Therefore, files with the "*.xls" extension must be opened in Excel 2007-2013 and resaved in the required format.

The constituent component of the office suite - Microsoft Excel has long, and quite deservedly, become the main tool in business areas. It is most actively used by accountants, estimators, mathematicians and businessmen.
Many, in order to protect their calculations from outsiders, put protection on an Excel workbook, or protect a separate sheet. If this is information intended only for the owner, there are no problems. But more often it is intended for the work of employees of the company. The file is sent by mail, forgetting to remove protection, or not warning the addressee about the existence of such a sheet in the file.
Working with Excel 2003
The task is to add a list on the page. When you try to enter the next serial number, you encounter a message: the cell or chart is protected from changes.
The action plan is prompted by Excel itself. We follow the path: Service → Protection → Unprotect the sheet. 
Working with Excel 2007, 2010
In this version of Excel, a different menu is used instead of "Tools": "Review" → "Unprotect sheet" (group "Changes").
Important! The "Unprotect sheet" item is active if it is protected. In the case of 2007 or 2010, the workbook is shared and needs to be cancelled.
Reset the password of a protected sheet
If they sent an Excel file in which the sheet is password protected and the owner is unavailable or, corny, forgot the password. The only task before the user is to reset the password in order to be able to work with this page.
They do this:
- Using add-ons.
- Using the archiver and notepad.
We find and install a macro that performs our task.
Add-in installation
- The downloaded macro (add-on) is placed in the Addins folder (the default macro folder).
- We go along the path Tools → add-ons → overview.
- Select the desired file.
- We install.
The macro is launched along the path from clause 2. macro settings. We remove protection by resetting the password for the active sheet.
After starting, it seems that the program is frozen, because the process takes about two minutes, after which we will receive a message.
Using the archiver and notepad
Important! This method is only possible for files with the xlsx extension. Those. files created in versions later than 2003. Alternatively, you can resave the file in a newer version.
Procedure:
- Open with an existing archiver, for example, WinRar.
- Among the archive files will be sheet1.xml. Open it with any text editor (for example, notepad).
- Find the text sheetProtection password.
- Remove the password value (what is in quotes).
- Or use this value as the password for protecting the sheet.
If the tips in this article didn't help you, or if you have a question about Windows or Microsoft products. Together we will try to find the answer.