Hello admin! Windows 10 is installed on my laptop, I am completely satisfied with the system, except for one thing, I can’t turn off automatic updates. I work as a manager and travel all day with laptop in Moscow, the Internet is connected via a USB modem, and when you open a page of any site, the laptop freezes terribly, and after a reboot, this window appears with a message"Working with updates. Completed 100%. Do not turn off the computer "and so it hangs for half an hour,
apparently the system has received updates and is now processing them, and I'm sitting and waiting stupidly!
Another thing at home, I connect to the router and everything flies. A familiar wizard recommended disabling automatic Windows 10 updates, but how to do this, and is it possible?
How to turn off automatic updates in Windows 10
Hello friends! I would advise our reader to switch to Wi-Fi settings in the Wi-Fi settings and Windows 10 will not download all the updates in a row. This option is the most acceptable for owners of laptops with Windows 10 installed (details later in the article), of course, you can completely disable updates, but the fact is that Windows 10 was released with minor flaws and the outgoing patches should bring the operating system to mind in the next month - two.
Also, do not forget that updates bring important fixes to all components of the operating system, including security, if you use it as an antivirus program, then keep in mind that it will not be updated either. In addition, along with the updates, various tools will come to check your computer for the presence of rootkits and other dangerous malware.

- Note: To be honest, sometimes the opposite happens - updates designed to fix problems lead to other errors. Also, updates may conflict with drivers and third-party programs, as a result, the system may freeze and even fall into a blue screen.
Well, I warned you about everything and let's move on to the most important thing. There are five ways to turn off automatic updates in Windows 10.
Switching to a metered connection in Wi-Fi settings
Left mouse click on the menu Start and click on Settings

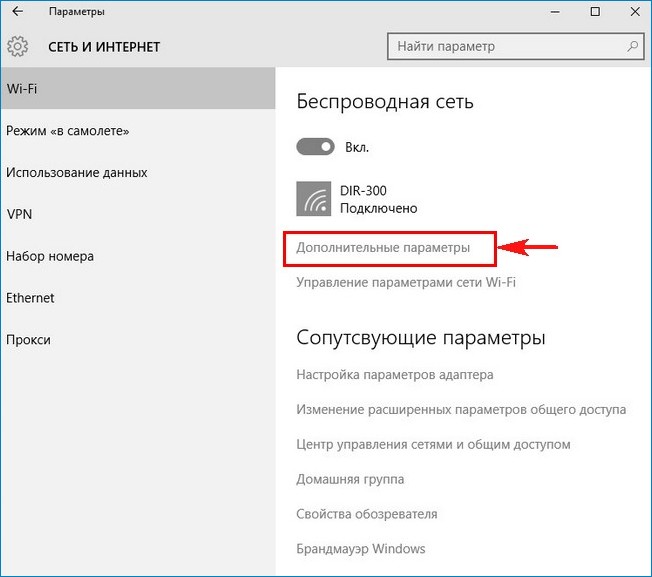
Network and Internet Wi-Fi

Extra options
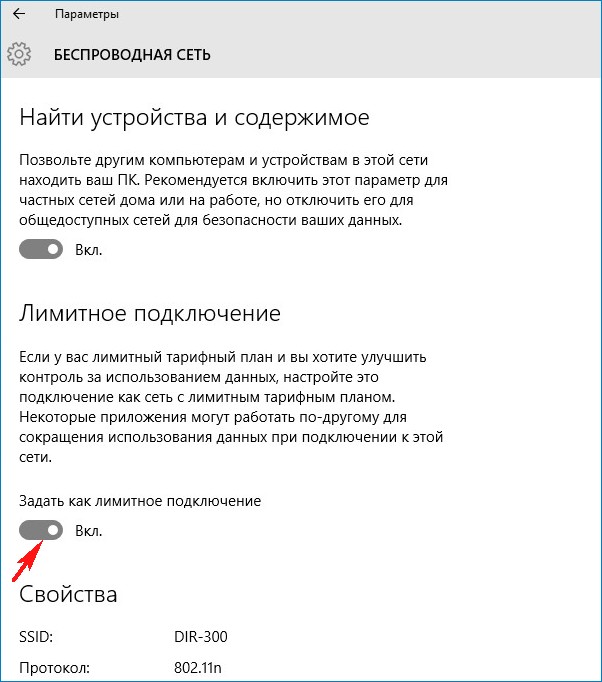
Put the switch in position Set as metered connection
Disable operating system updates completely in computer settings
Left mouse click on the menu Start and click on Options
Go to the section
Update and Security
Windows Update,

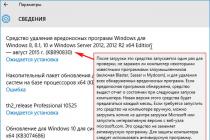
We see that there are new updates that are immediately installed on our computer
Click on the button Extra options

In this tab, disable receiving updates:
Choose how to install updates
We set the parameter Notify when a reboot is scheduled
Check the box Postpone updates.

Let's take a step back out the window
Update and Security
Windows Update,
and we see that the updates are no longer downloaded and installed automatically, but are waiting for your permissions. The installation of updates will start if you click on the button Install now.

Disable updates in Windows 10 by disabling the Windows Update service
Right click on the Start menu and select Computer Management

Left-click on the Services item, and in the list that opens, select Windows Update, double-click on it with the left mouse
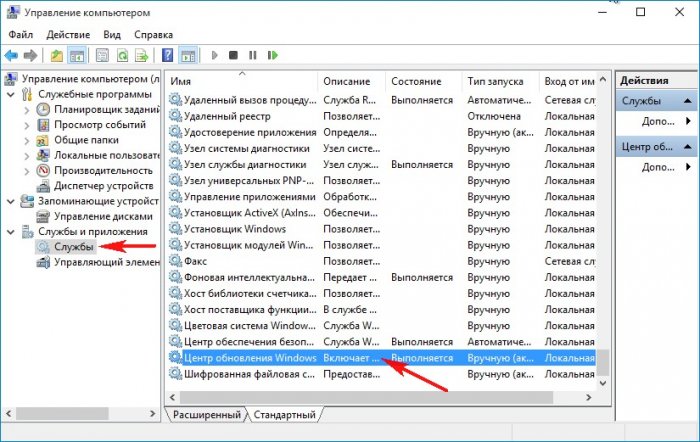
and exhibit Launch type into position Disabled.
Apply And OK.


Disable updates in Windows 10 using the registry
I consider this method unnecessary, but, as they say, everything will fit in the economy.
Start->Run
Enter the command in the input field regedit
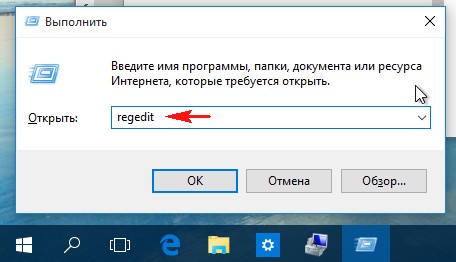
The registry opens. Finding a branch
HKEY_LOCAL_MACHINE\SOFTWARE\Policies\Microsoft\Windows
Right-click on the Windows partition and select New - Partition.
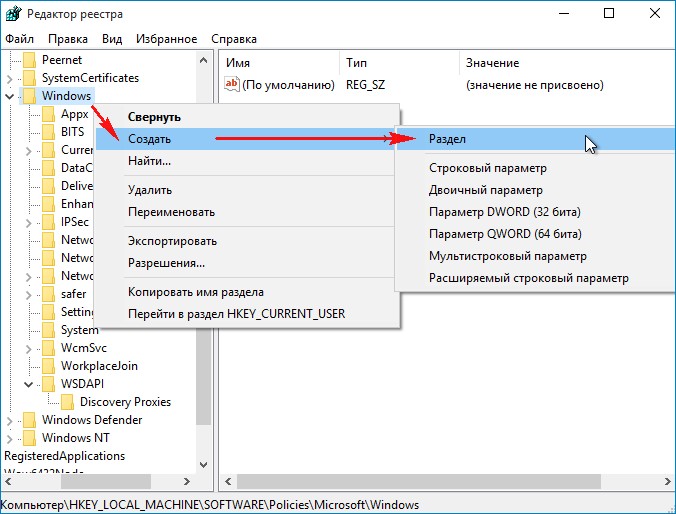
Enter the name of the WindowsUpdate section and right-click on it and selectCreate - Section, enter the name of the section AU.

Right-click on the created AU partition and select New - DWORD Value (32-bit)
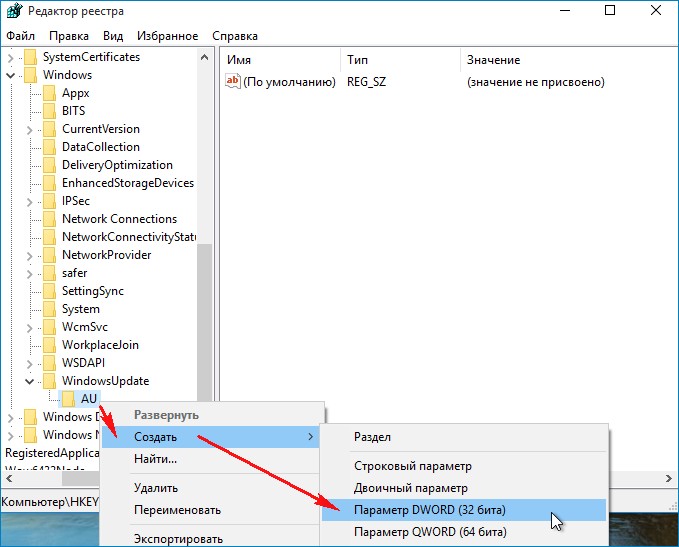
We name the parameter NoAutoUpdate and assign the value 1 to it.

If after this operation you reboot and enter the parameters:
"Update and security
Windows Update", you will see that the update download failed. Click Advanced Options.

As you can see, not a single option for installing updates is available to us.

Friends, the fifth way is to use the Group Policy Editor, if you are interested in it, I will talk about it in the next article.
Windows 10 is less demanding on computer performance than previous versions of Windows. Installing "tens" on weak laptops can really make working with the device more comfortable. But even with optimized Windows 10, unnecessary services run in the background, the execution of which requires computer resources.
Today we will analyze which unnecessary services it is better to disable in Windows 10 so that the computer runs a little faster.
What are Services in Windows?
Windows operating system services are processes that run at system startup or when an event occurs, and run independently of the user. All these processes run in the background, sometimes even unnoticed by the user's eyes. Some services start automatically when you turn on your computer, but they are not used on your home computer. In addition, certain services use a network connection for their work, which means that they can be the cause of a security breach and hacking of your device.
How to disable services in Windows?
Disabling Windows services allows you to reduce the load on the computer's processor and RAM, which is important for weak and outdated devices. As well as improve computer security. It is not surprising that many are wondering how to disable services in Windows without harming the system. There are two ways to disable background processes, through the "Service Manager" and using the command line.
Disable services through settings
There are several ways to open the service settings:
- Launch the control panel, in the search at the top right, enter Services and run.
- Open the Run window by pressing hotkeys Win And R, and enter services.msc.
After launch, you will see a list of all services installed on your device. Please note that disabling everything in a row is strongly discouraged, as this may affect the stable operation of the computer and lead to its complete inoperability.
We find a service that works in vain and consumes system resources. In our case, this is a fax service.
Press the right mouse button, then properties. In the window that appears, from the drop-down list, select the launch type " Disabled» and button OK.
Stop unnecessary services through the command line
Also, any of the unnecessary services can be turned off and on using the command line, run as administrator. To do this, do the following:

List of unnecessary Windows 10 services
Below is a list of the most common unnecessary services, disabling which can speed up the system. However, disable these services with care and don't forget to make a system restore point just in case.
- Dmwappushservice: Your device's location service.
- Machine Debug Manager: service for debugging some programs by programmers.
- NVIDIA Stereoscopic 3D Driver Service: Feel free to turn it off if you don't have a 3D TV or monitor.
- NVIDIA Streamer Service And NVIDIA Streamer Network Service: If you do not play computer games with image streaming on the Internet, you can safely disable the service.
Superfetch: This service is not compatible with SSD. And if your HDD drive slows down, disabling this service will speed up your computer.- Windows Search: If you rarely use the search, you can turn it off.
Wireless Setup: If your computer does not have WiFi or Bluetooth, you can turn it off.- Windows Biometric Service: stores and processes biometric data such as fingerprints.
- Firewall: If you use a third-party antivirus, you can disable the built-in one.
Computer Browser: Displays a list of computers on the local network.- All Hyper-V services: Required for virtual machines to function.
- Print Manager: If you do not use printing on your device, turning off this service will save background processes.
- Internet Connection Sharing (ICS): If you do not need to share WiFi from your laptop or share your Internet with other devices, you can disable this service.
- Work station: Provides access to files and folders on the network via SMB, if there is no home network, you can turn it off.
- Working Folders: Can also be disabled if the computer is not on the local network.
- Error Logging: not needed in most cases.
- Server: If you do not have shared network folders and a printer, you can disable it.
- Xbox Live Network Service: Required to access Xbox Live services.
- Sensor Service: Controls the sensors installed on the PC.
- Image Upload Service: can be turned off when you are not using the scanner.
- CD Burning Service: on most PCs there is no longer a drive for them, so if you do not use CDs, you can turn them off.
- Sensor Surveillance Service: A service that controls the brightness of the monitor based on the light in the room.
- Bluetooth support service: If you are not using an adapter, you can turn off this service.
- BitLocker Drive Encryption Service: This function encrypts the information on the hard disk.
- Remote registry: allows you to edit the registry by a remote user.
- Fax: Enables fax operation.
- Connected user functionality and telemetry: Collect user data.
- Update centre: You can stop this service so that the computer does not update itself. It is worth periodically turning on and updating the system manually.
Finally
Disabling some services is sometimes a forced measure that is necessary in order for the computer to work faster and less overheat. However, turning off most of the unnecessary services can cause the computer to simply stop working correctly. Set up your computer carefully, and we hope you find this guide helpful.
Windows updates are sometimes of dubious value. In the case of the tenth version, all updates except the first after the installation of the system are very specific and controversial. Moreover, they always start unexpectedly, without notifying the user, and their sudden use causes a long restart of the computer. However, updates can be interrupted at any stage.
How to quickly abort an update
If you want to quickly interrupt a Windows 10 update, depending on its stage, the first step is to do the following:
- if the update has just started downloading, disconnect your Internet connection;
- if the update has downloaded and the system asks for a restart to apply it, in no case do this;
- if when you turn on / off / restart the system, the installation or application of updates starts, turn off the computer by holding the power button on the case.
Regardless of the option you are faced with, all further actions will look almost the same. Now you need to start canceling the update that has begun. For the last variant of the problem, start the system in safe mode.
Starting the system in safe mode
Starting the system in safe mode is guaranteed to help start the computer without installing the downloaded updates.
If you skip downloading updates and turn off your computer, there will be some difficulties with canceling them: every time you try to log in, an attempt will be made to apply the updates. On later versions of Windows 10, this problem has been fixed, but just in case, it's better to start the computer in safe mode.
How to cancel an update
The described method is suitable for quickly interrupting an update that has begun. Now the update needs to be canceled so that you can safely turn on the Internet or restart your computer.
There are several ways to cancel an update that has started. For example, turn on metered connection or Airplane mode. However, such methods will only interrupt the download of new packages and in no way prevent the installation of already downloaded ones. It is guaranteed that the update that has begun can be canceled only through the command line.

To resume the update, you need to repeat the above commands, replacing stop with start.
How to permanently disable downloading updates
The method mentioned in canceling the update also includes preventing further system updates. But there are others that will be more convenient and reliable in the long run.
Through the Group Policy Editor
This method will not work for Windows home and some unlicensed versions of the system, but by using it you will still be able to manually run system updates.

Through Services
This method is available on all versions of Windows, but it completely prohibits updating the system: you will not be able to download updates even by starting the check manually (the check will start, but it will not be able to find anything).

Through the registry editor
This method can be considered the most correct, but also the least safe: it makes changes directly to the system configuration, and you can cancel it only by doing the same steps again. If you intend to use this method, store the path to the parameter you are changing somewhere so that you can roll back the changes.

Via Windows Update
Blocking updates through Windows Update is official, but the least reliable. In this way, you will mark your own Internet connection as limited: updates are not downloaded through such connections in order to save traffic.
If you connect to a different network or reset your router, the ban on downloading updates will disappear.

Video: How to disable updates in Windows 10
Despite the services carefully hidden from the user, an active Windows update is easy to cancel. Just in case, copy the necessary commands somewhere or disable the system update in advance so that it will never take you by surprise again.
The release of Windows 10 generated mostly positive reviews from computer users. The new operating system from Microsoft has become much prettier and more convenient for ordinary computer owners. However, Microsoft has implemented a user tracking system into it, which, according to the company, should help improve the system.
At the same time, tracking in Windows 10 is enabled by default, and if you did not disable these functions during the installation of the operating system, then during operation your computer will constantly send information about you and your actions to Microsoft.
In today's article, we will tell you how to disable Windows 10 tracking, which will not only hide yourself from the all-seeing eye of the American giant, but also slightly speed up your computer and reduce network load.
Why Windows 10 Tracks Users
Microsoft states that the tracking features of Windows 10 collect and send to the company's servers the following data: contact information (your name, surname, email address, phone number, and so on), location data, your preferences (for example, for which sports team you are sick), credentials (logins, passwords, hints), payment system data, and so on.
Microsoft expects this data to help improve the operating system and user experience with it. For example, reporting system crashes can help a company understand what needs to be fixed so that computer users don't experience crashes again. Or, if you, for example, are a bank employee and often read economic news and look at exchange rates on the Internet, then you will be offered thematic ads targeted personally at you.
It would seem that the goals are noble and perhaps the way it is. But, Microsoft is an American company and all your data will be stored with it. Microsft itself can give out user data to intelligence agencies, not to mention hackers who can steal this data from Microsoft servers.
Therefore, it is better to turn off Windows 10 spying features. Even if you have nothing to hide, it is better to turn off spying so as not to waste computer and network resources once again.
Disabling surveillance during the installation of Windows 10
You can and should turn off tracking options at the stage of installing Windows 10. This feature appears at the step called "Improve the speed of work."
The vast majority of users press the big button "Use default settings" and thus agree with the default privacy settings, in which, of course, user tracking is enabled.
To turn off tracking during the installation of Windows 10, click on the "settings" item in the lower left corner of the screen.
In the window that appears, you should transfer all the sliders to the state " disabled". In this way, you will disable the collection of your data entered from the keyboard, by voice, disable ad recommendations and the collection of your location data.
On the second screen, you can turn off page prediction features, reporting to Microsoft, connections to other networks, and so on.
Of all these options, the only option that makes sense is “Use SmartScreen Web Services to protect against malicious content. After that, click "next" and continue the installation of the OS.
On the Buy for Yourself screen, the system asks you to enter or create a Microsoft account. Of course you shouldn't do this.
In the lower left corner, click "skip this step".
Disable Tracking in Windows 10
If you have already installed Windows 10 with default settings, where surveillance is enabled, nothing prevents you from disabling it already when working with Windows 10. Moreover, at the installation stage you cannot disable all tracking functions.
To enter the Windows 10 privacy settings, click the start menu and click the gear (Windows settings).

Now let's go to "Privacy".
You will see a window of privacy options on the tab " Are common«.
Toggle all sliders to off.
At the bottom of the same page, click "Manage the receipt of advertising from Microsoft and other personalization information."
In the browser that opens, make sure that the toggles for "Personalized ads in this browser" and "Personalized ads everywhere my Microsoft account is used" are in the "off" position. If they are not, turn them off. This feature will not turn off ads, but will make them non-personalized.
We return to the privacy settings menu and go to the section " Location«.
Here we also disable all options. Pay attention to the item " Location information log". Be sure to click there Clear“ to delete recordings that were made before you turned off tracking options.
Go to the section " Camera". Here we also turn off all the sliders if there are no programs in the list where you need a camera.
We do the same in the section " Microphone«.
Chapter " Speech, handwriting, and text input«.
If you see the "Meet me" button in this window, then you have already turned off the option in which Windows 10 will remember your handwriting, voice, and the characters entered on the keyboard. If there is a "Stop learning" button, then click it to disable tracking.
Chapter Account Information.
We disable and thus prevent applications from accessing your name and other account data.

In the "Reviews and diagnostics" section, select " never" And " basic information«.
This will minimize the amount of data sent to Microsoft.
And the last section is "Background Applications". Here you can specify which apps are allowed to receive information, send notifications, and update in the background.
As you may have guessed, we turn them all off.
Disabling telemetry
Telemetry allows Microsoft to monitor the load on your computer system and installed programs for sending and analyzing to the company's servers.
To disable telemetry, open a command prompt. To do this, find in the start menu the folder "tools" - "command line". Click on it with the right mouse button - "advanced" - "run as administrator".
At the command line, type the following commands:
- sc delete DiagTrack and press Enter on your keyboard.
- sc delete dmwappushservice and press Enter.
- echo "" > C:\ProgramData\Microsoft\Diagnosis\ETLLogs\AutoLogger\AutoLogger-Diagtrack-Listener.etl
- reg add "HKLM\SOFTWARE\Policies\Microsoft\Windows\DataCollection" /v AllowTelemetry /t REG_DWORD /d 0 /f
These commands first erase all the data accumulated by telemetry, then disable this function and enter a ban on further data collection in the registry. Telemetry will now be completely disabled on your computer.
Disable Tracking in Edge Browser
Internet Explorer in Windows 10 has been replaced by the Edge browser. You may not be using it, but it also has features for spying on the computer user.
Open the Edge browser and go to the settings in the top right corner.
At the very bottom, open "Advanced Options".
In the "Privacy and Services" subsection, find the item "Send Do Not Track Requests" and turn it on.

This switch prevents the browser and other applications from collecting data and tracking your location.
Disabling Windows Defender
In order to disable tracking in Windows 10, you need to deal with standard antivirus software. Windows Defender automatically disables when you install any other antivirus software on your computer. But just in case, make sure you have it disabled.
To do this, click on the start menu, go to Windows settings in the "Updates and Security" section.
Move the switches to the off position.
Disable Windows 10 Settings Sync
If you are not using a local computer account, but a Microsoft account, which we recommended not to register when installing the system at the beginning of this article, then you most likely have cloud synchronization turned on.
Go to menu Start — Windows Settings — Accounts — Synchronizing your settings.
Disable sync by toggling the switch to Off.
Blocking Microsoft servers
As you know, all collected data is sent to Microsoft servers. We can block these addresses on our computer. Thus, even if the data is collected on a computer, it still cannot go anywhere.
Open the C:\Windows\System32\drivers\etc folder and open the hosts file with notepad.
Copy the following lines there to the very bottom of the file.
127.0.0.1 localhost
127.0.0.1localhost.localdomain
255.255.255.255broadcasthost
::1 localhost
127.0.0.1 local
127.0.0.1 vortex.data.microsoft.com
127.0.0.1 vortex-win.data.microsoft.com
127.0.0.1 telecommand.telemetry.microsoft.com
127.0.0.1 telecommand.telemetry.microsoft.com.nsatc.net
127.0.0.1 oca.telemetry.microsoft.com
127.0.0.1 oca.telemetry.microsoft.com.nsatc.net
127.0.0.1sqm.telemetry.microsoft.com
127.0.0.1 sqm.telemetry.microsoft.com.nsatc.net
127.0.0.1 watson.telemetry.microsoft.com
127.0.0.1 watson.telemetry.microsoft.com.nsatc.net
127.0.0.1 redir.metaservices.microsoft.com
127.0.0.1 choice.microsoft.com
127.0.0.1 choice.microsoft.com.nsatc.net
127.0.0.1 df.telemetry.microsoft.com
127.0.0.1 reports.wes.df.telemetry.microsoft.com
127.0.0.1 wes.df.telemetry.microsoft.com
127.0.0.1 services.wes.df.telemetry.microsoft.com
127.0.0.1 sqm.df.telemetry.microsoft.com
127.0.0.1 telemetry.microsoft.com
127.0.0.1 watson.ppe.telemetry.microsoft.com
127.0.0.1 telemetry.appex.bing.net
127.0.0.1 telemetry.urs.microsoft.com
127.0.0.1 telemetry.appex.bing.net:443
127.0.0.1 settings-sandbox.data.microsoft.com
127.0.0.1 vortex-sandbox.data.microsoft.com
127.0.0.1 survey.watson.microsoft.com
127.0.0.1 watson.live.com
127.0.0.1 watson.microsoft.com
127.0.0.1 statsfe2.ws.microsoft.com
127.0.0.1 corpext.mitadfs.glbdns2.microsoft.com
127.0.0.1 compatexchange.cloudapp.net
127.0.0.1 cs1.wpc.v0cdn.net
127.0.0.1 a-0001.a-msedge.net
127.0.0.1 statsfe2.update.microsoft.com.akadns.net
127.0.0.1 sls.update.microsoft.com.akadns.net
127.0.0.1 fe2.update.microsoft.com.akadns.net
127.0.0.1 65.55.108.23
127.0.0.1 65.39.117.230
127.0.0.1 23.218.212.69
127.0.0.1 134.170.30.202
127.0.0.1 137.116.81.24
127.0.0.1 diagnostics.support.microsoft.com
127.0.0.1 corp.sts.microsoft.com
127.0.0.1 statsfe1.ws.microsoft.com
127.0.0.1 pre.footprintpredict.com
127.0.0.1 204.79.197.200
127.0.0.1 23.218.212.69
127.0.0.1 i1.services.social.microsoft.com
127.0.0.1 i1.services.social.microsoft.com.nsatc.net
127.0.0.1 feedback.windows.com
127.0.0.1feedback.microsoft-hohm.com
127.0.0.1 feedback.search.microsoft.com
You should get the same as in the screenshot below.
After that, close the hosts file and save the changes.
Now the data collected by the tracking functions of Windows 10 will not reach the addressee, even if you forgot to turn off any of the tracking options.
Disable Windows 10 Tracking Using Programs
And the last chapter of our article, which everyone has been waiting for. Of course, all the actions described above can be carried out using several utilities.
Destroy Windows 10 Spying (DWS)
Perhaps the best utility for removing spyware from Windows 10. The program is absolutely free and has an open source code, so you don’t have to worry about viruses if you download it from the official website of the program. The program can remove and turn off telemetry elements, disable Windows Defender, Cortana voice assistant, and much more.
At the time of writing this article, the latest version was DWS 1.6 Build 722. Go to the official website and download the latest release of this utility.
Run the program and go to the "Settings" tab and select the tracking features that you want to disable. In my case, this is all from the proposed list.
After that, go to the Home tab and click the Destroy Windows 10 Spying button. This will begin the process of removing Windows 10 tracking services, telemetry items, adding Microsoft servers to the blocked list, and so on.
After the utility completes, it will prompt you to restart your computer.
Disable Win Tracking
Another great program to remove spyware from Windows 10. Like DWS, this program is free and available on github.
The main difference of this program is that it allows you to selectively disable tracking services on your computer, as well as return them back if you accidentally deleted them.
Although the program is in English, it is extremely easy to work with it. On the right, you need to choose what you want to do with the selected elements - disable (disable) or delete (delete). After that, select the tracking elements you don’t need with checkboxes and click Go to start the process.
Video on disabling Windows 10 tracking
In the new Windows 10 operating system, Microsoft has gone to meet PC users, making the system not very demanding on computer resources. But even on Windows 10, users improve the overall performance of the system by disabling unnecessary services, as it is slow on some weak and old PCs.
Disabling all services in a row in Windows 10 can cause the operating system to become unstable. Therefore, so that our readers can figure out which services can be disabled in Windows 10 without consequences, we have prepared a material where we will describe a detailed solution to the task.
Disable unnecessary services using the Services add-on
Get into the add-on " Services» possible through Control Panel and through the program Run", by entering the command "services.msc" in it.
When you open the add-on, you will see the entire list of services installed on the computer.
For example, let's try to disable the service " Remote registry through the opened add-on. To do this, go to the desired service and open it.

From the window that opens, you can see a detailed description of the service, as well as its status. To finally stop Remote registry”, we will select the launch type “ Disabled” and click the Stop button.
After these actions Remote registry» will turn off completely. " Remote registry"Designed for editing registry files by a remote user. For example, the Administrator edits registry branches on a remote computer on the network. For home PC user Remote registry” is absolutely useless, so you can safely turn it off.
The example shows how easy it is to disable unnecessary services. When asked which services can be disabled in the top ten, we have prepared a list with a description of services that can be safely disabled:
- Windows Biometric Service- used to process and store biometric data;
- Computer browser- used to create a list of computers on the network;
- Secondary login- Allows other users to control the computer;
- Print Manager- ensures the operation of printing devices;
- CNG key isolation- produces isolation for the key process;
- SNMP trap- provides message interception for local SNMP agents;
- Work station- access to workstations via the SMB protocol;
- Working Folders- used to synchronize directories on different devices;
- Xbox Live Network Service- Provides access to Xbox Live services;
- All services related to the hardware Hyper-V rendering- services that are designed for the operation of virtual machines;
- Geolocation Service- used to track the coordinates of the computer;
- Sensor Data Service- processes and stores information received from sensors installed on a PC;
- Sensor Service- manages sensors on a PC;
- Client License Service- ensures the correct operation of the Windows 10 store;
- Microsoft Windows SMS Router Service- forwards messages according to pre-created rules;
- Remote registry- created for editing the registry by a remote user;
- Fax- provides operation of devices that can receive and send fax messages.
All of the listed services in the list do not affect the performance and stability of the operating system, therefore you can safely turn them off..
I would also like to note that before disabling these services, carefully read their purpose in the description. For example, if you disable "Print Manager" and "Bluetooth Support Service", you will not be able to connect the printer and you will not be able to use Bluetooth devices.
Disable unnecessary services using the command line
Each of the services listed in the first example can be easily and quickly disabled through the console. To disable, we need a console running in Administrator mode. In Windows 10, you can launch the console in Administrator mode in various ways. The most convenient way is to click on the menu " Start» Right-click and select the item we need.

In the running console, let's try to stop the already familiar service " Remote registry". To do this, type the net stop "RemoteRegistry" command in the console and execute it.
If you need to start the "Remote Registry" again, then this can be done with the command net start "RemoteRegistry"
The English name for entering on the command line can be found in the task manager on the tab " Services»
This example is best for system administrators and advanced users. I would also like to note that the considered example can be used without problems on previous Windows 7 and 8 operating systems.
Disable unnecessary services with PowerShell
In addition to the command line, to disable unnecessary services, you can also use PowerShell. You can open PowerShell in Windows 10 through the Control Panel or through Search.

Now we will enter the stop-service remoteregistry command in PowerShell and execute it.
This command will stop the familiar service " Remote registry". To restart " Remote registry» in PowerShell, you need to run the command: start-service remoteregistry
In the same way, unnecessary services are stopped through PowerShell. This example, like the previous one, is best for system administrators and advanced users.
Stop services through the task manager
First of all, let's launch the Task Manager. You can run it in Windows 10 with the familiar key combination Ctrl + Shift + Esc. It can also be launched by clicking on the menu " Start» right-click and select « Task Manager».
Now right-click on it and select " Stop».

After these steps, the remote registry will be stopped. In the same way, you can restart this service.
I would also like to note that you can open the add-on considered in the first example through the task manager. To do this, click on the link at the bottom of the task manager window.
In this article, we looked at four ways to stop services, and also found out which of them can be turned off without harm to the computer.
I would also like to advise our readers, if you want to disable a certain service not from the list considered, then carefully read its functions and purpose so as not to harm the system.
For example, if you stop Windows Audio, you will disable all audio devices and sound programs. To restore the functionality of audio devices and sound programs, you need to restart the unused Windows Audio. From this example, it can be noted that it is necessary to remember disabled services to restore Windows 10 to normal.
We hope our material will help you disable unnecessary services, and you can increase the performance of Windows 10.
Related videos