Greetings, my dear friends! Today I want to tell you about how you can reduce the size and weight of a picture in Photoshop, while practically not losing image quality. To do this, there are many different ways, for example, for the most "lazy" just in the browser search engine enter the following inscription "How to reduce the weight of a picture online", choose what is convenient for you and voila, everything is ready. But we are studying FS and I want to show you how to do it in your Photoshop. Because FS is not only an album for drawing, it can do a lot of photo processing. And so we proceed.
I suggest you download these pictures and practice
1.0 To start, open the picture in the FS (Fig. 1) to find out its size
Going: Menu Bar - Image - Image Size
or press the keyboard shortcut ALT + CTRL + I
Keyboard shortcuts work in English layout
Picture size
Width: 4006 Pixels
Height: 5000 Pixels
Resolution: 300 Pixels / inch
1.1 For example, we need to make this picture:
900
on 1290
pixels with a weight of no more than 80K
1) First, change the setting (at the bottom), click on the arrow and select Bicubic, sharper (best for decreasing)
2) Change Resolution from 300
on 72
Pixels / inch
(Such a large resolution is only needed for printing for the Internet, 72 is enough)
Leave the rest of the settings unchanged.
1.2 What we see is that the "weight" and size of the picture have already decreased.
Now let's adjust the size of the picture, since the size of the picture does not differ much from the desired one (the deformation will be almost invisible).
1) Uncheck the first two checkboxes in the settings, leave it only against "Interpolation".
The lock is gone.
2) Then just change the dimensions of the Width and Height as in my picture. Click "Ok"
1.3. So, with the dimensions everything has been done, now you need to reduce the "weight" of the work.
Why do you need to reduce the "weight" of the picture?
Some sites have a limit on the weight of images. If you do not reduce the weight of the image, then the entire page will acquire a lot of weight. From this, the page loading speed decreases.
Our picture is without animation, so you can save it in GIF, PNG or JPEG format. Today I will not talk about all the possibilities of these formats, all the information can be found on the Internet. We'll just compare how these formats affect the "weight" of the image.
To save the picture, as always, go:
Menu Bar - File - Save For Web ... or ALT + Shift + CTRL + S
1.4 Comparing the screenshots, it can be seen that in the JPEG format the smallest is 171.3K.
Is it still possible to make the weight of the picture less?
To do this, we need to slightly reduce the "Quality" settings, while the difference will be almost imperceptible. If everything suits us, Press "Save ..."
What if we have a very wide picture that needs to be adjusted to the same dimensions?
2.0.Open the picture in FSH Fig. 2 to find out its size
Go to: Menu Bar - Image - Image Size or press the keyboard shortcut ALT + CTRL + I
2.1. Change the settings as I showed in paragraph 1.1. Click "OK"
2.2.Resize the picture as shown in paragraph 1.2. we can not(deformation will be very noticeable).
To avoid this, you just need to cut off the extra ones using the "Frame" tool
Take the "Frame" tool, set these settings, set the size we need.
2.3 Pay attention to everything that inside the selected frame has a light shade after clipping. Everything else will be deleted.
In FS CS6, the selected frame remains stationary, but the document can be moved by selecting the desired area.
If everything suits you, press Enter or as shown in the screenshot.
2.3. Be sure to check the size of our drawing as in paragraph 1.0.
If the dimensions are not accurate, change them as in paragraph 1.2.
2.4.Save the picture as in paragraph 1.4. having previously reduced the "weight".
Lesson result
Fig. 1 (modified)
Fig. 2 (modified)
Thank you for your attention until next meetings!
Irina Hochweis
Group I + YOU study together - my.mail.ru/community/japlusti/
Original taken from - strelec-l.livejournal.com/135545.html
Reducing the size of the picture using Photoshop.
Simple decrease
1. Open Photoshop, open the desired file. On the top menu bar, select Image -> Image Size.

2. In the window that appears, we see the current size of the picture:

In the field width (width) set the desired size of the picture in pixels. To keep the proportions when resizing the picture, there must be a checkmark in the Constraip Proportions box.
Reduce for WEB
If you need to use a reduced picture on the site, you must do the following:

3. In the pop-up window of optimization for Web in the upper right corner, select the jpеg format (No. 1)

4. When saving the file, the ICC Profile checkbox should not be checked (# 2). Then we select the quality of the saved image (No. 3). The higher the quality, the more the file will "weigh". Medium quality is usually sufficient.
5. Save the file (No. 4).
Reduce and crop
The picture can be reduced by cutting.
1. Select the "Frame" tool

Select the desired area on the image (by holding down the shift key on the keyboard, you will get an oblate of the square):

How to reduce image size without losing quality, I got interested in the answer to this question when I wanted to make a thumbnail for the article from the image for the desktop wallpaper of the PC.
By hammering a query into the search bar of my "favorite browser" I began my journey through the sites, hoping to quickly solve this problem.
But it was not there, I tell you dear, in the words of a well-known saying. In search of a suitable one for myself, I tried many of them. After all, high-quality images and design is the right way (read the previous article), and the search engine gave me a lot of articles where, with the help of various programs, "our brother blogger" conjures over his own and other people's (read those downloaded from "neta") pictures.
Various ways to change image size and quality
- Among them there are: multifunctional, shareware, such as Batch Picture Resizer... I provide a list of its capabilities: resizing photos, renaming files and overlaying watermarks, batch processing photos, converting formats. It can be downloaded from this link: https://yadi.sk/d/g6eDFTyzAMob6
- And very simple, they include PicSizer.
But as always, looking in the distance, we forget, or do not know, that lies very close. After all, manipulations can be performed using standard tools of the operating system itself.
Let's admit that reduce photo size in Windows 7 you need:
- Hover the cursor over the object, right-click and select: Open by viewing images and faxes and click Paint.
- Further: Menu-Properties and a plate pops up, and in the lower right corner there is a slider for changes. We use the slider or set the size and click OK.
- After that “click "Save as…, here on the right are the possible options for changing the format of the picture.
Changing the image in Photoshop
But today, using Photoshop (Photoshop) I want to show you how to resize an image without changing the quality... Well, along the way, and the format, at your discretion. I will make a reservation right away that in order to obtain a high-quality image, it is necessary to make a step-by-step reduction of the image. That is, we will do it in two times.
Open the program, load the picture- File-Open.

After that we "click" -Image- Image size as shown in the screenshot above. When the change plate appears (screenshot below), first do the resizing to half the original format.

And in order not to lose in quality, we select below: Bicubic Sharper (Best for Reducing).
And as always, we confirm the action by pressing the OK button. After doing all the steps again and getting the required size of the picture, you can improve its sharpness so that it looks clearer and sharper on different browsers. We do as in the screenshot below, following the path - Filter-Sharpening- and choose which one we want.

I think that the information that I have provided you will be useful to you... After all, the question all bloggers are interested in how to reduce the size of a picture without losing quality. Because loading images on a web page takes the lion's share of the time allotted for this action. And as you know, it is important for the promotion of your resource.
At this point, I ran out of information on this topic. And to you, dear visitors, a small request, when leaving to press one of the buttons of social networks. This way you express your gratitude for my (your) work. thanks.
Yes, sorry, I also completely forgot to remind you that there is an interesting article on the site on the topic of making money on questionnaires, but
17.11.2014 27.01.2018
After completing this tutorial, you will learn in Photoshop:
- Reduce photo size
- Reduce the size of an individual object in the photo
- Transform photos and objects - twist, shrink, flip and reflect.
In this article I will tell you how to use Photoshop to reduce a picture, image, text, layer, a single object - everything that can be reduced in Photoshop. Photoshop allows you to quickly and conveniently reduce objects without losing image quality.
After all, it often happens that it is necessary to reduce a photo or picture before sending it by mail or uploading it to any website in order to show it to people. The huge original dimensions of the photos are not suitable and therefore Photoshop comes to the rescue to reduce the photo.
I will be using Photoshop CS 6 to perform the reduction operations.
How to reduce a photo
First, open the photo you want in Photoshop. Click on CTRL + O or File - Open (File - Open) and select the desired photo on disk.
The photo opened in Photoshop:
Photo of huge size 1600x1200 pixels. For example, we need 600x450 or so.
There is a way to reduce the photo proportionally, for this go to the menu Image - Image size (Image - Image size). In English Photoshop, this window looks like this:
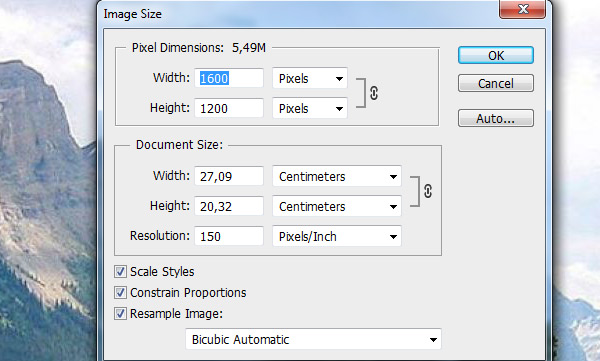
We see values Width and Height (Width and Height), make sure the values are shown in pixels, but if you need you can look and change in centimeters and other measurements.
Enter width instead of 1600 and value 600 and you will see the height automatically adjust to 450 so that the resizing of the photo is proportional.
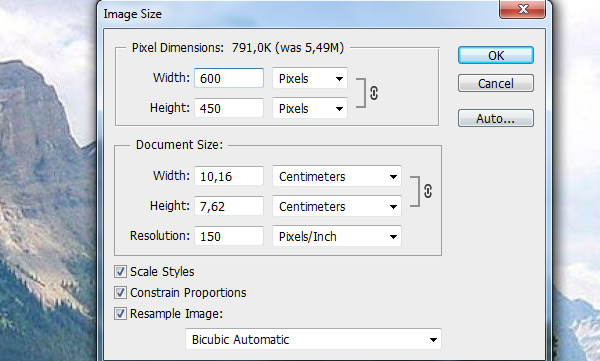
Click OK and that's it! Our photo has shrunk:

Select the desired area and reduce
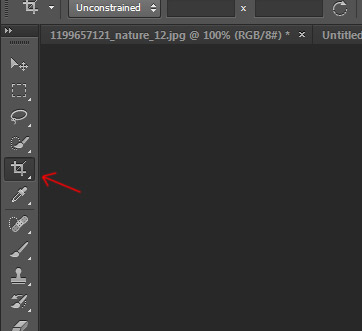
But what if we do not need the whole photograph, but part of it? And we need to reduce this part, but not proportionally and in our opinion. For this, the function that we used before will not work.
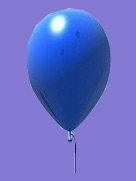
Let's say we have such a picture with balloons and we opened it in Photoshop:

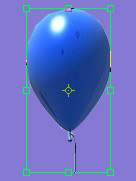
But we don't need all the balls, we only need the blue one and we need to reduce it a little. To do this, select the tool Crop Tool(in the Russian version it is called Cropping) - with the help of it we can select the area of the image we need and crop it. Namely, the blue ball.
The tool itself on the panel looks like this:
Select the desired area:
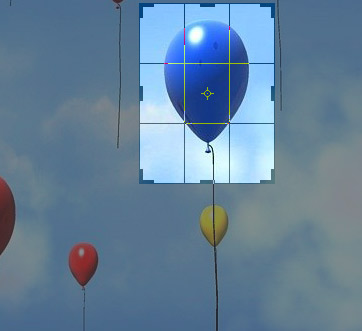
Click on Enter on the keyboard - we will cut out this ball and remove the rest of the image.

Fine. Now we need to make the ball smaller. You can use the function as in the previous step. Or you can do it differently, while maintaining the image size. First, let's get rid of the background, make it a solid color. To do this, we need to select the ball, cut it out and place it on a separate layer. And on another layer we will make the background.
With a tool Polygonal Lasso Tool select the ball.

Click on CTRL + X to cut and copy it. After you click it will disappear, and there will be a transparent background behind it. Press CTRL + V immediately to insert a ball. Insert the ball slightly to the side of the original place. And it will be inserted immediately automatically on a new layer:


Now we will quickly make another background so that the ball does not seem to be cut out. And the old background does not fit because there is a cut out place in it because of the ball, and since we will reduce the ball even further, it will be even larger.
Create a new layer under the balloon and fill it with any color:
Of course, the ball does not look neat, but the purpose of this article is to tell you how to reduce it in Photoshop, not cut it out. Read about how to cut in Photoshop and in what ways in our other article.
Now let's make the ball smaller. Select the balloon layer and click CTRL + T(or menu Edit - Transform - Scale(Editing - Transform - Scale)) and you will see how a frame appears around the ball to reduce:
Now drag the squares to scale the ball. You can resize the image as you like, while maintaining the overall size of the document in Photoshop. You are shrinking a separate object that is on a separate layer, not the entire image document.

You can apply all these methods as you need, in any order. Knowing these techniques, you can cope with any task in which you need to reduce something in Photoshop.
Hello friends!
This is another material on working with images.
In it, you will learn how to reduce the size of an image without losing quality using Paint, Photoshop and an online service.
Moreover, you will learn how to do it in two aspects. After all, the size of the image has 2 meanings:
- Size in pixels, that is, the height and width of the picture;
- Size in kilobytes, that is, the weight of the image on a computer or other medium.
This material is suitable for everyone who is interested in reducing the size of their images, photographs, and so on. And it will be very useful for site owners, since it is categorically not recommended to place large-sized and heavy pictures in their materials.
Let's start with a little consideration of the need for all of the actions discussed below.
With regards to changing the height and width of the picture, there are many options: you need the required size for printing, for posting on the site, to reduce the same weight of the picture, since when the size is reduced, it decreases.
Weight reduction may be required to save weight on the media (hard drive, flash drive, etc.), to quickly load images on the site, and so on.
There are actually a huge number of options. In order not to torment, we begin to practice.
By tradition, I give a detailed video lesson in which I showed everything clearly.
Now for those who like text instructions.
Resizing in Paint
To change the dimensions of the height and width, I do not recommend using any online services, since this can be done using a standard set of programs and even the standard editor of the Windows operating system - Paint.
We open the image in Paint and on the "Home" tab there is an item "Resize".
By clicking on it, we can change the size without losing quality (if we reduce it) and without losing proportion. To do this, be sure to activate the setting to maintain proportions.

By changing the horizontal and vertical dimensions, you adjust the width and height of the image accordingly. Select the necessary parameters, click on the "Ok" button, and then save the resulting file to your computer.

This is the end of the image resizing in Paint.
By the way, changing the width and height parameters also affects the weight of the image. Therefore, take note of this.
Now let's look at the option using Photoshop.
Resizing in Photoshop
Open our image in the program and move to the item "Image - Image size".

In the next window, the change occurs in the same way as in Paint. Make sure that there is a check-box to maintain the proportions and set the necessary parameters for the height or width.

After clicking on the "Ok" button, the size parameters will be applied and you can save the file.

These methods are quite enough for resizing the height and width of images.
Now we will look at 2 ways how you can reduce the weight of images.
But before that I want to note that you already know one way. If you do not need images that are oversized, then you can reduce their height and width, thereby reducing the weight by several, or even tens of times.
Reduce weight in Photoshop
This method will be very useful for site owners, since the less the page weighs, the faster it loads. And this is very important. The method is also suitable for any needs.
After opening the image in Photoshop, you need to immediately save it, but not usually, but for the web and devices.

In the next window, you need to set the image quality parameters:
- The quality is high (60-70). Adjust the value to fit your needs;
- The format is jpeg. If you need to preserve transparent areas in the image, then you need the png format;
- Also set the setting to "Progressive".

You can also resize right in this window, and not separately through the item "Image - image size", as I showed it in the paragraph earlier. It is very convenient.
After setting the parameters, save the settings (see the screenshot above).
Only in this way I was able to reduce the weight of the image from 116 kb to 75 kb without changing the dimensions (the height and width remained the same).
In this way, you can play with the quality value. It all depends on why you need to reduce the weight of the image. It is quite possible that you can set the parameter and smaller, making the weight even less.
Now let's look at how to reduce weight using an online service.
Online service for optimization
This method is very useful already for reduced images. For example, if I have already reduced the picture earlier in Photoshop, then with the service we can finish the size completely.
The service has a name krakin.io... Let's go to it. I gave the link directly to the image selection page.
On this page, you first need to decide on the compression ratio of the image. There are 2 parameters responsible for this:
- Lossy - strong compression (default);
- Lossless - less compression.

You can only determine this parameter by testing them. Therefore, try to compress the picture this way and that, and then select the desired option.

The image is immediately optimized and we will see a report on the work done under the area for selecting a file.
It can be seen that the original file size was 77 kb, and after optimization it became 59 kb. It also shows how much was compressed in kilobytes (18 kb) and in percentage (23.8%).
To save a compressed image, you need to click on the "Download this file" button in the last column "Status". We will be transferred to a new tab, where the final image will open so that we can evaluate it. To save, you need to right-click on the image and select "Save Image As".

If you watched the video at the beginning of the article, where I clearly showed the process and all the nuances of this article, then you know that only these methods can reduce an image from 360 kb to 40 kb. And this is not the limit.
This material has come to an end. All the methods described in the article, as an ordinary Internet user, you will be with your head.
In the comments below, I will be interested to know some of your ways to reduce the weight of images. Maybe there is something simpler, but effective. Therefore, I am waiting for you below near the comment form.
Best regards, Konstantin Khmelev!


