On the tab "Home", Editing panel when expanding all tools of the panel, there is Hatch Edit button... After selecting it, you need to specify the hatch for editing by clicking LMB.
But in AutoCAD it is more convenient to just select the hatch, and the Hatch Editor tab will automatically appear on the ribbon. Here you can change the parameters. If it is more convenient to edit from the dialog box, then click on the ribbon on the arrow in the lower left corner of the "Options" tab.
Now you have learned how to hatch closed areas or some objects in AutoCAD. And then you can also edit existing hatches in AutoCAD.
How to add shading. (How to load a hatch)
AutoCAD hatch files have the .pat extension. You can load existing hatch files into AutoCAD. For this:
1. Add files with the .pat extension to the Support folder. The path is something like this: C: \ Program files \ AutoCAD20XX \ Support.
2. Now start the program. And call the Hatch and Gradient dialog box.
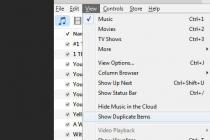
3. Click the Hatch Patterns Palette button. And then the Custom tab. (Shown in the picture below)
Trim command.
When constructing, very often fragments of lines, arcs, etc. are found that have "crawled" beyond the boundaries of the objects. To trim such fragments in AutoCAD, use the "Trim" command. Lines, rectangles, splines, rays, etc. can also occur as clipping elements.
Trimming in AutoCAD is carried out by specifying the so-called cutting edge and a fragment of the object, which, after crossing this edge, must be removed.
As always, you can call the command in several ways:
1. On tab "Home" → panel "Editing".
2. By entering a keyword "OBR" and then pressing "Enter".

First you need to select the cutting edge (or edges), and then you will have to select the objects to trim.
For example, let's say you need to cut off a part of a line segment that has gone beyond the rectangle. In this case, the cutting edge will be the rectangle itself, and the trimmed object will be the part of the segment outside the rectangle. I presented the whole process in the figure.


There can be many cutting edges, as well as trimmed objects. For example, I sometimes select all or most objects as cutting edges. And then I click LMB on those elements that I want to crop. Immediately after specifying an object, it is trimmed. You can end trimming by pressing the "Enter" or "Esc" key. Parts of the cutting edges themselves can also be trimmed objects.


By the way, if, when selecting cropped objects, the selection is made with the “Shift” key pressed, then the objects will not be cropped, but lengthened.
When choosing objects to trim, you can use the following options:
✗ Line and Secramka- allow you to select clipped objects using a temporary broken line and a cutting frame.


✗ Edge- enables / disables the mode of continuation of the edge to an imaginary intersection.
When this mode is enabled, trimming in AutoCAD will be performed even in cases when the trimmed object does not explicitly intersect with the cutting edge. Whether this mode is enabled or not can be seen from the command line prompt when calling the "Trim" command in AutoCAD.
If it says "Edges = No Continue", it means that the mode is turned off. You can enable it before selecting the trimmed objects by entering the letter "C" in the command line (or simply from the keyboard).
✗ Cancel- an option that allows you to cancel the trimming of the last object without canceling the entire command execution.
✗ delete- this option allows you to delete any objects without interrupting the execution of the trim command. After you use any option, you will again return to specifying the trimmed objects.
The concept of "Layers" and work with them.
Very often in the AutoCAD system it is necessary to change the color of the object, thickness and type of lines. True, constantly changing the parameters of a line when drawing one object or another is not the most productive exercise.
If you had a task to cut off a part of a block or array, cut a block or an array by a certain branch, then you probably already noticed that the command Trim (_TRIM) useless in this case.
At least until the block or array is blown up. How to cope with this task without breaking up blocks and breaking arrays will be discussed in this article.
Looking ahead, I will say that the team will come to our aid Crop (_CLIP)... And to make it more interesting to read, I will not only describe the procedure for working with the team, but also show specific examples its application.
Example # 1. Cropping a block
There is a block of a truck with cargo, which partially drove into the hangar. It is required to hide the part of the block that is inside the hangar. Blowing up a block and manually cutting off everything inside the building is a rather painstaking business, and then it will be very inconvenient to work with such an object.
Select the block. Go to the tab "Insert" tapes, panel "Link" and choose a team Crop (_CLIP)

V command line the request will be displayed:
Please note that the option <Новый> is selected as the default (this is indicated by the triangular brackets), it suits us, so just click SPACE or ENTER.
Next, we will be asked what exactly we want to use as a clipping path - an existing polyline, polygonal or rectangular area. The option will suit us Rectangular- note, it is suggested as a default, so we just click again SPACE or ENTER.
Then we need to specify the first corner of the block area that we want to save, and then the second corner - this is done two consecutive clicks of the left mouse button (LMB):

This is the result we get:

The clipping was successful, but we can see the clipping path, which in this case we do not need. To control clipping contours, you need to select one of three options for displaying contours in the ribbon:

Let's select an item Hide outlines... Now the result really suits us:

I draw your attention to the fact that when a block is selected, the contours will be highlighted, and moreover, they are interactive - i.e. you can change them by moving the corresponding markers and the clipping result will change, which is quite convenient:

Example No. 2. Trimming the array with tiles along the contour of the room
V this example we will consider a very useful case for those who are engaged in interior design, and in particular, the layout of tiles in AutoCAD. The description will be less detailed as We have already covered the basics in the first example, but here I will focus only on those steps that will be different.
So, we have a bathroom wall, in which the tiles are laid out using a Rectangular array:

As you can see, the array extends beyond the wall, and moreover, you need to make a cut for the door. We do not want to explode the array and cut it off, and it will not work, because the pattern uses hatching.
The beginning will be as in example # 1 - select the array, call the command Undercut, click SPACE or ENTER to create New contour trimming. But this time we select the option Polygonal:
Now we need with a few clicks sequentially indicate all the points of our contour and after specifying the last point, press SPACE or ENTER:

A total of 8 points turned out, and the cropping result is presented below:

Agree, it's very simple and convenient.
Example No. 3. Creating your own hatching (texture) from a block
We have a detail like this:

The part is made of a bar and this view is the end of this very bar. We want to apply a texture to the end that would resemble tree rings and make the detail easier to visualize. To do this, create a block of concentric circles, something like this.
How to make shading in AutoCAD? This function often used when designing drawings in AutoCAD. In the drawings, cuts, sections, etc. are hatched.
In AutoCAD, you can shade any enclosed area with a specific pattern. In Russia graphic symbols materials in sections and cuts are regulated by GOST 2.306 - 68.
How to shade an area in AutoCAD / AutoCAD. Type and type of hatching
To create hatching in AutoCAD, select Home tab → Draw panel.
To begin with, let's set the hatch parameters in AutoCAD - these are the type, sample, transparency, color, etc. This is done using a tape. A temporary Hatch Creation context-sensitive tab.
To shade an area, click inside it with the mouse, and it will be shaded. You can select an object instead of picking a path. To do this, first call option "Select object"(enter the letter B from the keyboard). Then select the object by clicking LMB.
If you do not click the mouse, but simply hover it over an object or some area, a preview of the shaded area will appear with the current shading settings in AutoCAD.

Hatching parameters in AutoCAD can be set in Hatch and Gradient dialog box... To do this, select the "Options" option, by typing the letter P. In AutoCAD 2013, you can select an option by clicking on it on the command line. This is a very convenient innovation.

How to set the hatch parameters in AutoCAD is up to you. It's just a matter of convenience.
The dialog box has two tabs - Hatching and Gradient. On each of the tabs, you can set the Autocad hatch or gradient parameters.
Consider the hatching tab.
Shading type
Standard means that you will use one of the standard hatch patterns, which you select on the next line.
From lines means that you can create your own hatch pattern based on the current linetype.
Custom shading AutoCAD - You will be able to use the hatch pattern you created earlier, saved in a .pat file.
Most often, the first option is selected and a standard hatch pattern is specified. In the "Structure" window you can see how the hatch we have selected in Autocad looks like.

A drop-down list for selecting a hatch pattern is inconvenient. The easiest way is to click on the button with the ellipsis [...] located next to it. This will open Hatch Patterns Palette Dialog Box where it is more convenient to choose a sample. To select, click on the hatch pattern and click OK.
Hatch color and background
There are two drop-down lists in which to set the color of the hatch lines and the background color.

The angle of inclination and scale of hatching in AutoCAD
All hatches, in the form in which they are selected, initially have a slope of zero. But sometimes you need to change it. For example, rotate a hatch with straight lines by 30 °. If you need Autocad hatching with lines at 45 °, then it is by default in the AutoCAD system.

The initial scale of the hatching is taken as 1. But often this does not suit you, since the hatching may be too dense or, on the contrary, too stretched. See an example of hatching at different scales in the figure.

The origin of the hatch
This option can be quite useful for those who are not comfortable with the default shaded option. It is necessary that the shading in AutoCAD starts from a certain point. To do this, select the option "Specified origin"... And then click on the button below and specify a new origin of the hatch directly in the drawing. For a better understanding, I attach a drawing.

Customization
Annotative... Indicates that the hatch is annotative. I have a video tutorial about the annotative property (annotative dimensions) in AutoCAD. Check it out and be sure to understand this concept. This property allows annotation to be automatically scaled to fit the paper size when printed or screened.
Associative. The checkbox is checked by default. An associative hatch or fill in AutoCAD is updated when its contour objects change.

Individual hatches... If you hatch several areas, the hatching in them is a single element. If you want to move one of the hatched objects along with its hatching, the hatching from other areas will also move. To prevent this from happening, tick this option in advance. And then the shading will only apply to its specific area.


Configuring the rest of the options is intuitive. It can be very convenient to use the "Copy properties" option... When you click on this button, you get into the model, where you can select the hatch already available in the drawing to take all the properties from it.
Hatching contours in AutoCAD
Add: Points of choice.
With a mouse click, we indicate a contour from existing objects that form a closed area around the specified point. NECESSARILY! The area must be closed. Otherwise AutoCAD will generate the "Unable to define closed loop" error.
Add: Select objects.
By clicking the mouse, select the object or objects that we want to shade. Here you need to make sure that the objects are closed.

Exclusion of islands.
Using this button you can exclude regions from the selection.
When you have finished selecting objects, press Enter and you will be returned to the Hatching tab. After all the parameters are set, click "OK". But before that, you can preview how the object will look with the applied hatching, and, if necessary, correct something. To do this, click on Sample button in the lower left corner of the window.
If during the preview you like how the hatching is applied, to agree with it, press the right mouse button or "Enter". If you don't like the preview and you decide to make corrections to the shading parameters, then click on "Esc". As a result, you will be returned to the Hatch and Gradient window, where you can make changes.
Additional hatch options in AutoCAD
By clicking round button with an arrow in the lower right corner of the "Hatching" tab, you will open the additional area of the tab, which contains additional hatch settings in AutoCAD. Also see our tutorials on other topics.
Sometimes, you need to indicate how to deal with objects that fall inside the shaded area: shade them too or not. Such areas are called islets. The settings in this part of the window are illustrated by pictures. Everything is clearly visible here. Just choose the option you want.
I also displayed the difference between the options in the figure.

Editing a hatch in AutoCAD
On the tab "Home", panel "Editing", when expanding all tools of the panel, there is Hatch Edit button... After selecting it, you need to specify the hatch for editing by clicking LMB.
But in AutoCAD it is more convenient to just select the hatch, and the Hatch Editor tab will automatically appear on the ribbon. Here you can change the parameters. If it is more convenient to edit from the dialog box, then click on the ribbon on the arrow in the lower left corner of the "Options" tab.
Now you have learned how to hatch closed areas or some objects in AutoCAD. And then you can also edit existing hatches in AutoCAD.
How to add shading to AutoCAD. (How to load a hatch)
AutoCAD hatch files have the .pat extension. You can load existing hatch files into AutoCAD. To know how to load hatches into AutoCAD, follow these steps:
1. Add files with the .pat extension to the Support folder. The path is something like this: C: \ Program files \ AutoCAD20XX \ Support.
2. Now start the program. And call the Hatch and Gradient dialog box.
3. Click the Hatch Patterns Palette button. And then the Custom tab. (Shown in the picture below)

Now you know how to make shading in AutoCAD. AutoCAD for beginners is simple and available only in our course!
Video courses on AutoCAD: