lk.budget.gov.ru/udu-webcenter- if you got to this page, then you tried to enter your personal account of the Electronic Budget, but could not do it.
Why? Let's try to answer the question.
1. First of all, we check if you also have the Jinn and Continent TLS programs installed (at the time of this writing, version 1.0.920.0 was installed). I advise you to immediately switch to

2. - The main reason why you could not enter the Electronic Budget when all the programs necessary for the operation are installed is not a configured browser (Mozilla Firefox, Internet Explorer, Google Chrome, Opera). Let's take a look at the example of popular browsers for working in DL.
Browser settings for working in the Electronic Budget for version 1.0.920.0
I advise you to set everything up to Internet Explorer!!!
a) Internet Explorer
1. Open web browser properties.
2. Go to the "Connections" tab.
3. Press the "Network Settings" button.
4. In the "Proxy server" section, set the fields Address: 127.0.0.1, Port: 8080.
5. Press the "OK" button.
6. Go to the "Security" tab.
7. Select the zone for the "Trusted sites" setting.
8. Press the button "Sites".
9. In the "Trusted sites" window, uncheck the box "All sites in this zone require server verification (https :)".
10. In the "Add the next node to the zone" field, set the value "http://lk.budget.gov.ru" and click the "Add" button.
11. In the "Trusted sites" window, click the "Close" button.
12. In the "Browser Properties" window, click the "OK" button.
b) Google Chrome
1. Open your web browser settings.
2. Go to the bottom of the settings window and activate the link "Show additional settings".
3. Click the "Change proxy server settings" button.
4. Repeat paragraphs 4-12 of section "a) Internet Explorer".
c) Mozilla Firefox
1. Open the "Tools" menu and select "Options".
2. Go to the "Additional" section on the "Network" tab.
3. In the "Connection" settings section, click the "Configure ..." button.
4. In the connection settings window that opens, set the value "Manual configuration of the proxy service".
5. Set the values of the HTTP proxy fields: 127.0.0.1; Port: 8080.
6. Press the "OK" button.
7. In the "Settings" window, click the "OK" button.
d) Opera
1. Open the "Settings \ General Settings" menu.
2. Go to the "Advanced" tab, select the "Network" section of the settings.
3. Click the "Proxy servers ..." button.
4. In the connection settings window that opens, set the "Configure proxy server manually" value.
5. For the HTTP protocol, set the values of the proxy-server fields: 127.0.0.1; Port: 8080.
6. Set the value "Use proxy server for all protocols".
The Electronic Budget (EB) system functions for the creation and storage of accounting documents, accounting, formation and placement of documents of government customers and the performance of some other functions. Read more about the system, as well as how to create a procurement plan in the Electronic Budget, in our material below.
Who generates procurement plans in the electronic budget
The subjects of the electronic budget system are:
- bodies of state power and local self-government;
- budgetary institutions;
- other legal entities that receive budget funds;
- governing bodies of state extra-budgetary funds;
- other participants in the budgetary process;
- customers under Law No. 223-FZ.
Who is involved in the formation of the procurement plan in the electronic budget:
- government customers acting on behalf of the Russian Federation;
- FSBI, FSUE, whose property belongs to the Russian Federation;
- federal state autonomous institutions, whose property belongs to the state;
- FGBU, FGAU, FGUP, which carry out purchases within the framework of the powers delegated to them by the state customer from the federal authorities, state corporations.
This is stated in clause 6 of the Rules for placing procurement plans in the EIS approved by the Government of the Russian Federation of October 29, 2015 No. 1168).
The following customers publish the procurement plan through the EIS interface or through regional or municipal information systems:
- government customers acting on behalf of a subject or a municipality;
- budgetary institutions created by a subject or a municipality);
- GUPs, whose property belongs to the subject of the Russian Federation;
- MUPs;
- autonomous institutions created by a constituent entity of the Russian Federation;
- budgetary, autonomous institutions created by a constituent entity of the Russian Federation, state unitary enterprises, whose property belongs to the constituent entities, municipal unitary enterprises that conduct purchases within the framework of the delegated powers of customers to conclude contracts on behalf of the constituent entities of the Russian Federation.
In addition, according to the order of the Ministry of Finance of the Russian Federation of December 29, 2014 No. 173n, all government customers are required to create data for maintaining the register of government contracts first in the electronic security system and only then transfer them to the Federal Treasury.
How to create a procurement plan for 2019 in an e-budget step by step
Let's analyze the formation of a procurement plan in an electronic budget step by step. To go to the desired section, in the main window, select the "Menu" tab, the "Procurement management" section and the "Purchase proposal (VU / BU)" subsection. You will be taken to the subsection “Procurement plans for AU / BU”. Go to the tab corresponding to the budget cycle with which the work will be carried out, then to the tab "Execution".
Open the procurement plan form and click the "Create new document" button. You need to fill in the tabs:
- Total information;
- positions of the public procurement plan;
- special government purchases;
- final data on the BCF;
- summary information on CWR;
- justification;
- approval sheet.
Form a procurement plan in the budget planning subsystem of the Electronic budget. To do this, log into your personal account on the budget.gov.ru website. First, create a purchase proposal and then create a plan. Read how to create and how to agree on a procurement plan in the Electronic Budget.
Some tabs will be filled in automatically, but some will have to be filled in manually. For example, the system will indicate the number, status, version of the plan itself, as well as the date of creation. But the planning period must be chosen. The tab with the data of the state customer is filled in by the program automatically, the information is taken from the register of organizations. You can only correct the address, phone number, email, OKPO and OKTMO.
You also need to attach documents. For example, a list of changes made to a previously published plan, or a scanned copy of the plan. To do this, click on one of the three buttons: "Add attachment", "Create link", "Make a scanned copy of the document and attach as an attachment."
How to make changes to the procurement plan in e-budget 2019
To change the position of the placed purchase plan, you need to go to the list form of the purchase plan positions and find the required position. To search, you can use the inclusion identifier (in the procurement plan), the date and time of placement in the EIS, etc.
After selecting a position, click on the "Make changes to the approved version" button. The system will generate a new version of the plan item with the "Draft" status. This will invalidate the earlier version. Next, select the required item of the procurement plan and click on the "Open document for editing" button. In the form that opens, make changes on the tabs "Basic information", "Amount of financial security", "Justification of purchases" and "Approval sheet". It is important to reflect the rationale for the change. Select a value from the lookup:
- "Change following the results of the decision taken by the public discussion of the procurement";
- “Other” - if any circumstances arose that could not be foreseen at the date of the plan's approval.
After filling in the fields, click on the "Save changes and close the window" button. Further, the changed position must be approved.
Attached files
- Instructions for making changes to the procurement plan and schedule schedule.pdf
- User Workstation Installation and Configuration Manual.doc
- GRBS user manual for the formation of a plan in the Electronic budget.docx
- PBS User Guide for Forming a Plan in the Electronic Budget.docx
Setting up an electronic budget workstation takes place in several stages, they are not complicated, but require care. We do everything according to the instructions for setting up an electronic budget. Briefly and to the point ...
Electronic budget workplace setup
Root certificate e-budget
Create a key folder in My Documents to store downloaded certificates in this folder:
On the site http://roskazna.ru/gis/udostoveryayushhij-centr/kornevye-sertifikaty/ in the GIS menu -> Certification center -> Root certificates, you need to download “ Root certificate (qualified) "(see figure), or if you received a USB flash drive with certificates, copy them from the Certificates folder.
Continent TLS VPN Certificate
The second certificate that needs to be downloaded is the Continent TLS VPN certificate, but I could not find it on the new roskazna site, so I put a link from my site. Download the Continent TLS VPN certificate to the key folder, it will be useful to us later when we configure the Continent TLS client program.
Install the downloaded Root Certificate (qualified) to work with an electronic budget.
In the START menu -> All programs -> CRYPTO-PRO -> run the Certificates program.
Go to Certificates as shown in the picture below:

Go to the Action menu - All tasks - Import, the Certificate Import Wizard window will appear - Next - Browse - Find the downloaded Root certificate (qualified) in our case, it is located in My Documents in the key folder

If everything is done correctly, then the root certificate of the CA of the Federal Treasury will appear in the certificates folder.

Installation "Continent TLS Client" for working with electronic budget
Continent_tls_client_1.0.920.0 can be found on the internet.
Unpack the downloaded archive, go to the CD folder and run ContinentTLSSetup.exe

From the item, click on the Continent TLS Client KC2 and start the installation.

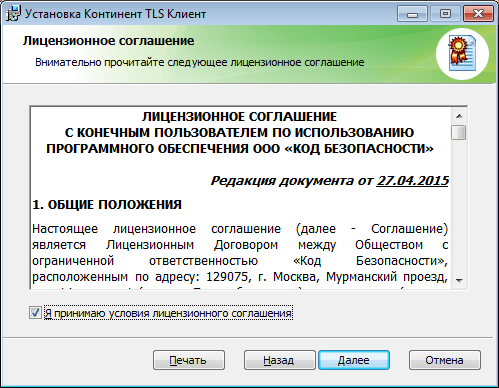
We accept the terms

In the destination folder, we leave it by default

In the Configurator Launch window, put a check mark on Launch Configurator after installation is complete.
During installation, the Service settings window will appear:

Address - specify lk.budget.gov.ru
Certificate - select the second certificate downloaded earlier in the key folder.

Click OK and complete the installation, Done.

When asked to restart the operating system, we answer No.
Installation of the electronic signature tool "Jinn-Client"
You can download the Jinn-Client program on the Internet.
Go to the Jinn-client - CD folder, run setup.exe
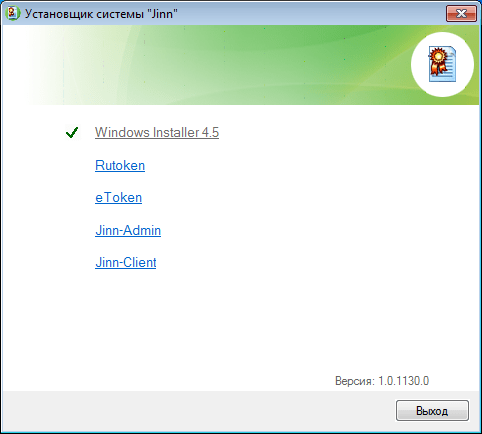
Click from the Jinn-Client list, the installation of the program starts
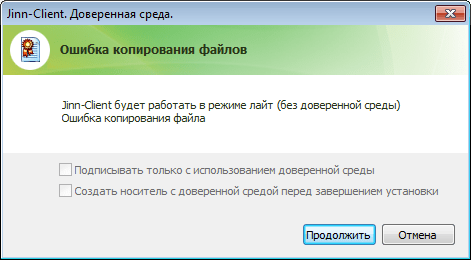
Ignore the error, click Continue, Next, accept the agreement and click Next.

Enter the issued license key
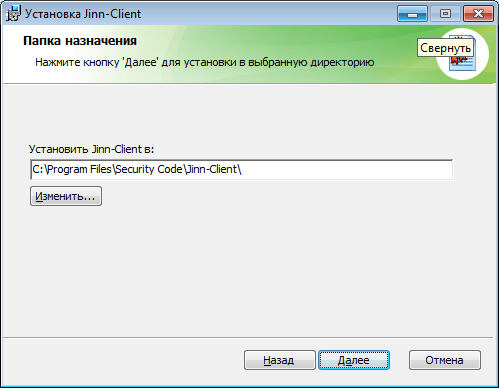
Install the program by default, click Next
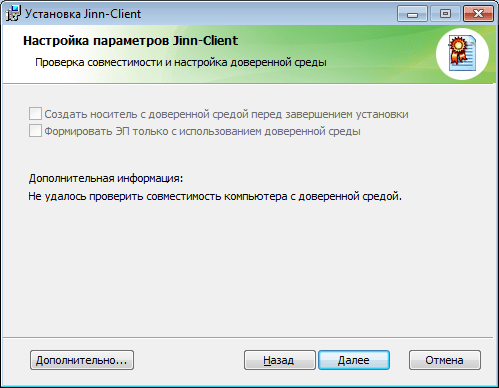
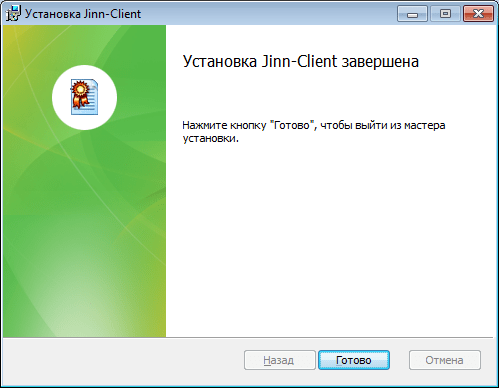
We are completing the installation, we answer the question about restarting the operating system No
Installation of the module for working with electronic signature "Cubesign"
If you need an archive with the program, write in the comments.
Run the cubesign.msi installation file


Configuring the Mozilla Firefox browser to work with the Electronic budget.
1. Open the "Tools" menu and select "Options".
2. Go to the "Additional" section on the "Network" tab
3. In the "Connection" settings section, click the "Configure ..." button.
4. In the opened connection parameters window, set the value
"Manual configuration of the proxy service".
5. Set the values of the HTTP proxy fields: 127.0.0.1; Port: 8080.
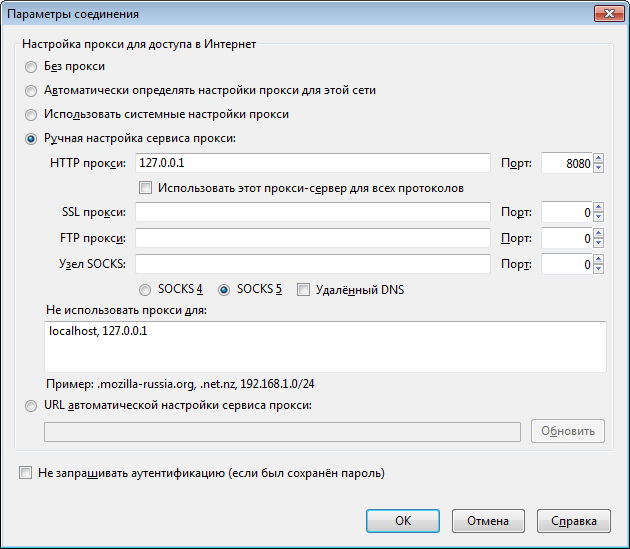
6. Press the "OK" button.
7. In the "Settings" window, click the "OK" button.
Login to the personal account of the Electronic Budget
A window will open with a choice of a certificate for entering the personal account of the Electronic Budget.

We select a certificate for entering the Personal Account of the Electronic Budget, if there is a password for the closed part of the certificate, write and click OK, after that the Personal Account of the Electronic Budget will open.

The state information system "Electronic Budget" was created by the Ministry of Finance of the Russian Federation. What is "Electronic budget", what is its structure and how to work with it, we will tell in the article.
What is "Electronic budget"
It is a state integrated information system. Its work is dedicated to the Resolution of the Government of the Russian Federation of June 30, 2015 No. 658. The system was created in order to ensure transparency, openness and accountability of the activities of state bodies, local governments, state and municipal institutions. With the help of "EP" is the management of state and municipal finances.
Among the tasks of the system are:
- ensuring the relationship between strategic and budget planning;
- posting information on financial results in the public domain;
- providing a link between the budgeting process and procurement planning.
The subjects of the system are:
- bodies of state power and local self-government;
- budgetary institutions;
- other legal entities that receive budget funds;
- governing bodies of state extra-budgetary funds;
- other participants in the budgetary process;
- customers under Law No. 223-FZ.
Structure
Let's analyze what subsystems the system consists of:
- budget planning;
- cost and income management;
- cash management;
- procurement management;
- management of public debt, financial and non-financial assets;
- pay management;
- financial control;
- maintaining regulatory reference information;
- accounting and reporting;
- information support;
- management of national projects.
Customers under 44-FZ place schedules using the Financial Management subsystem. Budgetary and autonomous institutions at the federal and municipal levels and other customers can form and publish schedules directly in the EIS. But the documents need to be duplicated in the electronic library and transferred to the treasury.
Form offers on the basis of enlarged purchase cards. To do this, enter the personal account of the Electronic Budget, the procurement management subsystem. Proposals must be approved and agreed with the main manager of budgetary funds - GRBS.
How to form a proposal and what to do if errors occur, read the recommendations.
What is "Electronic budget" and how to work with it
For the connection regulations, see the letter of the Ministry of Finance of the Russian Federation dated June 17, 2016 No. 21-03-04 / 35490. First of all, the organization should issue an order on the appointment of persons responsible for work in the "Electronic Budget" system and placement of documentation. Further, according to the instructions (which can be found on the website of the Ministry of Finance), prepare the workplace for work with GIIS "EB". Each employee must have an EDS key. If employees work in the EIS, new keys are not needed. After installing the drivers and programs, send an application for connection using a special unified form (letter from the Ministry of Finance No. 21-03-04 / 61291 dated 20.10.2016).
Attach to the application an order on the appointment of employees responsible for working in the system, files of EDS certificates, employee consent to the processing of personal data, as well as a power of attorney in the form approved by the Ministry of Finance (letter No. 21-03-04 / 35490 dated 17.06.2016). The application is submitted to the Territorial Body of the Federal Treasury.
Wait for the documents to be checked, install the cryptographic data protection tool at the workplace, register new performers in the UIS, install new certificates for EDS keys and define the roles of each employee in the system.
Authorized persons in the system are registered at the request of federal authorities or authorities of subjects.
Formation of a schedule in the "Electronic budget" system
Go to the section on planning and select the subsection "Procurement Schedule". Click on the "Create a new document" button. A form with the "Draft" status will open, containing the following tabs:
- "Basic information";
- "Positions of the procurement schedule";
- "Special purchases";
- "Results by KBK";
- "Results of the CWR";
- "The final indicators of the procurement schedule";
- "Justification of purchases";
- "Approval sheet";
- Errors and Warnings.
General information about the document, information about the customer, the official responsible for the formation of the schedule, about the manager, etc. is entered on the "Basic Information" tab. The general information indicates the planning period, the document number, the version number of the schedule, the number in the UIS, the date of creation, the date of approval.
On the tab "Items of the procurement schedule" we see a table with information about the items included in the procurement schedule. To add a new one, click on the button "Include procurement schedule items".
To get information about budget allocations in the Electronic Budget, log in and enter the procurement management subsystem. If the procurement proposals exceed the allocation limits, the system will issue a warning - it is necessary to make corrections to the consolidated purchases.
How to make procurement proposals in line with appropriations, read in the recommendation.
The "Special purchases" tab is filled in if the following types of purchases are available in the schedule:
- medicines (clause 7, part 2, article 83 44-FZ);
- TRU, not exceeding 100 thousand rubles. (Clause 4, Part 1, Article 93 44-FZ);
- TRU, not exceeding 400 thousand rubles. (Clause 5, Part 1, Article 93 44-FZ);
- maintenance and repair of non-residential premises (clause 23, part 1, article 93 44-FZ);
- business trips, cultural events (clause 26, part 1 of article 93 44-FZ);
- teaching services (clause 33, part 1 of article 93 44-FZ);
- guide services (clause 33, part 1, article 93 44-FZ);
- collection and processing of primary statistical data (clause 42, part 1 of article 93 44-FZ);
- services for granting the right to access information (clause 44, part 1 of article 93 44-FZ).
Next is the tab “Results by KBK”. It displays information about the amounts of items in the procurement schedule for the BCC. The fields and tables on the tab are filled in automatically and cannot be edited. The tab “CWR totals” is also filled in by the system automatically.
The tab "Schedule summary indicators" indicates:
- NMCK of all positions under contracts concluded with a single supplier, and special positions of the schedule (if there is no information, zeros are put down here and further);
- the amount of the NMC of contracts concluded following the request for quotations;
- the total amount of planned payments;
- the total amount of planned payments for purchases by requesting quotations;
- the total annual volume of purchases.
To send the version of the schedule to the EIS, select an entry in the "Approved" status and click on the "Send for control and placement in the EIS" button.
Attached files
- Instructions for connecting to the subsystem.doc
The federal information system "Electronic Budget" was developed by the Ministry of Finance for the purpose of conducting electronic document management. The authorities were the first to use the service.
Since 2017, the obligation to apply the "Electronic Budget" has been extended to budgetary institutions. In this article, you will learn how to configure e-budgeting - installation instructions are provided in accordance with regulatory requirements.
Setting up the Electronic Budget workplace is carried out in accordance with the requirements of the Ministry of Finance in
Workplace setup
To get started with the service, you need to know how to set up an electronic budget. This procedure is carried out in several stages. First of all, the instructions for installing an electronic budget require downloading a root certificate, then a workplace is configured to connect to the state GIIS subsystem. Next, let's take a closer look at how to set up an electronic budget.
How to set up an electronic budget - step-by-step instructions for setting up an automated workplace:
- Download CryptoPro and Jinn-client - they are issued to the user simultaneously with the license in a special Certification Center. You can download it via the Internet, but the license key number is obtained only through the Certification Center. More on installation below.
- Download the required root certificate - it is recommended to create a separate “key” folder in the “My Documents” folder to store the values of the certificates. Then the user needs to download a qualified certificate on the official website www.roskazna.ru in the "GIS" section, the "Certification center" subsection and then "Root certificates". After that, the root certificate of the qualified type is downloaded. If a USB flash drive was issued at the Certification Center, you must copy the data from the folder with certificates.
- Downloading another mandatory certificate Continent TLS VPN - this indicator was introduced for use recently, more precisely from June 25, 2018. The data is posted on the website www.roskazna.ru. The certificate is downloaded to the "key" folder and must be replaced when the value is planned to be changed. When configuring, the following information is indicated:
- address - lk.budget.gov.ru.
- port - 8080.
- the TLS root certificate is selected.
- it is allowed to use an external proxy if necessary. In some cases, disabling this feature will facilitate connectivity. Settings are made through Start, then All Programs and Security Code. Then you need to enter the TLS Continent and click Settings. More on installation below.
- We download the certificates of the head Certification Center and the CA of the FC - installation is carried out in the local storage or on the local computer.
- Install a qualified certificate (root) - the Certificates program is launched through Start, then CRYPTO-PRO is selected in the All programs folder and then Certificates. Then you need to select Import from the "key" folder in "My Documents". To do this, the previously downloaded Root Certificate is launched through the Import Wizard in the Browse tab. After clicking the Finish button, the installation takes place. If all actions are performed correctly, the Root certificate downloaded from the website is added to the Certificates folder.
- Install the TLS Continent - for this you need to find the previously downloaded archive and run the file with the Setup.exe extension. When the window with the Installation Wizard appears, the Next button is pressed, the terms of the license agreement are accepted (a check mark is placed). The folder for installation is selected by default, the launch of the configurator upon completion of the installation is marked with a tick. In the Service settings window, enter the port data - 8080, the address - lk.budget.gov.ru. In the Certificate section, select the second TLS certificate, then click OK to complete the installation. The system does not need to be rebooted.
- We set the signature Jinn-Client - The program is available for download on the Internet. After downloading the software, the setup.exe file is launched and the Jinn-Client installation is selected. During the copying process, an error may pop up, you do not need to pay attention to it. The license key number is issued at the Certification Center and entered in the appropriate field. Then the software is installed by default and the Finish button is clicked. Restarting your computer is optional.
- Install the KUB module - required by users for (electronic digital signature). The program is called Cubesign and is launched via the cubesign.msi file. Acceptance of the license agreement is also required (by checking the box). The path is specified by default, installation is performed by clicking Next.
- Then the browser is configured to work with the e-budget. When using Mozilla Firefox, in the Tools menu, select the Settings Section, then the Advanced subsection and the Network tab. Then you need to click the Configure button in the Connection section and set the Manual proxy service setting value. The field values are entered as follows: port - 8080, HTTP proxy - 127.0.0.1. The same steps are performed when using the Internet Explorer browser through the Connections tab. Additionally, you must add the site address http://lk.budget.gov.ru to trusted sites through the Security tab (Trusted sites section, Sites subsection). In general, the algorithm is also relevant for the Google Chrome and Opera browsers.
Login to your personal account
After the user has completed all the steps for downloading and installing programs, you can start working with the Electronic Budget. To open access to your personal account, you need to log into your Internet browser. Let's consider the procedure for the Mozilla Firefox browser:
- Launch your browser.
- Open the link http://lk.budget.gov.ru/udu-webcenter.
- In the window that appears to select a certificate, first select the store, and then the certificate itself.
- If necessary, specify a password value for the private part and click OK.
- If all the information is entered correctly, the Personal Account window will open.
- The system is ready for operation - all actions are performed through the corresponding sections and subsections of the Menu.
- To contact the support service, call tel. 8-800-222-27-77.
Note!
The EDS signature for the electronic budget is issued only at the Certification Center. You can download programs for setting the budget yourself, but the signature is assigned to the user individually.


