Today we will tell you about how to replace the display module on the iPhone 5 at home. In this article, we tried to take into account all the pitfalls that are not mentioned in various training videos found on the Internet. First, we would like to draw your attention to the fact that you will need perseverance and patience to make the replacement yourself.
The second point, and probably the most important one, is that all iPhone parts are very fragile, you need to be especially careful when handling flexible cables. Do everything carefully - one awkward movement can ruin the whole phone.
How to change glass on iPhone 5: preparation
You will need:
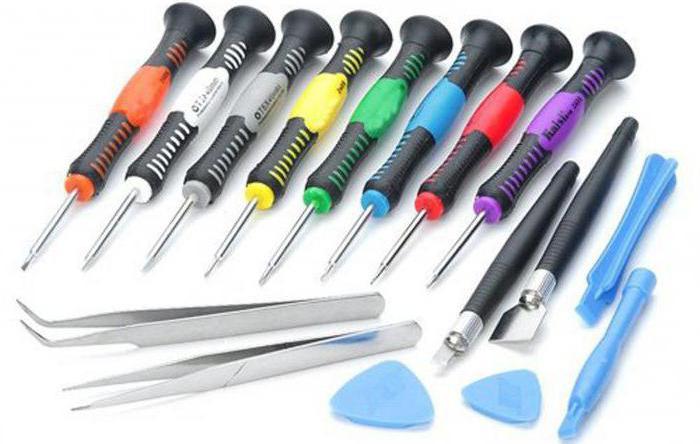
- Screwdriver 0.8mm Pentalobe
- Phillips screwdriver 0.8mm
- Metal spatula or minus screwdriver (for prying off the display)
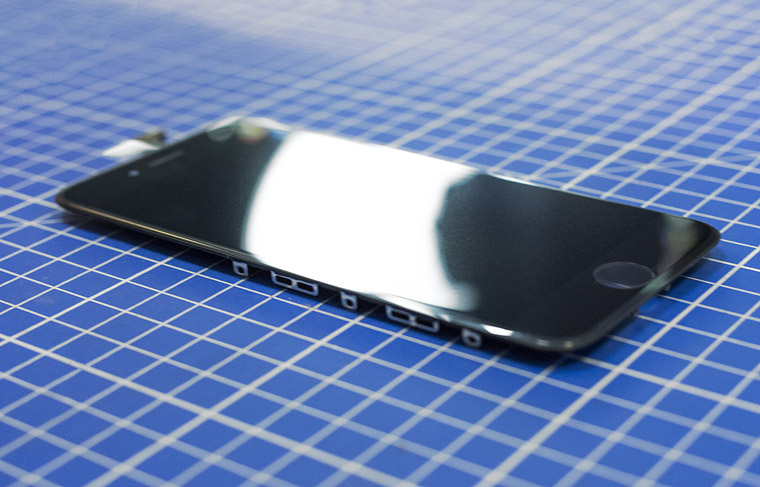
- New glass assembly with module
The first thing we encountered when replacing glass is that it is quite difficult to find the necessary screwdrivers. The screws used in the construction of the iPhone are very small - 0.8mm.
We could not find screwdrivers of such a small size in any of the well-known hardware stores. To get such a screwdriver, you need to take a ride through specialized stores, for example, in St. Petersburg a set of screwdrivers for iPhone repair can be found in the Profi store, at the address: Stolyarny Lane, 7. The cost of such a set is 350 rubles.
Screwdriver set and other accessories
A high-quality display can be bought, for example, at the Green Spark store, at the address: st. Sadovaya, d.28, bldg. 8 (St. Petersburg). The cost of the display ranges from 2000 to 3000 rubles.
Be sure to turn off the phone before replacing the module so that a short circuit does not occur.
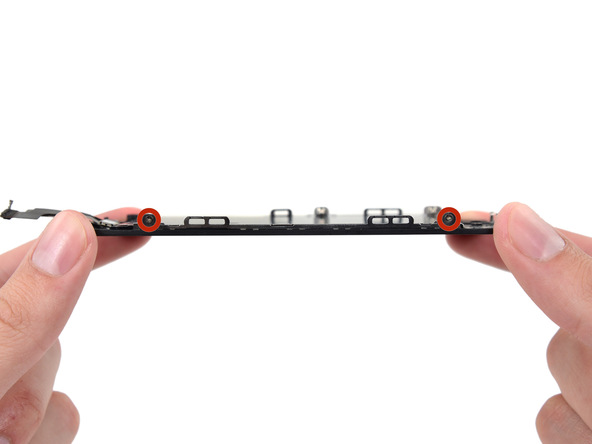
Step 1: unscrew the two screws from the bottom of the device:
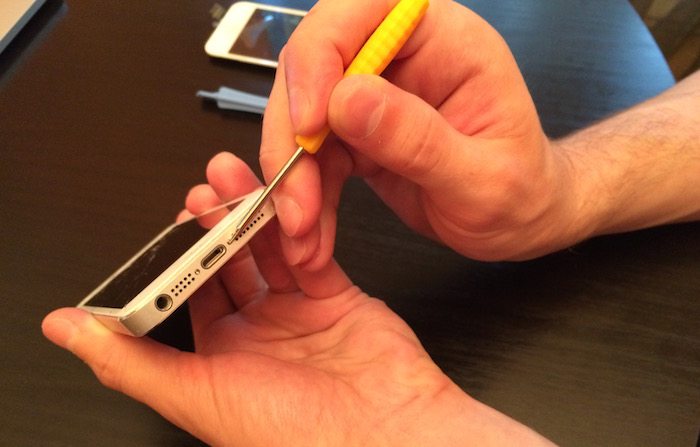
To do this, we need a Pentalobe 0.8mm screwdriver
Please note that all the screws that you will meet during the repair are different; we recommend that you remember the ownership of the screws. All parts are very small and fragile, so for your convenience, clear the table, turn on good light and use, if possible, a multi-compartment box so as not to lose the screws.
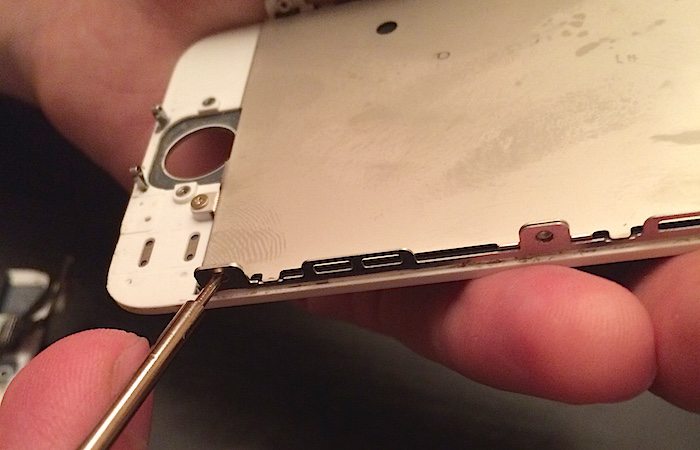
Step 2: pry off the iPhone display and open the device:
This must be done carefully so as not to damage the external and internal parts of the phone.
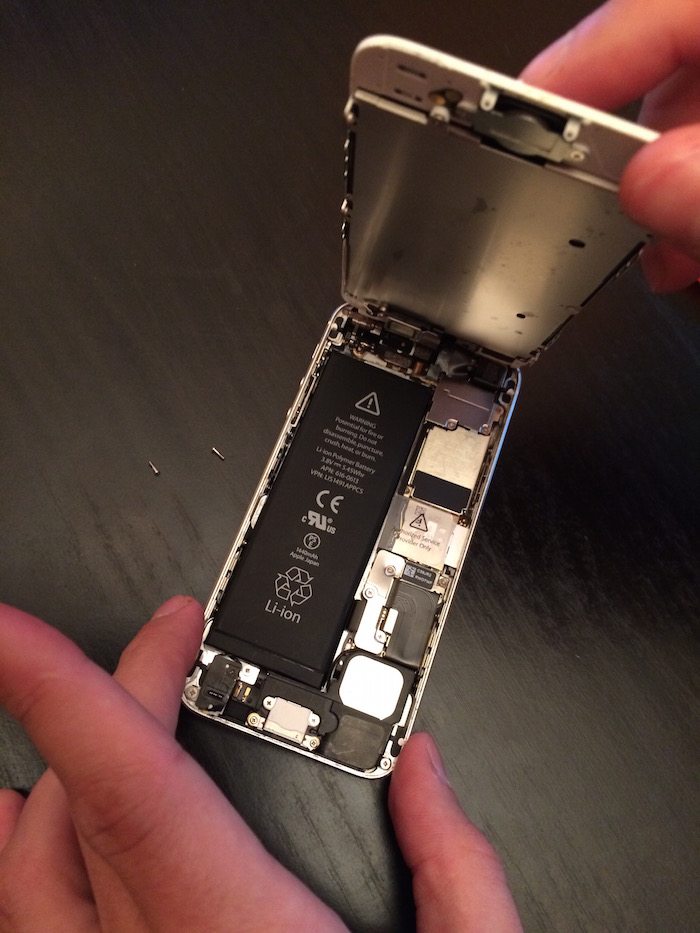
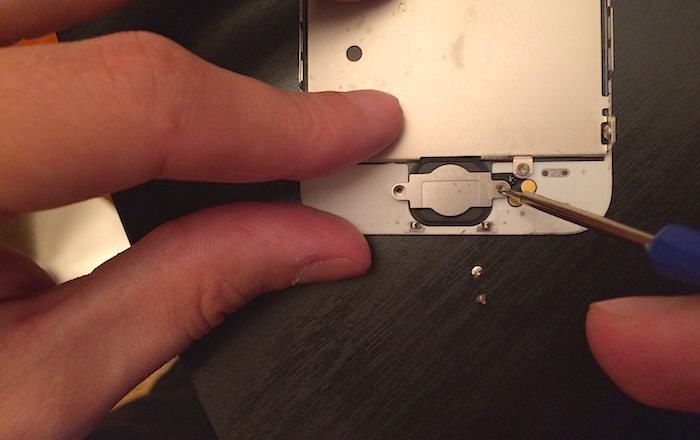
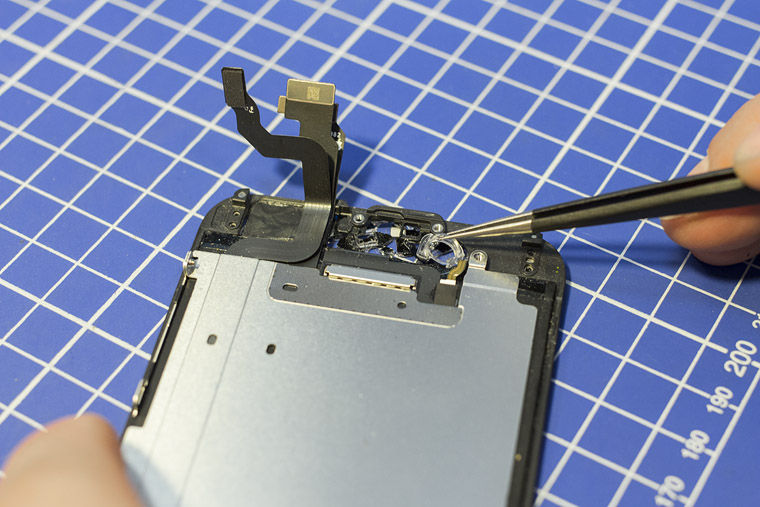
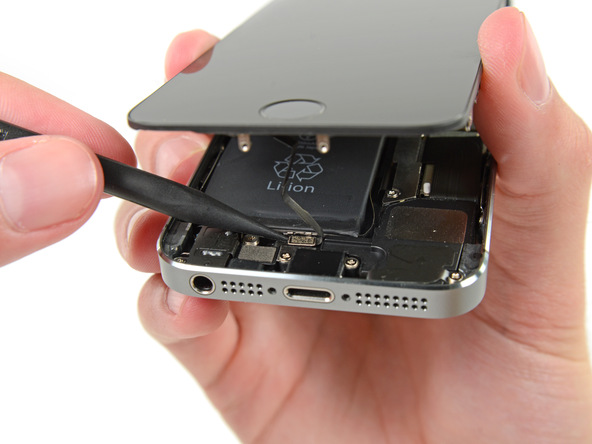
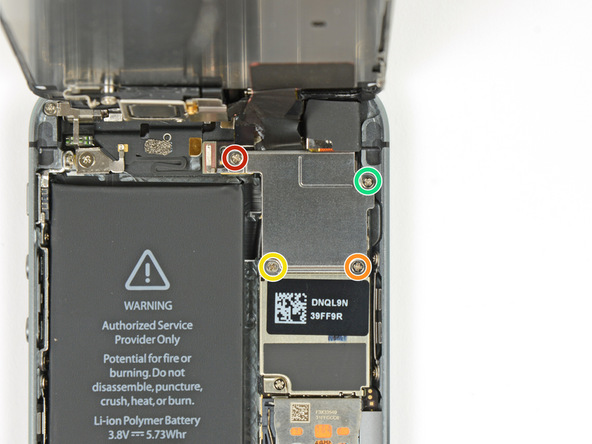
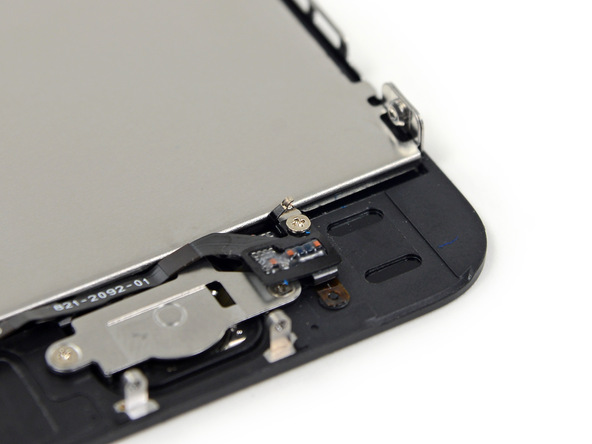
Step 3: unscrew the metal protection that holds the contacts of the loops, disconnect the loops:
![]()
Here we already need another screwdriver - a Phillips, 0.8mm. The protection (pressure screen) is held back by three screws, one of which is slightly longer than the other two. After we remove the protection, you will need to disconnect the three connectors in the following order: right, bottom and top. Disconnecting them is simple: you need to pry off each cable with a screwdriver.
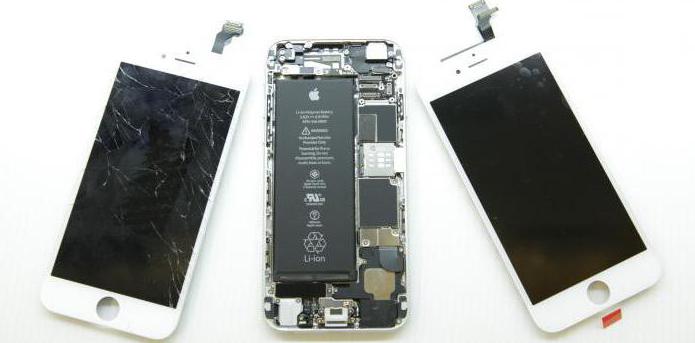
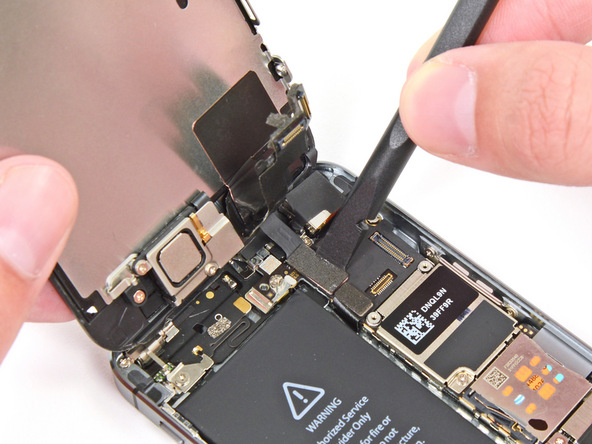
Please note that the purchased module has two cables (touch screen and screen), the third cable is a cable from the front camera, it is in the old module:
Comparison of two modules. Old on top, new on bottom
Step 4: connect the new module with the two cables it contains to the corresponding connectors:
Be careful when disassembling the phone, and make sure that the cables are connected to the appropriate connectors correctly. After connecting the display, activate the phone by pressing the lock button, then check the operation of the display. Press actively on the screen and make sure that the display responds to pressure at any point. Please note that we are doing this for a module test.
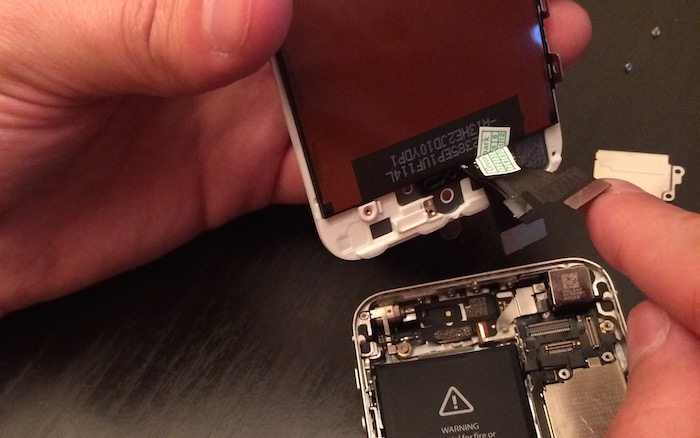
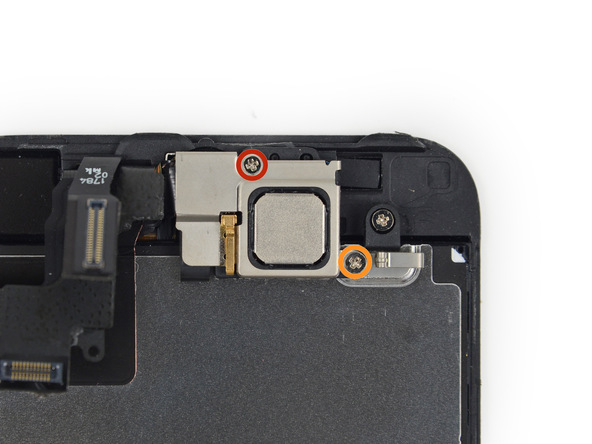
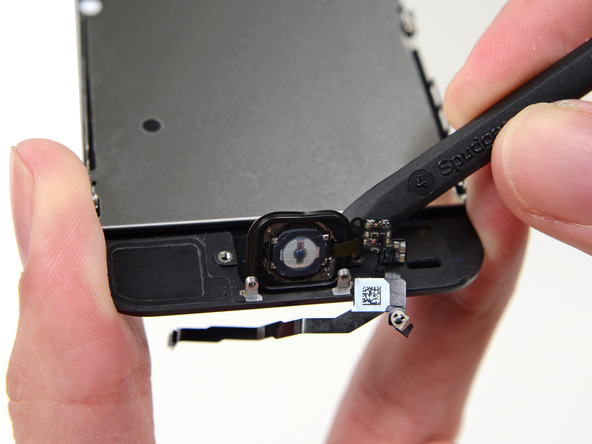
We transfer the missing parts from the old module to the new one:
→ Display modules come in different configurations, for example, the Home button may already be present in the new module. In our module home buttons did not have.
In this case, we will transfer the Home button, camera and metal base. After you put the button, immediately check that it works and you feel the usual click. The button is transferred with its own mini cable, which is pry off with a screwdriver.
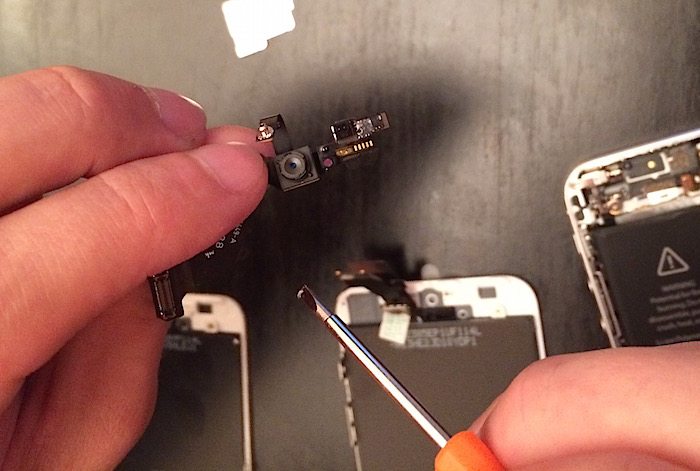
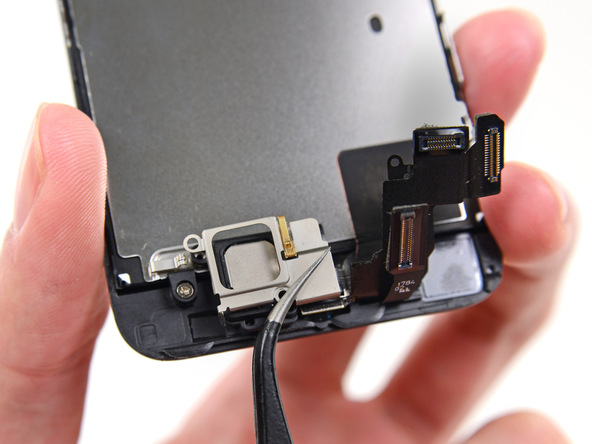
This is the inner chamber, the third loop
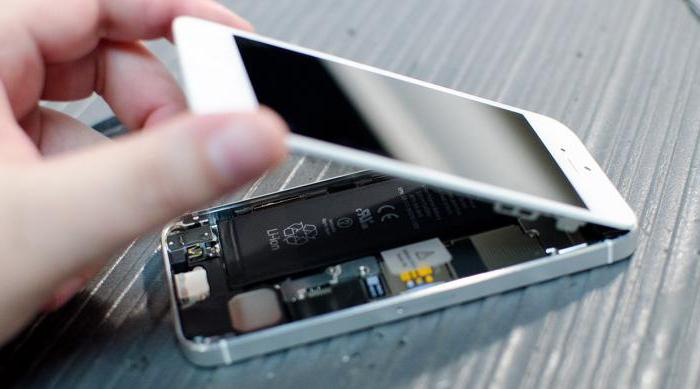
Then we just collect everything, as it was on the old module. When we have assembled the module, we connect it to the phone now with three cables, according to the principle, as we did earlier, when testing the screen. Then we put back the protective metal screen and carefully lower the display module, securing it from top to bottom.
Step 5: final and easiest:
Tighten the bottom two screws using a pentalon screwdriver. That's all!
→ Summary: In our opinion, this procedure turned out to be more complicated than expected. It was necessary to show great accuracy and attention to detail, spend time looking for the necessary tools and buying a display. If you are an experimenter and you like painstaking work, then change the module yourself, the process will give you pleasure.
If you want to spend a minimum of effort, then go to the service, and they will do everything for you! It remains only to decide who you are in this case. We hope that this article was useful, we wish you victories!
Found a typo? Select a piece of text and send it by pressing Ctrl+Enter. If you liked this material, share with your friends.
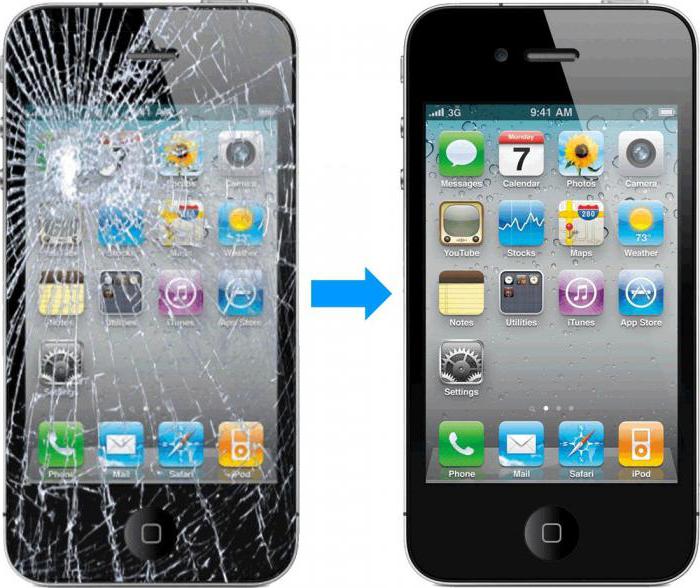
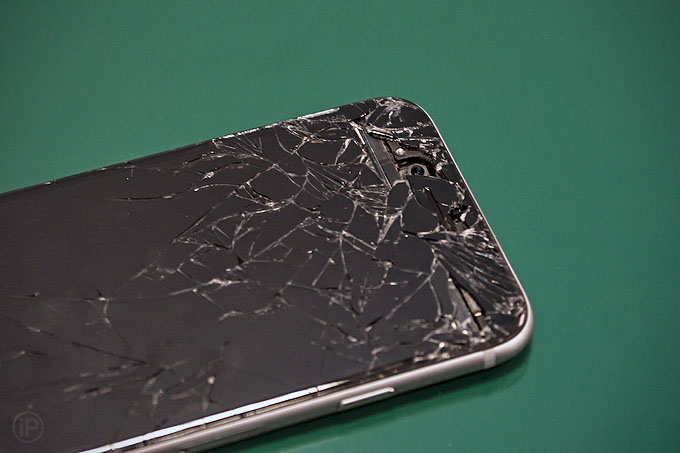
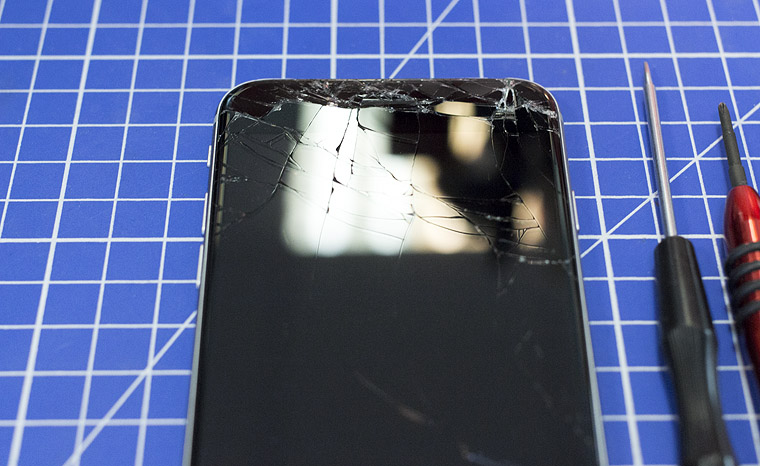
When dropped from a great height, the glass of the iPhone can not only be scratched, but even broken. However, few people know that in this case it is possible to repair the phone at home, because in a specialized service you will have to pay a rather large amount for this.
How is iPhone 5 glass replaced?
The first thing to do is to remove the fragments that remain in the phone. If the glass cracked badly and turned into a network of small pieces, then in order to remove them, you should use a hair dryer. Under a stream of hot air, all fragments are removed simply and easily. However, here you need to carefully monitor the temperature - otherwise the phone may "fry".
After all the remnants of the glass are removed, you need to get rid of the glue. To do this, you can use the simplest solvent and a cotton swab, which you need to moisten with this solvent and wipe off all the glue. But, again, the most important thing here is not to overdo it with liquid and make sure that it does not flow into all the cracks of the phone.
But there is a second way to install a broken screen. The first thing to do is unscrew all the screws that are on the phone and remove the screen base. After that, you need to find three loops under the screen. Two of them can be turned off with a thin plastic stick, while the third cable can be pushed out of the slot by pulling the screen in the opposite direction.
After the phone is disassembled into two parts, it is necessary to disassemble the part on which the screen is attached and change it to a new one. Here you need to unscrew the 6 bolts that hold the display and screen. When the bolts are unscrewed, the glass can be easily removed. If new glass was purchased with a frame, then it can be installed already at this stage of repair.
If only glass was purchased, then the old one must be separated from the frame. Here, again, you can use a hair dryer, and after the glass heats up, you only need to pry it off and separate it from the frame, and install a new one in the frame.
iPhone glass is an integral part of display protection. If cracks or chips appear on it, then the risk of damage to the internal parts of the gadget is extremely high, so it’s better not to risk it and replace the broken glass with a new one.
Let's try to analyze the main steps and nuances of this event, in order for the glass replacement on the iPhone 5S to be successful and painless both for the gadget itself and for the owner's nervous system.
What will be needed?
The process itself is quite painstaking and requires maximum concentration. Therefore, it is highly recommended to prepare all the necessary tools and accessories in advance so that nothing distracts you later, and accordingly, the replacement of glass with 5S is successful.
The iPhone cannot be repaired without certain equipment. You will need:
- New glass. It is highly desirable to purchase a branded version in a specialized store. Otherwise, you will change it very often.
- About 100 grams of gasoline or thinner. Needed to remove old adhesive.
- A special napkin for processing the screen of monitors or a blotter for gloss. Needed to remove stains.
- Plastic screwdriver or similar pointed tool. They carry out the removal of fragments and an autopsy.
- Special glue for plastic (preferably transparent) or branded tape from Apple (expensive, but effective).
- Cotton buds. They will remove the remaining glue.
Warning
A big problem can be replacing the glass on the iPhone 5S. Repairing an original, in particular, is a serious matter, so opening an expensive and high-quality gadget with a kitchen knife or an ordinary screwdriver is highly discouraged. Such a barbaric approach can lead to disastrous consequences.
It would be much more practical, and much more convenient, to purchase a special set of tools, which, by the way, will certainly come in handy in your household if another malfunction suddenly arises. Therefore, the purchase of such a special set cannot be called throwing money away.
Glass
To successfully complete the task, you will need a protective display. And it doesn't matter where exactly the glass is replaced: at Chinese copy iPhone 5S or on the original gadget. If you live in enough big city, then you can easily find out the location of the company store. You must contact any service center Apple. They will certainly sell the glass you need.
If you are on the outskirts or in the outback, then the best option will order online. Fortunately, there are plenty of resources that deal with components for iPhones. And what's more, the range of prices will be a pleasant surprise, which will surely surprise you. However, do not go to extremes - original spare parts cannot be too cheap. Otherwise, blame your own greed, if you have failed to replace glass with one or another manufacturer of components, they should help you navigate the choice, so look and read carefully.
Let's start replacing
Before starting such a delicate process, prepare your workplace. It is advisable to cover the surface where the repair will take place with a dense, light-colored cloth in order to minimize the sliding effect. Good lighting will be on hand in such a responsible matter. And the sound of your favorite composition in the background also does not hurt.
module frame
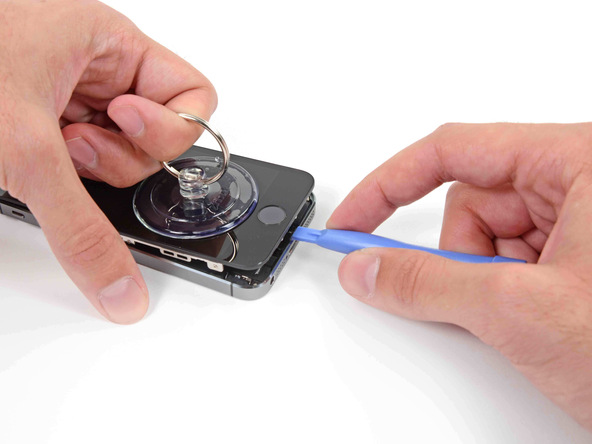
First you need to release the frame of the screen module. We unscrew the two end screws that are hidden at the bottom of the gadget. Then carefully remove the front of the smartphone (the branded suction cup helps a lot) with smooth movements, without fanaticism and jerks.

In the gap that has formed, you need to insert a plastic screwdriver or a credit card, and then with smooth movements separate the frame from the body. Be extremely careful with the fingerprint sensor, namely with its cable, which is mounted on the Home button. Gently unplug the biosensor connector from the system module.
visual block
After releasing the frame of the module, it is necessary to separate the technical block of the gadget from the display. At the top of the smartphone, we unscrew the four screws of the protective cover, where we will see the pads. Here you will need to disable the three connecting loops that are fixed on motherboard. On this, the technical dismantling of the device can be considered complete. You can proceed to the next item on the glass replacement itself. The assembly process is also carried out point by point, but in reverse order. If everything is done correctly and accurately, then problems should not arise. The main thing is not to confuse anything and follow the instructions.
Replacement on iPhone 5S
The first step is to heat the glass with a hot air dryer. At this step, it is important not to overdo it with the temperature. No need to overheat the gadget, it is better to do several approaches with an interval of two minutes.
Then you need to remove the fragments of the old glass with the aforementioned plastic screwdriver. You can additionally use tweezers or any other similar tool. must be done very carefully. Therefore, pry the fragments very carefully. In no case do not put pressure on them, otherwise you may damage the display. Glue particles may remain around the perimeter, which must be removed with cotton swabs and solvent. Wet swabs with a small amount of liquid. Otherwise, it can get inside the gadget, and the problem of drying parts will be added.
A competent approach requires replacing glass with 5S. The iPhone must be completely dry, so after removing the fragments and cleaning the glue, wipe all parts dry with a special cloth. Then, on those parts that do not come into contact with the display, you need to carefully apply glue or special branded tape. Some users in their reviews complain about the option with adhesive tape, complaining about the glass slightly extended beyond the perimeter. But this method is the safest in terms of isolating the device from leakage.
Further, it is easier to replace glass with 5S: we take an iPhone and carefully glue the Home button. You need to make sure that it is clearly in its place. After we wipe the rims of the gadget with a napkin. Then we release the new glass from protective film and insert the device into the case. At this stage, we can say that the glass replacement for 5S is completed - the iPhone has been repaired! The operation went well and you did well.
Be careful!
As mentioned above, this process is very painstaking and requires remarkable perseverance and accuracy. Just one wrong move at the moment of removing the fragments - and your display can be irreparably damaged, which is fraught with even more expensive repairs.
It is also worth noting that the careless use of third-party glue and ordinary solvent with gasoline can harm the internal elements of the gadget. Therefore, if you are not confident in your abilities and there is no person nearby who can help or suggest something to you, then it is better to take the device to a service center. Those problems that you will get in case of failure, and it is quite possible that you will drastically aggravate the situation, are not worth the spent nerves. It is better to entrust this business to professionals.
Summarizing
With the advent of the fifth version of the iPhone, the whole process, if not significantly, then at least a little simplified, compared to the problems of previous lines. Nevertheless, do not forget about the small, but at the same time important nuances of glass replacement. Beware of mechanical damage to the gadget while removing the case frame: here you need an exceptional balance of strength and care - one careless movement and it will crack. Be extremely careful with cables: in no case do not allow glue, solvent or any other moisture to get on or under them.
Do not save on such seemingly simple things as napkins or cotton buds: branded accessories will help not only to carry out repairs in a quality manner, but will also greatly facilitate the entire procedure. And I would like to once again warn the owners of iPhones: in front of you is an expensive and high-quality gadget that can be easily spoiled due to lack of proper qualifications. Therefore, do not risk your device and take it to a service center - there are professionals, albeit for a fee, but with knowledge of the matter, will solve all your problems with the device.
The number one question for everyone who broke the iPhone.
People are furious, offended when they are told: we do not recommend changing the glass on the iPhone. But in vain.
You can change it, it's not a problem. Just in the end it will cost you more. This will be confirmed to you in any service.
Why is that? I decided to turn to proven masters and find out what was the matter. What are they afraid of?
What is the difference between "glass" and "module"
Let's get straight to the terminology.
Glass: a polarizing film and a sensor layer are installed on a special film or gel to it, which recognizes touches. If you break only the glass, then in most cases the image on the screen does not deteriorate, but pixels often begin to burn out and yellow spots and streaks appear.
Display: right - "the matrix". On models 3G and 3GS, the matrix is installed separately from the glass, and each spare part can be replaced separately without much difficulty. On other models, it is a tightly glued modular assembly.
Display module: is a single construction of glass, matrix, touch part, polarizing film, backlight and mounting frame. Of course, loops are an integral part.
So why does no one allow glass to be changed or are they trying to dissuade?
1. Glass must be changed under sterile conditions
No, you don't understand. Not just in a more or less clean room without air movement and dust. Conditions must be ideal, just sterile.
Why? Any speck of dust caught between the glass and the display can spoil the whole procedure. Even if you don’t notice it right away, over time (and temperature changes) a crack from internal pressure may appear in this place. Such a marriage, by the way, sometimes occurs even in factory modules and new iPhones - stories about iPhones whose screens burst “by themselves”.
Of course, most experimental devices are “lucky”: even with dust between the glass and the display, the owners sell or break the iPhone before something happens. At best, you will walk with visible dots that are noticeable when the backlight is turned on. At worst, well, you get the idea.
2. The procedure takes a lot of time
Broken glass is very difficult to remove from an old module, even if it itself is not damaged in any way. Small fragments and real glass dust are often almost invisible to the eye. But to install new glass, the surface of the module must be surgically clean.
It turns out that the very removal of glass takes at least an hour of diligent work to remove residues and fragments. And the whole procedure from start to finish can take from two to six hours of work by one master.
Compare this to a 20-minute module replacement procedure, and not wanting to deal with glass becomes logical. And we haven't even finished...
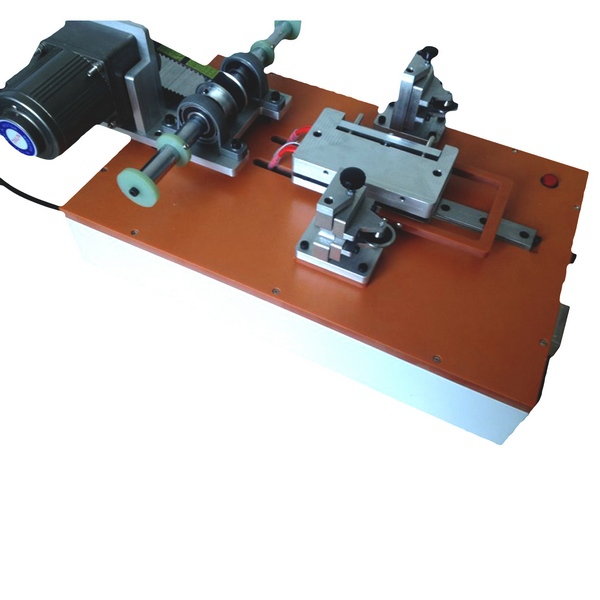
3. The equipment does not compare with the factory
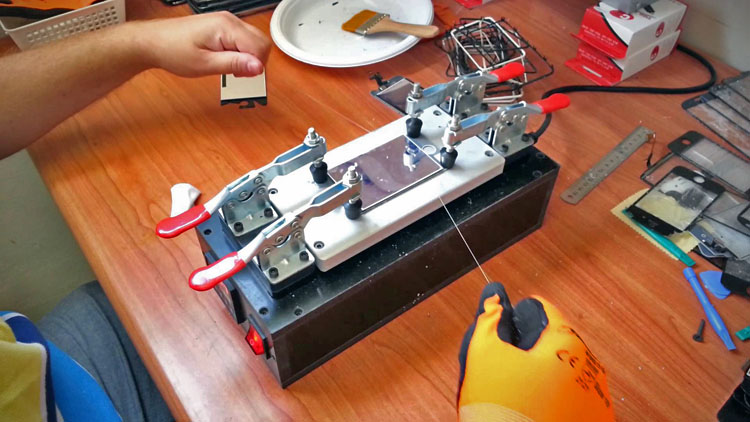
Machine example (Google images)
Of course, not every service will replace the display manually. Some buy machines from China for dense and noticeably better glass installation. Seems great, doesn't it?
The problem with all these machines is that they are not perfect. This concerns both the procedure, and the design, and their calibration. Sometimes (but rarely, which at least pleases) such machines can damage the screen module in the process. This means that the service will still have to install a new one - and lose money on it.
It is clear that we do not care about their problems - a light bulb. Or not? Some damage is not immediately noticeable, then you will come for a guarantee for the work ... and still get a new module. A losing situation, no matter what.
4. Glass gluing does not guarantee results.
The last and the same sad moment. Bonding is not a panacea. Sometimes, after light falls, temperature changes (or strong heating of the device), the glass still begins to peel off the display. Air bubbles appear and then burst. And again you go to the service.
It is important that the procedure can be done cheaply only if the matrix does not have any damage or visible defects. These can be: yellow streaks around the perimeter of the screen, pink spots, defective pixels, translucent vertical stripes and, of course, any cracks. The touchscreen should work perfectly without crashes and broken lines.
In all other cases, you will have to replace the entire display module at a standard price, and maybe even higher than it actually is - given that you have already had to spend time arriving at the service and diagnosing. But it would be easier to pay extra.
Let's be serious: the module is better
I do not pretend to be the ultimate truth. To each his own. But I think that module is always preferable to glass. In terms of time, quality of work and even the consequences after the replacement.
Maybe absolutely all the masters agree with me? :) For some reason it seems that yes.
You can replace the display module for any iPhone at fruit fix. It takes only 30 minutes, and after that you get a guarantee for work and a perfectly working device. The cost depends on the device, but there are no supernatural amounts:
- iPhone 5/5s/5c: 6 190 rubles and safety glass/film as a gift.
- iPhone 6: 8 490 rubles
- iPhone 6 Plus: 9 990 rubles
- iPhone 6s: 21 990 rubles
- iPhone 6s Plus: 27 990 rubles
- iPhone 4/4s: 2 500 rubles
Do you want to know more? Cm.
None of us is immune from dropping the phone on a hard surface, after which the glass of the device can be broken. Today, this is the most common phone breakdown and let's figure out how to replace the glass.
Below we provide instructions in pictures on how to replace the glass on, based on the fifth model, namely on the basis of the iPhone 5S. But according to the same principle, you can replace the glass on literally any phone from the company, the procedure is practically indistinguishable. We want to immediately focus on the fact that if you have the opportunity, it is better to immediately contact the service center, and do not do it yourself at home, since the glass replacement procedure requires some experience. For example, we can recommend this service center, which has helped blog authors more than once.
- In order to disassemble the phone, we need a Pentalobe pentalobe screwdriver, a Phillips screwdriver, a suction cup, a plastic spatula and the glass itself. If you don't have the parts you need, you can buy from this store for a nominal fee. Here, for example set of tools for glass replacement.
- First we will need to unscrew the two screws on the bottom end, Pentalobe pentagon screwdriver
- We take a suction cup, and with its help, raise the screen.
- We move the part of the module where the Home button is located to disconnect the cables going from Touch ID to the motherboard
- The top of the screen remains attached by a cable. We put the module vertically and unscrew the screws that hold the cable mount.
- After that, we disconnect the cable with a plastic tool and get the disconnected module.
- Next, we need to disassemble the module itself. To do this, we will first unscrew the 2 screws of the speaker
- Remove the aluminum plate holder
- And behind this we remove the speaker itself

- Unscrew the three screws of the Home button with Touch ID
- Touch ID in 5S pry off with a rubber spatula and carefully remove it.
- After that, unscrew the screw of the metal base and remove it.
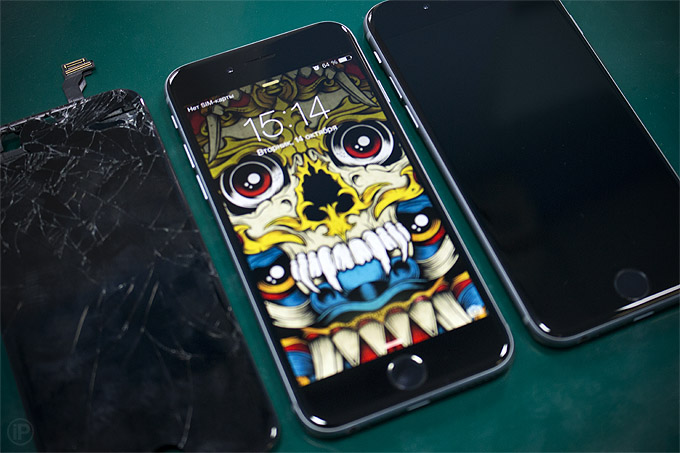
After disassembly, we get a display with cracked glass. Also, to better understand the disassembly procedure, we recommend watching the video below:
Now we have two options. In the first case, to change the display assembly, this procedure is much easier but much more expensive than the second method - to replace only the top glass. We wrote more about the difference between replacing a module and glass in an iPhone in this one. So, to replace the glass you need:
That's all, but if you have any questions - write in the comments, I'll try to help you.