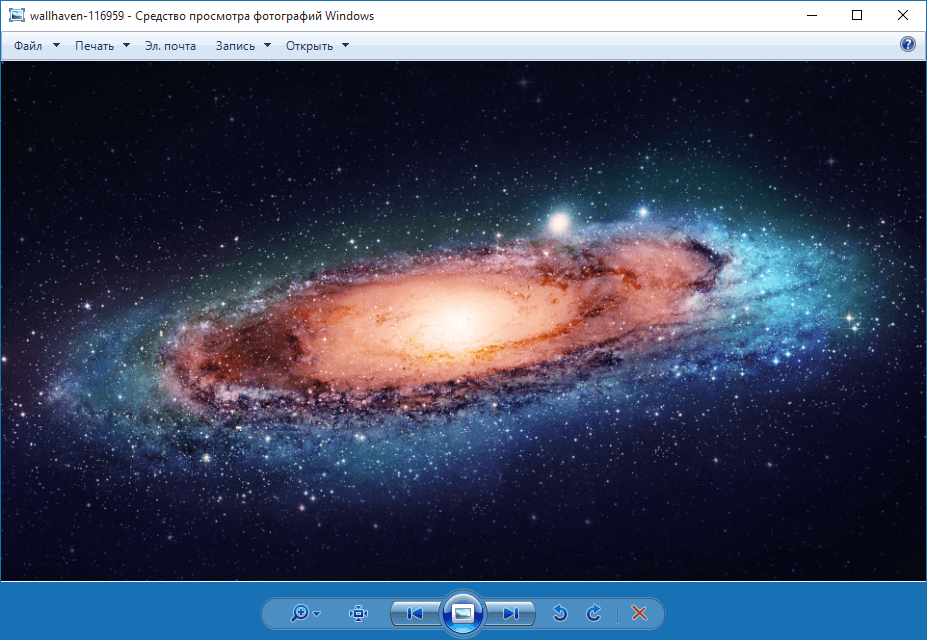
Windows 8 introduces two apps for viewing photos. One was used on touch devices, the other, familiar Windows users 7 could be used on traditional PCs and was called "Photo Viewer". The application is fast, convenient and belongs to the category of "why fix something that is not broken". But in Windows 10, Microsoft made the process of restoring this application very difficult and not everyone likes the new application, and it does not work in the best way. Enough tolerating this! Your attention the instruction, How to get photo viewer back to Windows 10.

Windows Photo Viewer in Windows 10.
This procedure can be done in two ways:
- With the help of the third party application WinAero Tweaker.
- By manually editing the registry.
How to get back Windows 10 Photo Viewer with WinAero Tweaker
This is an easy way that will take literally 3 minutes of your time.

WinAero Tweaker window
- Download the app.
- Agree to the terms of use and scroll down to the bottom of the tweak list.
- Open "Activate Windows Photo Viewer" and click the button with the similar caption.
- The system will now open a window for configuring default applications.
- On the left side of the screen, find the words "Windows Photo Viewer" and select "Set this program as default."
- All photos will now open in the default Windows Photo Viewer.
Windows 10 Photo Viewer via Registry Editor
More complex and more suitable for advanced users.
- Open Registry Editor (press Win + R and type regedit).
- Go to the next branch: HKEY_LOCAL_MACHINE \ SOFTWARE \ Microsoft \ Windows Photo Viewer \ Capabilities \ FileAssociations... If this branch does not exist, just create it.
- Create the following values:
".bmp" = "PhotoViewer.FileAssoc.Tiff"
".dib" = "PhotoViewer.FileAssoc.Tiff"
".gif" = "PhotoViewer.FileAssoc.Tiff"
".jfif" = "PhotoViewer.FileAssoc.Tiff"
".jpe" = "PhotoViewer.FileAssoc.Tiff"
".jpeg" = "PhotoViewer.FileAssoc.Tiff"
".jpg" = "PhotoViewer.FileAssoc.Tiff"
".jxr" = "PhotoViewer.FileAssoc.Tiff"
".png" = "PhotoViewer.FileAssoc.Tiff" - Now go to Computer Settings - System - Default Applications - Set Application Defaults.
- Find Windows Photo Viewer and activate the default.
Do you like the new app, or are you going back to the old Windows photo viewer? Share with us in the comments below.
As with other universal apps offered with Windows 10, the Photos app sometimes won't open the first time. Since the Photos app is used to view images by default in Windows 10, and the classic Photo Viewer for Windows is turned off by default, many users have difficulty opening image files in Windows 10.
Photos app won't open inWindows 10.
Photos app refuses to open or doesn't close after launch. And in some cases, the Photos app opens but does not load the image files.
If you are having similar issues with Photos app in Windows 10, you can try these tips for troubleshooting Photos app.
Method 1 of 4.
Using the Troubleshooter in the app Windows 10 settings.
This utility from Microsoft can automatically find and fix some problems with Universal Apps. The troubleshooter is available in multiple languages, and works in any operating system language.
If you are experiencing problems with Photos from Windows Store, use Microsoft's troubleshooter
- Open " Windows Settings " by pressing the keyboard shortcut Win + I or click in the menu " Start" on the gear icon.
- Follow the next path " Update and Security ”→“ Troubleshooting ”.

- On the page in the section " Search and elimination of other problems " find and click the item - " Windows Store Apps ", the button will appear "Run the troubleshooter" click it.
If running this utility does not help, use the following tips to solve the problem with the application yourself.
After the reset, the Photos app should work and not be a hassle for you.
- Open Windows Settings by pressing the Win + I keyboard shortcut or click on the menu Start on the gear icon.
- Follow the next path Applications → Applications and Features.
- In the list of applications, find and click on the application Photos to see the link Extra options ... Click on it.

- In the window that opens, click the button Reset.

- A dialog box appears with the message "This action will permanently delete data for the app on this device, including settings and registration data." Press the " Reset " to reset all settings for the Photos app.

This should eliminate possible problems.
Method 3 of 4.
Re-registration Apps Photos with Windows PowerShell
If the above methods did not help you solve the problem, re-registering the photography application is probably The best way to correct errors. the method works offline, it does not require an internet connection to complete it.
To re-register the application :.
- Open the console .
- Run the command:

- In the opened list of applications we find the package Microsoft. Windows. Photos, copy the content of the parameter “ PackageFullName ".
In my case with the Photos app the line PackageFullName contains the following value
Microsoft.Windows.Photos_2018.18091.16610.0_x64__8wekyb3d8bbwe
You may have it different, so copy and paste it in the place of the xxxx symbols as in the picture below.
Add-AppxPackage -register "C: \ Program Files \ WindowsApps \ xxxx\ AppxManifest.xml "–DisableDevelopmentMode

In my case, I got the following command:
Add-AppxPackage -register "C: \ Program Files \ WindowsApps \ Microsoft.Windows.Photos_2018.18091.16610.0_x64__8wekyb3d8bbwe \ AppxManifest.xml" –DisableDevelopmentMode
With the help of these actions, we re-registered Windows. Photos on the system in an attempt to fix the application Photos .
Method 4 of 4.
To reinstall the Photos app, you must uninstall the app and then reinstall it from the Store.
- Run PowerShell as Administrator (otherwise the command will fail).
- Type or copy paste the following command:

- Wait for the command to complete, close PowerShell and follow the link: https://www.microsoft.com/ru-ru/p/microsoft-photos/9wzdncrfjbh4 to the store and install the Photos app.

If you are wondering how to delete preinstalled apps refer to our article:
Additionally.
And finally, for the information to be comprehensive, there are two more solutions not related to restoring the Photos application.
If reinstalling for some reason does not suit you, you can try to enable, which was installed by default in Windows 7 and previous versions... You just need to make a small change in windows registry 10 to turn it on.
Other programs for viewing images. There are dozens free apps as well as traditional programs that can help you open all kinds of graphic formats.
You can use classic programs like: IrfanView, Windows Live Photo Gallery, XnView and FastStone Image Viewer. And if you want to install an app from the Store, try: Fotor, Photo Fast Viewer, and 123 Image Viewer HD.
Share the article with your friends
With the release of the operating room Windows systems 10 users are faced with more than just a new interface. The developers have made it so that all images can be opened through the "Photos" utility. Although it is more functional, many people want to return the old photo viewing in Windows 10. To solve this issue, you do not have to download and install anything, since the program we need has not been removed. It simply cannot open popular image formats, working exclusively with .tif and .tiff.
Now let's figure out how to enable viewing photos in Windows 10, add the corresponding item to "To open with" and allow the program to open images in common formats.
Adding parameters in the registry
Right-click on the "Start" button and click on the context menu. Or you can use the Win + R combination on your keyboard.


The window we need will open "Registry Editor"... Here you need to open:
HKEY_LOCAL_MACHINE \ SOFTWARE \ Microsoft \ Windows Photo Viewer \
Capabilities \ FileAssociation
In the main window, you will see only the 2 formats mentioned above, which can be opened using the photo viewer. Let's expand this list.

To do this, click in the window with the right mouse button on an empty space and select "Create" - "String parameter".

In the field that appears, erase its name and specify the required format as the name. For example, I'll write .jpeg. Then press "Enter".

Then open the created parameter by double-clicking on its name. A window for modification will appear. In the "Value" field write PhotoViewer.FileAssoc.Tiff and click "OK".

Likewise, make the required number of parameters, the names of which will correspond to the extensions of the images that you want to view. For example, .gif, .jpg, .bmp. Do not forget to fill in the "Value" field for each.
When you're done, just close this window.

Now let's make the Photo Viewer open the formats specified in the registry by default.
Right-click on "Start" again and go to.

At the top right, note that "View" is selected - "Large icons"... Then click "Default Programs".

In the next window, you need to click on the line "Setting programs ...".


Check the box "Select all", well, or put the birds only next to the required formats, and click on the bottom right on "Save".
In the updated Top 10, everything is done through the Parameters window. You can read about this in the article:.

Now find the photo you want, right-click on it and select "To open with"... In the next menu, I immediately have "View Photos", so I press on it. If this is not the case for you, then press "Choose another application".

I have the desired item at the top of the window. If you do not have it, expand "More Applications" and find it in the list that opens. Put the bird in front of "Always use this app to open ... files" and click "OK".
All - the selected picture is open in the required application.

Using Winaero Tweaker
The first method is quite simple and quick, but if you yourself do not want to touch anything in the registry, then you can use the Winaero Tweaker program, which can also solve the problem.
You can download it from the official website at the link: https://winaero.com/download.php?view.1796. It's completely free. Take a look at the screenshot below. To download, you need to click not on the green button with the inscription "FOR FREE", but on the line with the word "Download" and the name of the utility itself.

Go to the Downloads folder, unpack the archive and run the only executable file (in fact, there is only one).

The Application Setup Wizard will open. Everything is quite simple here. Click Next.

Then mark the item "Portable mode" with a marker, so as not to install Winaero Tweaker, but simply extract required files, and click "Next" again.

We agree with the license terms - "I accept ..." and continue.

The upper field will indicate the folder where all files will be extracted: C: \ WinaeroTweaker. If you want to choose a different path, click Browse. After that select "Extract files".

When all the files are extracted, open in Explorer the folder that you selected in the last step of the installation (I left it: C: \ WinaeroTweaker). Here you need to run the file, opposite which in the column "Type" is written "Application".

Agree with the license again: "I AGREE".

The main program window will open. In the list on the left, we need the "Get Classic Apps" group, item "Activate Windows Photo Viewer"... Further on the right, click on the line with the same name.

In the already familiar window on the left, select Photo Viewer, farther "Choose default values".

In Windows 7, I'm used to opening photos and pictures through the standard “ Windows Photo Viewer”. After I reinstalled on my computer operating system on the Windows 10, I was unpleasantly surprised. The fact is that in Windows 10 all images are opened by default through an application called “ Photos”. Somehow I didn't like it right away, and I wanted to change it to a classic image viewer.
But after I right-clicked on the photo and selected “Open with” from the context menu, it turned out that the standard “ Windows Photo Viewers" there is no : 
In the control panel, in the program parameters by default, it also was not found: 
In order to return the ability to open images through standard remedy"Viewing Windows Photos" it is necessary to add some missing parameters to the registry in Windows 10.
To do this, download the ready-made registry file. Unpack the downloaded archive and run the registry file by double clicking: 
A window will appear with a warning - click in it “ Yes”: Then a message will appear that the changes have been successfully made to the registry - click “ OK”:
 That's all the solution to the problem!
Now we right-click on any photo on our computer - in the context menu, select “Open with”. We see that now available to select “ Viewing Windows Photos”:
Now, if you wish, you can go to the system settings and select the default application for viewing photos - “View Windows Photos”: 


