The article describes how to close access to your page on Vkontakte.
Navigation
On the social network In contact with» there are many amenities and opportunities. One of them is the ability to restrict access to your page, hide photos from prying eyes, prohibit other users from leaving messages on your wall or in private. We will talk about all this in our review.
Why do users hide their information on Vkontakte?
It is not necessary to hide information completely and absolutely from all other users, unless, of course, you store extremely secret data. There is an opportunity in In contact with» close access to your page, for example, from those who are not your friends, remaining open only to close people and acquaintances.
You can also hide only photos, and show other information to the public. It is also possible to set a ban on private messages for strangers, while freely corresponding with friends. If we proceed from the fact that the Internet is a "gateway" - then such opportunities in " In contact with» will be very useful for all users.
What can be hidden on your page in Vkontakte?
So, close access to your page in " In contact with» by selecting the following categories:
- All information on the page
- Video, audio and photo
- Groups the user is following
- Friend list
- Presents
- Ability to send private messages
- The ability to leave messages on the wall, under the video and photo (comments)
- Invitations to groups, communities
How to restrict access to your page on Vkontakte?
Now let's deal with the question of how to restrict access to your page in " In contact with»:
- We go to the site In contact with", log in and go to your page

How to restrict access to your page in Vkontakte How to close your page in VK from outsiders
- Next, click on your icon in the upper right and in the drop-down menu go to the item " Settings».

How to restrict access to your page in Vkontakte How to close your page in VK from outsiders
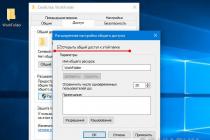
- Once on the new page, in the right column we go to the item " privacy»

How to restrict access to your page in Vkontakte How to close your page in VK from outsiders
- Now we find ourselves on a page where you can deal with issues of restricting access to your page for one reason or another: hide your page, hide photos, hide the list of groups, hide gifts, and so on.

How to restrict access to your page in Vkontakte How to close your page in VK from outsiders
- For example, we need to hide basic information on our page. Click on the drop-down menu next to the corresponding item. A list box will open: all users, friends only, some friends, etc. These items mean who exactly will not be able to see your page. Just select the desired item. You don't have to take any additional steps.

How to restrict access to your page in Vkontakte How to close your page in VK from outsiders
- Same with photos.

How to restrict access to your page in Vkontakte How to close your page in VK from outsiders
- The same is true with the posts on your page.

How to restrict access to your page in Vkontakte How to close your page in VK from outsiders
- You can hide your page from the eyes of unregistered people in " In contact with» users or do as you wish.

How to restrict access to your page in Vkontakte How to close your page in VK from outsiders
- To block access for certain users, they must be placed on your blacklist. On the same page where we were now, go to the right column in the item " Black list". This is the black list and there are all the users that you have brought there.

How to restrict access to your page in Vkontakte How to close your page in VK from outsiders
- To add a user to the black list, go to his page, under the avatar, click on the icon of three horizontal dots and in the drop-down list, click on " Block…».

How to restrict access to your page in Vkontakte How to close your page in VK from outsiders
- In this case, and when you hide your page from all/some users, your page will look like this to those users.

How to restrict access to your page in Vkontakte How to close your page in VK from outsiders
Video: How to close a page in VK from outsiders? How to make a page in VK closed?
Often, situations arise when it is necessary to block access not to the network, but only to one or several sites. The reasons can be very different: perhaps this site interferes with work, or the child is often in social networks. There are different ways to restrict access to sites, below we will analyze only those that do not require the intervention of third-party programs.
How to block a website using the hosts file
The hosts file is located at the root of the system, the tasks of this file also include limiting those sites that you do not want to view. We will not delve into the analysis of other functions that the hosts file has, and will concentrate solely on blocking sites.
1. Initially, you need to find in which directory this file is located. Through the Start menu, open "My Computer". Next, open the local drive in which the operating system is installed (by default, this is drive C). We start looking for the “Windows” folder, after opening we go to the “System32” folder, then “drivers”, and the last folder “etc”. This is where the hosts file we need is located.

2. The next step is to launch this file by double-clicking on it. This is done using an ordinary notepad, i.e. in the "Select program" window that Windows will give us, you need to select the "Notepad" program.

When the OS opens the file with notepad, we will see a similar picture:

3. Then the fun begins: put the mouse cursor on the last line (in our case, at the end of the word localhost) and press Enter. It should turn out like this:

4. We write "127.0.0.1" (without quotes), and press tab (Tab), after which the picture will be as follows:

5. It remains only to add the URL address of the site that needs to be restricted. You must enter the URL immediately after pressing the Tab key. Suppose, if you need to block access to the social network in a contact, then simply add the address of the vk.com resource. Other sites are registered in a similar way, the access of which must be added to the list of restrictions, after which the changes made must be saved.

What should I do if I have a 64-bit system?
In this case, you will have to act somewhat differently, because. the hosts file cannot be found in the above directory. Here you can search in the C:\Windows directory


then right-click and select "File Location" from the submenu

or, through the C:\Windows directory, find the “winsxs” folder, and try to find the “amd64_microsoft-windows-w..nfrastructure-other_31bf3856ad364e35_6.1.7600.16385_none_6079f415110c0210” folder in it, in which the file we need is located. But since this method is the most painstaking, it is best to use the search.

After that, we perform 2-5 points described above, the algorithm of actions here is no different, and they are performed exactly as in a 32-bit system.
Blocking sites by IP addresses
Most users, wanting to restrict access to a particular resource (or even advertising) resort to searching for various kinds of programs. But not many people know that the same blocking by IP address can also be done using the usual means installed by default in the operating system. You can carry out this operation using an ordinary firewall, which is in every computer.
1. First, open the Windows Firewall, you can find it in the following way: by right-clicking in the lower, right corner of the screen where the network connection is located, and selecting the item in the "Network and Sharing Center" submenu:

2. In the window that opens, in the lower left corner we find "Windows Firewall", and click on it:

3. In the same left submenu, select the "Advanced options" item:

4. A window will open, this is the Windows Firewall, in which we will register our IP addresses. It will look like this:

5. The structure of the Firewall is simple and logical: the action items are listed on the left, and the settings of those items are listed on the right. So, on the left, select "Rules for incoming connections", and on the right, click "Create rule":


7. In the next step, select "All Programs":

8. At this stage, everything remains unchanged - click on the "Next" button:

9. At the bottom of the window in which the OS asks you to specify remote IP addresses, select the "Specified IP addresses" item. In order to insert the desired address, click the "Add" button.

10. In the “IP address or subnet” field, enter the desired entry and confirm the action with the “OK” button


11. After that, an entry will appear in the window. You can add multiple addresses this way.

Those who have never identified the site's IP address can use various services that allow you to find out the site's IP address quite quickly, in a couple of clicks. For example, the 2ip service is suitable, which is a reliable and proven resource - http://2ip.ru/lookup/

13. Select the profiles we need (in our case, all) and click on the same "Next" button:

14. We drive in an arbitrary "name" as you wish, and click "Finish":

15. We return to the Firewall and do steps 6-14, only for the item “Rules for outgoing connections”, which is also on the left:

16. That's it. It remains only to check how the protection works by making an attempt to enter the site blocked by us. If you can’t access the page, then all settings are correct.
By the way, as already mentioned, this method is acceptable not only for restricting access to sites, but also to various kinds of advertisements, pop-up banners, etc. All you need is to enter the IP address into the Windows Firewall.
Access restriction via Internet browser
You can also block access to sites through an Internet browser, but this will require the installation of an additional extension. For such purposes, the Block site add-on is ideal, which allows you to limit the display of unwanted pages. This extension is included in the popular browser add-ons, but here we will analyze the process of blocking a site on Mozilla Firefox.
1. Open Mozilla Firefox, and in the upper right corner of the screen, click on the "Open menu" button, and in the drop-down menu, select the "Add-ons" item:

2. We drive Block site into the search engine, and referring to the screenshot, we launch the installation of the add-on:


3. After installing the extension, the browser must be restarted for the changes to take effect. You can also restart by clicking on the "Restart now" command (the button will appear after the add-on is installed):

4. When Mozilla Firefox restarts, a thank you tab will open regarding installing the extension. Click "Agree and continue":

5. The extension is enabled and ready to use. In order to add a site to the list of blocked, you can either right-click while on the site that you want to block and select "Block this site"

or, in the extension window, by adding an unwanted site to the field. Adding to the black list is done with the “Add” button, removal is carried out, respectively, using the “Remove” button (to open the list of add-ons, you need to select “Open menu” in the upper right corner of the screen, then “Add-ons”, in the search designation select “ search among: my additions"):


That, perhaps, is all. These methods are the most common and effective, if there is an urgent need to close access to a particular site.
Many of us use social networks, and the most popular of them is, of course, Vkontakte. The network has a lot of functionality more possible for users, which explains its popularity. The main purpose of the social network Vkontakte is communication.
But often there are situations when some individuals impose their communication and some simply do not understand that they do not want to communicate with them. To do this, the creators of Vkontakte provided an excellent function to restrict access to the user's page. Let's see what this function is and how to use it.
Why restrict access
Some users in order to ensure your safety close their pages with privacy settings, or restrict access to their information to some users.
What does it mean "Limited access to my page" Vkontakte
If you got to the user's page, and on it the inscription “Limited access to your page” is prepared for you, then you should think about two versions.
Many social network users hide information from unregistered users through the privacy settings in the editing panel. To remove the restriction, you need to log in to the system using your username and password. After that, the information on the page will be available to you.
The second version is the user of the page added you to the blacklist. If the user is your friend, then try to contact him in any known way and find out the reason for the closed access.
It is possible that he forgot to give you access to his page. If a person is unfamiliar, then it will not be possible to contact him, since the black list function implies a restriction on sending messages to the user.
How to restrict access to your Vkontakte page for one person
You have a situation in which you need to hide your page from a specific person. What should be done in this case.
Method 1. Adding to the blacklist. To do this, you need to go to the page of the user from whom you want to hide the page. Under the user's avatar, you will see a three-dot icon, click on it and select the item from the drop-down list "Complaint about the user." At the end of the list is the line “Close ... access to my page”.
Check this box and click Submit. That's it, now this user is blacklisted. With this function you can leave a complaint on the user, for example, if he distributes prohibited content (material) or sends spam.
To do this, you should also go to his page, click on the button with three dots and in the drop-down menu mark those items for which you want to complain about the user.
You can also attach a written appeal to your complaint. After clicking on the “Submit” button, the user will be automatically added to the black list, and the complaint will be reviewed by moderators In contact with.
Method 2. Page privacy settings. In the page editing section, there is a “Privacy Settings” item, in which you can customize the appearance of your page for other users. You can open photos to a certain circle of people, or videos, prohibit comments on photos, or leave messages on the wall.
In this way, you can hide information about your page from an unwanted user, but he will be able to send you messages.
How to restrict access to the Vkontakte page to several people
In this situation, you can also use the blacklist function, however, it will be faster to restrict access to your page for several people through the privacy settings.
This can be done by selecting “Everything except…” and then list those users from whom you want to hide information. To hide all information, you need to indicate “Everything except ...” in each block.
Social networks are very popular among users due to their great functionality and ease of use. Some users are worried about the safety of their photos and other materials, so they actively use the functions privacy settings pages and blacklist. These are very handy features in terms of protecting yourself from unwanted communication, spamming and other prohibited materials.
If you have an ill-wisher on the Vkontakte social network, or you are simply very offended by any user, you can restrict access to your page. The easiest and most reliable method is to add an enemy to the black list. In this situation, he will not be able to write to you, see personal information and other items on the page. All that will be available to him is your name and avatar. If you want to leave the possibility of correspondence between you, but limit access to information about yourself as much as possible, then you will have to configure privacy options for your page. In this article, you'll learn how to set up both of these methods.
How to restrict access to your Vkontakte page through the blacklist
Even in this case, you have two options: restrict access to the user in your settings or directly on his page. Consider each of them in more detail.
- Go to the user's Vkontakte page. Under his avatar, you can see a small icon of three dots. Click on it.
- A pop-up list will appear. In it, click on the line “Block *Name*”. Just like that, the user ended up on your blacklist. He no longer sees your photos and cannot send you a message.


- To add a person to the unwanted list through the settings, find your avatar thumbnail in the upper right corner of the site. Next to it there will be a small triangle that you need to click on.

- In the menu that appears, click on the "Settings" line.


- You will find yourself in the settings of your Vkontakte page. Here you can operate with all the information and all sections of the account. On the right is the menu, click on the “Black List” item.


- You will see all previously blocked users. To add a new one, click on the “Add to blacklist” field.


- By default, a list of your subscribers will be displayed. It is them that you can add to the black list in this way. The logic is simple: as soon as you remove a person from friends, he becomes a subscriber. Therefore, remove the ill-wisher to see him in this list.

How to restrict access to your Vkontakte page through settings
In order to leave the possibility of exchanging messages between you, but to close as much information as possible, you can adjust the privacy options of your account in a certain way. You will be able to close your audio recordings, photos, some posts, as well as the ability to comment on entries from the user.
- Go to settings and then to the "Privacy" tab.


- You will see all the options for opening and hiding information about your page. For example, next to the item “Who sees the basic information of my page”, click on the drop-down list and select the option “Everything except ..”. Here you can select an ill-wisher and place him in the list of those who do not see this information.


- There is another option. Select the “Some friends” item, then the privacy settings will act in such a way that the information will become visible only to a narrow circle of your friends, whom you choose yourself.


- Set up all the items in the privacy menu in this way. Set everything to “Everything except” and add the enemy to the list.
- Having lowered this page to the very bottom, you will see the link “See how other users see your page”. Click on it, you will see how the account looks like on behalf of any other user. Enter the name of the ill-wisher and you will see how he looks at your page. Return to this menu and finish setting up your account.
- So simply you can protect yourself from prying eyes on the social network Vkontakte.


Various reasons force page owners on social networks to look for a way to how to restrict (close) access to Vkontakte any of the visitors. It is not difficult to do this. Going to "Settings", open the item "Privacy" and select categories of people with different levels of access in each subsection. Someone will be able to see only basic information, photos on which the owner of the page is marked, others will also have access to lists of groups, friends, photos, subscriptions. If you want to add a person to the black list, read this articles on this topic.
Then, in the "Posts per page" menu, you need to select groups for reading other people's posts, leaving posts, reading and commenting. After that, in the “Contact me” item, select users who will be able to: write private messages, make video calls, and invite to groups, and in the “Other” section - people who will see the page and updates available to friends. Do not forget about the "Black List", where you can add unwanted visitors. High-quality, fast and inexpensive promotion of pages and groups on VKontakte is available on this address .
Restricted access to the Vkontakte page
Alas, sometimes it happens that we restricted access to the Vkontakte page another user, but you need to contact him, and social networks are the only way. Well, not all is lost. You can, firstly, in the “Friends” tab on your page, select the “Write a message” function for any person and click “Add”, after that, select the person we need and write a message to him. If the person is on the Black List, you need to select the "Write a message" option to any of the friends list, click "Add +", right-click on the friend's name, select "Inspect item" and replace the ID of this person with the ID of the desired recipient (which such an ID and where to look for it, read this section ).
How to enter Vkontakte if access is closed
Often interested in users and the question, how to enter Vkontakte if access is denied. This may be due to various reasons. The main thing is not to fall for the bait of scammers who demand to send SMS. It is best to use a special program that allows you to access the site anonymously - an anonymizer. The most popular is the Chameleon resource. Find out how to add subscribers to your VKontakte page.
Access is limited Vkontakte
So, for whatever reason access is limited Vkontakte everything is solved. You can always register a second page, write a message to the person who blocked us from another account, use an anonymizer, etc. Users are provided with a large number of ways to deal with the problem of limited access to Vkontakte. You can wind up likes for posts and photos on VKontakte by link .