Hello dear readers of the blog site. Today we will continue our series of tutorials on Joomla.
Today's post is about organizing, presenting, and managing the site's content (content). We will also take a closer look at the nuances of deleting sections, categories and materials, as well as study in detail the possible parameter settings that can be made when adding a new material.
Content structure and hierarchy in Joomla
Organization and display of content on project pages is carried out using components that are. To work with articles, the built-in component for working with content is used. True, access to its settings is somewhat different from the usual one and for this you will need to select from the top menu not the "Components" item, but the "Materials" item.
It allows you to organize articles into sections and categories, or leave them unclassified. There are also other components in Joomla that are capable of displaying their content on site pages.
This is, for example, the default built-in contact or weblink list component. You can also use third-party extensions, for example, which is used to organize all kinds of photo galleries. You will find a detailed publication on this fascinating process at the link provided.
Content display is also possible with the help of modules that display their content along the periphery of the main part of the page. In this article, we will take a closer look at the output methods using the built-in component for working with articles.
The texts of articles are stored in a database, and not in folders on the hosting hard drive. This organization allows you to very quickly reorganize content in Joomla. Instead of moving files with texts from one directory to another, it is enough to set new attributes for the article and it will instantly be assigned to another section and category.
As I mentioned earlier, the CMS does not store pages as files with the ".HTML" extension, as was done earlier in static sites. Joomla generates a web page the moment you click on a link, which makes it easy to modify the viewed documents by changing the links in the menu. The content itself will remain unchanged.
In the simplest case, a link from the menu can open one single article from the list of those that you have already added to. But it will also be possible to organize the output to the web page of the contents of an entire category or section (a list of all the materials contained in them in one form or another).
And in this case, you, too, will only need to follow the link from the menu. You can customize what exactly will be displayed when you click on a link in the menu in the admin panel by selecting the option you need. But we'll talk about this a little later.
The easiest way to organize your content is to use unclassified articles that will not belong to any sections or categories. This method can be relevant and in demand when creating a business card site on Joomla, for example, when a hierarchical organization is simply unnecessary and unnecessary.
At the same time, it will be possible to hang a separate article for each menu link by creating items in the admin panel called "Standard Material Template". In this case, you will spend the minimum amount of time to create a website, because you don't have to deal with all the subtleties and output methods. You just have to write a few articles and hang each of them on a link in the menu. That's all - we can assume that the business card has been created.
But it will be convenient and relevant only if there are no more than a dozen articles. And if there are more of them and you plan to add them over time, then you cannot do without a hierarchical organization of content. For these purposes, there are sections and categories (two-level hierarchy), over which it will be possible to scatter both existing materials and those that will be added over time.
The top level of the hierarchy is the sections into which it will not be possible to directly place content (materials). To place articles, there are already categories, which in turn must necessarily belong to some section. Simply put, the sections contain only categories within themselves, while the categories already contain articles (content).
The hierarchy will look something like this:

The best option will be when you think over the structure of the sections and the categories nested in them in advance. This will be much easier than transferring a bunch of materials between them later. I have already considered the nesting scheme in some detail, so I will not repeat it. There I also talked about their creation and settings.
Now I want to dwell on the very process of filling the site with content. Everything seems to be simple here - fill in the texts in a visual editor, insert pictures and save the result. But at first there may be slight difficulties and misunderstanding of how to do this or that action. After all, Joomla does not have a 100% intuitive interface, which means there will be work for me.
Removing sections, categories and materials in the admin panel
But before you start learning how to create content, I suggest you learn how to delete it correctly. Here, again, there is nothing tricky and complicated, but there are nuances that may arise in this case. Your content may appear on a new project for the reason that when using the engine, for example, you did not uncheck the box prescribing the addition of demo data.
They, of course, will allow you to visually see all the capabilities of the engine for work and content management. You will see in reality, placed in positions for your modules, look at the organization of materials in the Joomla admin panel and, finally, ripe to start adding your own articles, categories and sections, but for this you will need to delete all demo data.
If the engine is installed, along with demo materials, many different sections, categories and articles are created that you will not need in the future. They will need to be removed. It seems to be nothing complicated, but you need to know a few points that can get in the way.
First, the deletion must start from the very bottom of the hierarchy, i.e. from articles. For it will not be possible to delete a category in which there are articles and it will not be possible to delete a section in which there are categories.
Secondly, the article may be blocked and you will have to reset the locks to delete it. Well, besides this, you need to know that when they are removed from the manager, they will not be completely erased, but will go to the basket, from which they will also need to be removed. But first things first.
To delete articles in Joomla, you will need to select "Materials" - "Materials Manager" from the top menu in the admin panel. In the window that opens, you can use filters to display only articles of a specific section or a specific category.
If you see a lock icon in this list next to any publication instead of a radio button, it means that it is not currently being edited. Those. a window with a page for editing this article is open in the browser. Or you closed it, but forgot to click the "Close" or "Save" button on the edit page. Therefore, it is considered open and cannot be deleted from the Joomla database.
In this case, in order for the blocked publication to be deleted, you will have to select the "Tools" - "Reset locks" items from the top menu in the admin panel. After that, all materials will be unlocked and can be deleted:

In the material manager, you can select individual of them for deletion by checking the box next to them, or delete a whole batch at once. You can also use the filter to display materials only for a specific section or category, and then select the "All" option at the very bottom of the list in the "Number of rows" area:

Now you just have to put a tick in the topmost field of the column adjacent to the name, and click on the "Add to cart" button located at the top of the window. All selected articles will be transferred to the trash:

To permanently delete them, you need to select the items "Materials" - "Trash" in the admin panel from the top menu and in the window that opens, select all the articles that are there, and then click on the "Delete" button located at the top of the window:

Everything is done with the materials, now you just have to go in turn to the managers of categories and sections (from the top menu of the admin panel) and delete all unnecessary categories that no longer have articles, and then unnecessary sections that no longer have categories.
Well, we learned how to remove content from Joomla, now is the time to learn how to create it. As you know, it is easier to destroy than to build. I will not talk about creating the structure of sections and categories, because I had a whole article devoted to this (the link to which is given just above), and I will go straight to adding new material.
Adding and distributing content in Joomla
To do this, you will need to select the items "Materials" - "Manager" from the top menu of the admin panel. A window already familiar to us will open, where the titles of all articles available on your site will be displayed. If you have just deleted all demo data, then this list will be empty. Let's go over the toolbar of the Material Editor window and consider the purpose of the buttons available there:
The first two buttons "From archive" and "To archive" are used for unpacking articles from the archive and for placing them in the archive. The very rarely used feature of working with archives, in my opinion, is practically useless and unnecessary in work.
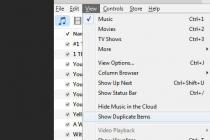
The buttons "Show" and "Hide" allow for mass publication (output of materials to the site pages) or mass unpublishing. To do this, you will need to put a checkmark in front of those articles to which you want to apply this action, and then click on one of these buttons.
You can customize the output of materials in relation to individual articles in the list by clicking on the red cross or green checkmark in its line:

The "Move" button allows you to move the selected materials (opposite which you will check the boxes) to another category or section in Joomla. The "Copy" button allows you to copy them only. "To the basket" allows you to move the selected materials to the basket, from which they can then be restored or permanently deleted.
"Edit" allows you to open the selected article for editing (equivalent to clicking on the title of the article in the manager's list). "Create" allows you to open a window for adding new material, where you can write the text of your article.
The "Options" button allows you to set the default settings for all materials. They will be used by default for all new materials that you add to Joomla in the future, as well as for those articles that you have already added:

You will be able to change almost the same settings for materials (with the exception of some) when writing or editing each individual article (read more about this at the end). Of course, it is much more convenient to set the desired default settings, and when writing articles, change them only as necessary, if they are not suitable for this particular publication.
Creating a new article in the Joomla admin panel
To add a new material, we will need to use the "Create" button. As a result, a window will open allowing you to enter its text and make various settings for it:

You will have to fill in the "Title" field, where you need to enter the desired name, which will subsequently be displayed on the site pages. The "Nickname" field should be filled in if you. There you will need to enter in Latin letters without spaces, in fact, a piece of the future URL (address) of the page, if it will be displayed separately via a link from the menu.
If you use third-party components for organizing CNC, you will not need to fill in the "Alias" field. I already wrote. By the way, this component will also help you create a proper 404 error page, which is also welcome.
For a new article, you need to select a section and category in the appropriate fields. If you wish, you can make it not belong to any of them, i.e. not classified (can be used later to create so-called static pages). To do this, in the "Section" and "Category" fields, select the "Not specified" option.
A check mark in the "Published" field will mean that after saving it will be immediately published and may appear on the site pages if a corresponding menu item is created to display it. This publication can be displayed, for example, as part of a category for which you have created a corresponding menu item (in the form of a Blog or a List).
For example, by creating a "News" menu item of the "Category Blog" type and adding a new article to it, this material will be available on the site when you click on the "News" link in the menu of your project. The most difficult thing for a novice user to understand is that there are no pages in Joomla like in a static website, and all the content (content) that you add in the admin area is stored in the database. On the website, however, content is only displayed when linked from the menu.
Thus, you must first add content and then create links to it in the website menu. They determine not only what should be displayed on the page, but also how the content should be positioned. But we are already running a little ahead and we will need to return to creating new material in the Joomla admin panel.
In the upper part of the window there is one more field "On the main", where by default the checkbox in the "No" position is active. This means that this article will not appear on the home page of your site.
All publications, when creating or editing which you put a tick in the "Yes" box of this field, will be displayed on the main page in the form of a blog. You can manage the articles displayed on the main page by selecting "Materials" - "Main Manager" from the top menu of the admin panel.
In the main part of the window for adding new material, you can enter the text of a future article, using the capabilities of the visual editor built into Joomla. I personally prefer to use another visual editor - JCE. To learn how to install JCE and make it the default editor, follow the link just above.
Basically, working in a visual editor is similar to working in a text Word, with the exception that in Joomla you sometimes still have to go directly to editing the HTML code (there is such a button "HTML" on the toolbar of the default editor).
Your ability to understand and make changes to the HTML code of the article will help you quickly and easily resolve any quirks of the visual editor. Therefore, if necessary, I advise you to familiarize yourself with the content of the heading of my blog "".
Personally, for the most part, I do not use the visual editor at all, because at first I just practiced using HTML code in practice, and then I got used to using only it. But this is already a matter of taste and personal preference. We will assume that with the creation of the text of the article and adding to it, if necessary, as well as images, etc. things you will figure out for yourself.
Settings (parameters) that can be set when adding an article
Let's take a look at the settings for the new material that we can make using the three tabs from the right pane of the window. The first one is called "Parameters - Articles" and on it you can select in the "Author" field the user who will be considered its author.

In the "Pseudonym" field, you can enter a pseudonym under which this material will be published, if you do not want to show the real name of the author. Authorship information will be displayed at the top of it, but only if you set it in the settings for this material, but we'll talk about this a little below.
In the "Access" field, you can select the group of users who will be able to see this article (either all, or only registered users, or only administrators). In the field "Date of creation" you can specify the date of creation and it will be displayed on the page with the article, unless it is prohibited in the settings for this material.
In the "Published" field, you can enter, if necessary, the date of postponed publication. In this case, after you save this article, it will appear on the site only with the onset of the date and time you specified in this field.
Thus, before leaving on vacation, you can add a lot of materials at once in the Joomla admin panel, but set up their sequential publication at intervals of a day and thereby create the appearance of your presence. By default, the current date and time will be registered there.
In the "Expires" field, you can set the date of removal of this article from publication. This may be necessary, for example, when carrying out a one-time promotion, after which it will no longer be needed. By default, the option "never" is selected in this field, which means that this material can only be removed from publication manually. In this and in the previous field, to select the date, you will need to click on the calendar icon located on the right.
Advanced settings for articles (materials) in Joomla
On the "Options - Advanced" tab, there are those settings of materials that will be used only when this article is fully displayed on the site (for example, when a visitor clicks on the link "More" at the bottom of the article announcement when displaying a category blog in Joomla). Often, very few people change these advanced parameters. either do not know how to do this, or do not consider it necessary.

Personally, I still think some of these advanced options should be changed. But, firstly, this can be done for all articles at once by clicking on the "Parameters" button on the page of the material manager and selecting the necessary settings for the same parameters.
As a result, these advanced settings for articles will be applied by default (the default option looks like "Use global") when writing all new articles. But you will be able to change some of them when creating or editing content.
Let's go in detail consider all the settings on the "Options - Advanced" tab, which you can do when creating or editing material in Joomla:

The next settings tab in the new material creation window is called "Meta-data":

Here you can set information about the article that is not visible on the site, which is primarily intended for search engine robots. In fact, some of the fields on this tab also have a pretty strong SEO value. I have already written about this in detail, so I do not consider it necessary to repeat myself. In the same place.
Good luck to you! See you soon on the pages of the blog site
You may be interested
 Creation and display of articles (content) in Joomla using sections and categories, a blog on Joomla and the More button
  What is Joomla
  Modules for displaying a list of sections in Joomla, random and latest news, similar materials, custom photos and Html code
  How to create a blog in Joomla based on a category or section using a menu item, as well as other options for displaying content
  Site contacts and feedback form using the built-in Joomla component
  Component K2 for creating blogs, catalogs and portals on Joomla - features, installation and russification
  Modules in Joomla - viewing position, setting and displaying, as well as assigning class suffixes
  CMS Joomla - principles of a free content management system, page creation and caching
  How to update a static Html site to a dynamic one on Joomla
  Creating a map for a Joomla site using the Xmap component
How to edit material on Joomla 3
In lesson 9 (How to create material in Joomla 3), the process of creating materials on a site powered by CMSJoomla was discussed. But we just looked at how to create a title, enter text and set a category for the material. In this lesson, we will take a closer look at all the functions that CMS Joomla offers us for editing material when creating it.
Create and edit material in Joomla
In lesson 9, we talked about how to create material on the CMS Joomla. Now I would like to talk in more detail about the functions that Joomla offers us. Recall that to create a material, you need to go to the section: MATERIALS - MATERIALS MANAGER - CREATE MATERIAL. After that, we get to the page for creating a material.

FIG 1
At the top of the screen, we see buttons:
Cancel- click to cancel the creation of a new material, or changes made
Below we see several functions for editing the material. Let's take a look at what's available in each of these tabs.
By default, when creating a material, you will be redirected to the Content tab. This tab allows you to manage the text of the material and additional elements that are present in the article. We will tell you how to insert a link or a picture into the text in the next lesson.
Now let's pay attention to the functions that are available to us on the right side of the screen.

State- For each material in Jumla there are 4 types of states:
In the archive- the material has been moved to the section archive
In the basket- the material has been removed from the site and is in the basket. You can restore it or delete it completely
Category- by default the site on Joomla has only 1 category - Uncategorised. You can create and manage categories in a separate tab. See the next tutorial for how to create categories.
Access- the mode of material availability for users. There are three types of material availability:
Public- the material is available to all users who are on your site
Register- the material is available only to registered users, others do not see it
Guest- the material is available only to unregistered users
Special- a special category, the settings of which you can set yourself
Language- You can specify the language of your material.
Tags- You can write the necessary tags for your material

The next tab of your material is Publishing options... Let's take a look at what functions are presented on this tab and what they mean.
Start of publication - You can indicate the start date of the publication of your material. For example, having prepared the material in advance, you can publish it at a specified time and date.
Completion of publication - You can specify the end time of the publication of your material. Upon the expiration of this period, the material will be assigned the status - UNPUBLISHED
date of creation - the date of creation of the material is set automatically, but you can change it
Alias- You can specify the pseudonym of the author of this article
Modification date - date of the last modification of the article
Changed- the user who last changed the article
Version- number of material changes
ID- a unique number that is automatically assigned to each material
Meta Description tag - this meta tag is responsible for the description of the material, which will be displayed on the search pages. From the point of view of SEO optimization, it is advisable to create a unique description for each material.
Meta Keywords tag - keys to the article. Words and phrases that inform the search bots of the main topics of the article. Separate words and phrases with a comma
Robots Meta Tag - here you can prohibit or allow the indexing of this page by search engines. This attribute has several functions:
Default - if the page is not prohibited from indexing in the main Robots.txt file, then the material will be indexed.
Index, Follow- allows the indexing of material, allows the receipt of links
NoIndex, Follow- prohibits indexing of material, allows the arrival of links
Index, NoFollow- allows indexing of the material, prohibits the arrival of the links available in the document
NoIndex, NoFollow- prohibits indexing of material, prohibits the arrival of the links available in the document
In general, in this section, it is desirable only to fill in the Meta Description tag and Meta Keywords tag. If necessary, fill in the publication start date if you want the material to be published later. The rest of the fields are filled in at the request of the author.

This tab allows you to manage the images and links that you add to your content. If you have a JCE text editor, this tab is useless.

In this tab you can control the display properties of the material. Initially, all parameters are set "DEFAULT". You can make changes in order to set individual settings for the output of the material. Settings for all materials are created in the general site settings.

This tab is responsible for setting parameters for editing materials. All settings are "DEFAULT".

Well, the last contribution. Here you can set the rights for different user categories. For example, you want to allow a certain group of users to change this content. You can do this in this tab.
CMS Joomla is a powerful yet convenient engine with good performance. For this reason, it is used not only by website developers, but also by designers, copywriters, ordinary users and many other visitors.
To install the engine, you need to perform a certain sequence of actions.
- Download the latest version of CMS Joomla from the official site.
- Create a database (DB) in accordance with all the rules. Be sure to write down the username, password and database name.
- Upload your Joomla files to your site directory.
- Go to your site address, after which the start page for installing Joomla will appear on the screen. In the empty windows you will need to enter your e-mail, site name and administrator login. It is also necessary to enter in the empty fields the requisites required to connect to the database (leave the name of the database server "localhost").
- If you do everything correctly, a page with three tabs will appear on the monitor: "Site Configuration", "Database Configuration" and "Overview". Now scroll down the page and check your settings. If you find a mistake, go back and correct the inaccuracies.
If the installation of CMS Joomla was carried out correctly, a window will appear on the screen stating that the installation of the engine has been completed.
After completing the procedure, do not forget to delete the installation directory.
We have installed the engine on the hosting https://s-host.com.ua and immediately after that we will proceed to setting up the publication parameters. In particular, let's remove the "Details" block that appears before each new material:

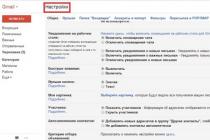
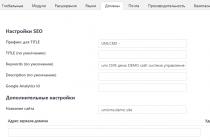
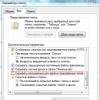
To solve this problem, we do not need additional extensions. It is enough to go to the "System" / "General settings /" Materials "section and perform a few simple steps:
open the "Materials" tab;
find the parameters entered before publications and using the radio buttons set next to each of them "Hide":

Be sure to save the changes, otherwise, the "Details" block with detailed information will not disappear anywhere. By the way, you do not have to remove all the data about the posted material. So, you can leave the date and the author, while removing all unnecessary.

In short, if you want to get rid of the intrusive “Details” block that is “tied” to each new publication, it is better to disable the display of unnecessary parameters immediately after installing Joomla on the hosting. If ever you want to display this or that parameter, just return to the page "System" / "General settings /" Materials "and make changes.
By the way, you can add “Details” on a specific page. To do this, go to the "Display" tab and select "Show" next to the desired parameters.
Hello dear readers of the KtoNaNovenkogo.ru blog. Today we will continue a series of tutorials on how to create a website yourself on the free Joomla engine.
Today's post is about organizing, presenting, and managing the site's content (content). We will also take a closer look at the nuances of deleting sections, categories and materials, as well as study in detail the possible parameter settings that can be made when adding a new material.
Content structure and hierarchy in Joomla
Organization and display of content on project pages is carried out using components, which are extensions for Joomla. To work with articles, the built-in component for working with content is used. True, access to its settings is somewhat different from the usual one and for this you will need to select from the top menu not the "Components" item, but the "Materials" item.
It allows you to organize articles into sections and categories, or leave them unclassified. There are also other components in Joomla that are capable of displaying their content on site pages.
This is, for example, the default built-in contact or weblink list component. You can also use third-party extensions, for example, Phoca Gallery, which is used to organize all kinds of photo galleries. You will find a detailed publication on this fascinating process at the link provided.
Content display is also possible with the help of modules that display their content along the periphery of the main part of the page. In this article, we will take a closer look at the output methods using the built-in component for working with articles.
The texts of articles are stored in a database, and not in folders on the hosting hard drive. This organization allows you to very quickly reorganize content in Joomla. Instead of moving files with texts from one directory to another, it is enough to set new attributes for the article and it will instantly be assigned to another section and category.
As I mentioned earlier, the CMS does not store pages as files with the ".HTML" extension, as was done earlier in static sites. Joomla generates a web page the moment you click on a link, which makes it easy to modify the viewed documents by changing the links in the menu. The content itself will remain unchanged.
In the simplest case, a link from the menu can open one single article from those that you have already added in the admin panel. But it will also be possible to organize the output to the web page of the contents of an entire category or section (a list of all the materials contained in them in one form or another).
And in this case, you, too, will only need to follow the link from the menu. You can customize what exactly will be displayed when you click on a link in the menu in the admin panel by selecting the option you need. But we'll talk about this a little later.
The easiest way to organize your content is to use unclassified articles that will not belong to any sections or categories. This method can be relevant and in demand when creating a business card site on Joomla, for example, when a hierarchical organization is simply unnecessary and unnecessary.
At the same time, it will be possible to hang a separate article for each menu link by creating items in the admin panel called "Standard Material Template". In this case, you will spend the minimum amount of time to create a website, because you don't have to deal with all the subtleties and output methods. You just have to write a few articles and hang each of them on a link in the menu. That's all - we can assume that the business card has been created.
But it will be convenient and relevant only if there are no more than a dozen articles. And if there are more of them and you plan to add them over time, then you cannot do without a hierarchical organization of content. For these purposes, there are sections and categories (two-level hierarchy), over which it will be possible to scatter both existing materials and those that will be added over time.
The top level of the hierarchy is the sections into which it will not be possible to directly place content (materials). To place articles, there are already categories, which in turn must necessarily belong to some section. Simply put, the sections contain only categories within themselves, while the categories already contain articles (content).
The hierarchy will look something like this:

The best option will be when you think over the structure of the sections and the categories nested in them in advance. This will be much easier than transferring a bunch of materials between them later. I have already considered the nesting scheme of sections, categories and articles in Joomla in some detail, so I will not repeat it. There I also talked about their creation and settings.
Now I want to dwell on the very process of filling the site with content. Everything seems to be simple here - fill in the texts in a visual editor, insert pictures and save the result. But at first there may be slight difficulties and misunderstanding of how to do this or that action. After all, Joomla does not have a 100% intuitive interface, which means there will be work for me.
Removing sections, categories and materials in the admin panel
But before you start learning how to create content, I suggest you learn how to delete it correctly. Here, again, there is nothing tricky and complicated, but there are nuances that may arise in this case. Your content may appear on a new project for the reason that when installing the engine, for example, you did not uncheck the box that prescribes adding demo data.
They, of course, will allow you to visually see all the capabilities of the engine for work and content management. You will see really working menus placed in the positions for the modules of your template, look at the organization of materials in the Joomla admin panel and, finally, ripe to start adding your own articles, categories and sections, but for this you will need to delete all demo data.
If the engine is installed, along with demo materials, many different sections, categories and articles are created that you will not need in the future. They will need to be removed. It seems to be nothing complicated, but you need to know a few points that can get in the way.
First, the deletion must start from the very bottom of the hierarchy, i.e. from articles. For it will not be possible to delete a category in which there are articles and it will not be possible to delete a section in which there are categories.
Secondly, the article may be blocked and you will have to reset the locks to delete it. Well, besides this, you need to know that when they are removed from the manager, they will not be completely erased, but will go to the basket, from which they will also need to be removed. But first things first.
To delete articles in Joomla, you will need to select "Materials" - "Materials Manager" from the top menu in the admin panel. In the window that opens, you can use filters to display only articles of a specific section or a specific category.
If you see a lock icon in this list next to any publication instead of a radio button, it means that it is not currently being edited. Those. a window with a page for editing this article is open in the browser. Or you closed it, but forgot to click the "Close" or "Save" button on the edit page. Therefore, it is considered open and cannot be deleted from the Joomla database.
In this case, in order for the blocked publication to be deleted, you will have to select the "Tools" - "Reset locks" items from the top menu in the admin panel. After that, all materials will be unlocked and can be deleted:

In the material manager, you can select individual of them for deletion by checking the box next to them, or delete a whole batch at once. You can also use the filter to display materials only for a specific section or category, and then select the "All" option at the very bottom of the list in the "Number of rows" area:

Now you just have to put a tick in the topmost field of the column adjacent to the name, and click on the "Add to cart" button located at the top of the window. All selected articles will be transferred to the trash:

To permanently delete them, you need to select in the admin panel from the top menu the items "Materials" - "Trash" and in the window that opens, select all the articles that are there, and then click on the "Delete" button located at the top of the window:

Everything is done with the materials, now you just have to go in turn to the managers of categories and sections (from the top menu of the admin panel) and delete all unnecessary categories that no longer have articles, and then unnecessary sections that no longer have categories.
Well, we learned how to remove content from Joomla, now is the time to learn how to create it. As you know, it is easier to destroy than to build. I will not talk about creating the structure of sections and categories, because I had a whole article devoted to this (the link to which is given just above), and I will go straight to adding new material.
Adding and distributing content in Joomla
To do this, you will need to select the items "Materials" - "Manager" from the top menu of the admin panel. A window already familiar to us will open, where the titles of all articles available on your site will be displayed. If you have just deleted all demo data, then this list will be empty. Let's go over the toolbar of the Material Editor window and consider the purpose of the buttons available there:
The first two buttons "From archive" and "To archive" are used for unpacking articles from the archive and for placing them in the archive. The very rarely used feature of working with archives, in my opinion, is practically useless and unnecessary in work.
The buttons "Show" and "Hide" allow for mass publication (output of materials to the site pages) or mass unpublishing. To do this, you will need to put a checkmark in front of those articles to which you want to apply this action, and then click on one of these buttons.
You can customize the output of materials in relation to individual articles in the list by clicking on the red cross or green checkmark in its line:

The "Move" button allows you to move the selected materials (opposite which you will check the boxes) to another category or section in Joomla. The "Copy" button allows you to copy them only. "To the basket" allows you to move the selected materials to the basket, from which they can then be restored or permanently deleted.
"Edit" allows you to open the selected article for editing (equivalent to clicking on the title of the article in the manager's list). "Create" allows you to open a window for adding new material, where you can write the text of your article.
The "Options" button allows you to set the default settings for all materials. They will be used by default for all new materials that you add to Joomla in the future, as well as for those articles that you have already added:

You will be able to change almost the same settings for materials (with the exception of some) when writing or editing each individual article (read more about this at the end). Of course, it is much more convenient to set the desired default settings, and when writing articles, change them only as necessary, if they are not suitable for this particular publication.
Creating a new article in the Joomla admin panel
To add a new material, we will need to use the "Create" button. As a result, a window will open allowing you to enter its text and make various settings for it:

You will have to fill in the "Title" field, where you need to enter the desired name, which will subsequently be displayed on the site pages. The "Nickname" field should be filled in if you. There you will need to enter in Latin letters without spaces, in fact, a piece of the future URL (address) of the page, if it will be displayed separately via a link from the menu.
If you use third-party components for organizing CNC, you will not need to fill in the "Alias" field. I already wrote. By the way, this component will also help you create a proper 404 error page, which is also welcome.
For a new article, you need to select a section and category in the appropriate fields. If you wish, you can make it not belong to any of them, i.e. not classified (can be used later to create so-called static pages). To do this, in the "Section" and "Category" fields, select the "Not specified" option.
A check mark in the "Published" field will mean that after saving it will be immediately published and may appear on the site pages if a corresponding menu item is created to display it. This publication can be displayed, for example, as part of a category for which you have created a corresponding menu item (in the form of a Blog or a List).
For example, by creating a "News" menu item of the "Category Blog" type and adding a new article to it, this material will be available on the site when you click on the "News" link in the menu of your project. The most difficult thing for a novice user to understand is that there are no pages in Joomla like in a static website, and all the content (content) that you add in the admin area is stored in the database. On the website, however, content is only displayed when linked from the menu.
Thus, you must first add content and then create links to it in the website menu. They determine not only what should be displayed on the page, but also how the content should be positioned. But we are already running a little ahead and we will need to return to creating new material in the Joomla admin panel.
In the upper part of the window there is one more field "On the main", where by default the checkbox in the "No" position is active. This means that this article will not appear on the home page of your site.
All publications, when creating or editing which you put a tick in the "Yes" box of this field, will be displayed on the main page in the form of a blog. You can manage the articles displayed on the main page by selecting "Materials" - "Main Manager" from the top menu of the admin panel.
In the main part of the window for adding new material, you can enter the text of a future article, using the capabilities of the visual editor built into Joomla. I personally prefer to use another visual editor - JCE. To learn how to install JCE and make it the default editor, follow the link just above.
Basically, working in a visual editor is similar to working in a text Word, with the exception that in Joomla you sometimes still have to go directly to editing the HTML code (there is such a button "HTML" on the toolbar of the default editor).
Your ability to understand and make changes to the HTML code of the article will help you quickly and easily resolve any quirks of the visual editor. Therefore, if necessary, I advise you to familiarize yourself with the content of the section of my blog "HTML for Beginners".
Personally, for the most part, I do not use the visual editor at all, because at first I just practiced using HTML code in practice, and then I got used to using only it. But this is already a matter of taste and personal preference. We will assume that with the creation of the text of the article and adding to it, if necessary, as well as images, etc. things you will figure out for yourself.
Settings (parameters) that can be set when adding an article
Let's take a look at the settings for the new material that we can make using the three tabs from the right pane of the window. The first one is called "Parameters - Articles" and on it you can select in the "Author" field the user who will be considered its author.

In the "Pseudonym" field, you can enter a pseudonym under which this material will be published, if you do not want to show the real name of the author. Authorship information will be displayed at the top of it, but only if you set it in the settings for this material, but we'll talk about this a little below.
In the "Access" field, you can select the group of users who will be able to see this article (either all, or only registered users, or only administrators). In the field "Date of creation" you can specify the date of creation and it will be displayed on the page with the article, unless it is prohibited in the settings for this material.
In the "Published" field, you can enter, if necessary, the date of postponed publication. In this case, after you save this article, it will appear on the site only with the onset of the date and time you specified in this field.
Thus, before leaving on vacation, you can add a lot of materials at once in the Joomla admin panel, but set up their sequential publication at intervals of a day and thereby create the appearance of your presence. By default, the current date and time will be registered there.
In the "Expires" field, you can set the date of removal of this article from publication. This may be necessary, for example, when carrying out a one-time promotion, after which it will no longer be needed. By default, the option "never" is selected in this field, which means that this material can only be removed from publication manually. In this and in the previous field, to select the date, you will need to click on the calendar icon located on the right.
Advanced settings for articles (materials) in Joomla
On the "Options - Advanced" tab, there are those settings of materials that will be used only when this article is fully displayed on the site (for example, when a visitor clicks on the "More" link at the bottom of the article announcement when displaying a category blog in Joomla). Often, very few people change these advanced parameters. either do not know how to do this, or do not consider it necessary.

Personally, I still think some of these advanced options should be changed. But, firstly, this can be done for all articles at once by clicking on the "Parameters" button on the page of the material manager and selecting the necessary settings for the same parameters.
As a result, these advanced settings for articles will be applied by default (the default option looks like "Use global") when writing all new articles. But you will be able to change some of them when creating or editing content.
Let's go in detail consider all the settings on the "Options - Advanced" tab, which you can do when creating or editing material in Joomla:

The next settings tab in the new material creation window is called "Meta-data":

Here you can set information about the article that is not visible on the site, which is primarily intended for search engine robots. In fact, some of the fields on this tab also have a pretty strong SEO value. I have already written about this in detail in an article about the Jumla administration panel, so I do not consider it necessary to repeat myself. In the same place.
I would be grateful if you use the buttons:
Good luck to you! See you soon on the pages of the blog KtoNaNovenkogo.ru