![]()
Sometimes the tablet's touchscreen or G-sensor calibration fails. The device begins to incorrectly determine the position of pressing on the screen or orientation in space. Depending on what type of display is used in your device, you can judge whether the situation can be somehow corrected. It is very easy to find out which display is in your device - just read the instructions for it, or look on the manufacturer’s website.
Resistive display sensors
Resistive touchscreens were the first to appear and were previously the most widely used. They are still used in some phones and tablets, as well as in the vast majority of car navigators. Now a little theory so that you have an idea of what kind of resistive displays these are. Try not to fall asleep while reading.
The design of such a screen is very simple - two plates, hard glass or plastic and flexible plastic, covered with a conductive layer and separated by point microinsulators. When you press on a flexible plastic plate, it bends, and at a certain point on the screen a short circuit occurs between the plates. The sensor controller measures the resistance of the plates up to this point and determines the coordinates of the press. This type of sensor has several disadvantages: low light transmission, fragility, the sensor responds precisely to pressing, and not to touch (therefore, you can control it with a regular stylus or any other fairly hard object, such as a match), the inability to detect several simultaneous presses, and also Due to manufacturing features, the parameters of the plates for each sensor may vary slightly, which causes inaccuracies in control.
To configure the controller of such a sensor, calibration is required. Usually this function is located in the display settings, called sensor calibration or touch screen settings (may be called differently, but the meaning is the same). Since I have a capacitive screen, I don't have these settings and I can't take a screenshot.
After starting the calibration, the setup program will ask you to press several times at certain points on the screen and will remember the settings. After this, the sensor readings will be adjusted in accordance with these settings, which will ensure an accurate determination of the location of the press.
Capacitive sensors
There are two main types of such sensors: surface capacitive and projection capacitive. The first ones are designed quite simply: an alternating voltage is applied to the corners of the conductive plate of the sensor, and leakage currents caused by the introduction of foreign capacitance (for example, from a finger) are checked. Based on the current ratio for each angle, the point of contact can be determined. These sensors do not respond to a regular stylus or gloved hand. Such sensors are quite rare, do not support multiple simultaneous touches, and also require calibration. Calibration is performed as for a resistive sensor.
Projected capacitive sensors, the most common today, have a complex multilayer design consisting of a matrix of individual sensors combined into a rectangular structure. You can control several simultaneous touches (multi-touch). Such a sensor is sometimes made directly on the glass of the screen, which reduces distortion (there is no air gap between the screen and the sensor). The controller is most often structurally integrated with the sensor itself, the parameters of which are known to it and do not require calibration. In many tablet models and rarely in phones, the controller is located on the main board of the device. Most often there are no problems with phones, but with tablets it happens that the same main board is used for screens of different diagonals, and the sensor parameters may vary.
Usually no configuration is required, but sometimes after firmware or software failures the controller may need to be calibrated. This can be done through the engineering menu (you need to figure out how to get there specifically for your model) or using special programs, such as TouchScreen Tune (available in the Google Play Market). Sometimes a capacitive sensor may not work correctly when charging due to interference from a non-original charger. There is no need to calibrate anything here - the charger goes into the garbage chute.

Accelerometer calibration (G-sensor)
This sensor, also called a gyro sensor or accelerometer, is used to determine the position of a device in space. G-sensor calculates the speed and rotation angles of the device. The simplest example of use is the “auto-rotate” function in Android and controlling games by tilting or rotating the phone (tablet). Air mouse remotes also use this sensor. Accelerometer calibration is usually not required; many games and programs allow for adjustments. It’s another matter if, after a “crooked” firmware, the accelerometer does not work at all or is difficult to configure normally. The engineering menu will help you here; there you can test and calibrate the G-sensor, or install normal firmware.
- To enter the engineering menu, hold down the volume down button and the power button at the same time, and wait until the menu appears.
- Using the volume up/down buttons, navigate through the menu and select the item Test Report, and in it - G-Sensor cali.
- Place the tablet on a flat surface and press Do Calibration (20%) until the numbers at the very top take the following form - +0.xxxx +0.xxxx +9.xxxx
- Calibration is completed, press volume up 2 times, and then - Reboot.
A short video on calibrating the G sensor (accelerometer) using the example of a Chinese tablet
Bottom line
In general, first find the reason why your display is behaving inappropriately. Don't rush to calibrate, figure everything out first. Perhaps you share lunch with your tablet, leaving grease marks or jam marks on the screen. Dispose of them carefully. It happens that a person accidentally touches the display with a finger of the hand with which he is holding the tablet, and the sensor is triggered. Just hold it differently.
Following the example of Pontius Pilate, I wash my fingers with which I typed this article and declare that all responsibility in the event of data loss or software failure lies entirely with your conscience.
Actions that relate to the formulation - calibrating the Android screen include setting up the touch-type display in order to properly execute commands by the device by touching the sensor with a stylus or fingers. Without such a setup, the device will work, but a number of undesirable consequences will arise when operating the gadget.
Some owners of devices running the Android operating system that are equipped with touch screens may sometimes encounter the unwanted problem of “disobedience” of the screen. In other words, when you touch a certain point on the touchscreen with a stylus or finger, the gadget perceives it as a completely different command.
Or there are situations when the sensor executes commands only after the third or fourth attempt. As a rule, the cause of these problems is the incorrect operation of the screen itself, for which it is necessary to calibrate the touchscreen of the device.
 Urgent and correct calibration of the touchscreen on Android may be required in almost all cases if the smartphone has been dropped from any height, and after the device accidentally falls into the aquatic environment, this procedure is mandatory.
Also, calibration of the sensor on Android will be required after repair work on replacing the screen, the appearance of a water stain under the glass of the screen, and after suffering other, at first glance, minor damage.
To check the need for this procedure, you must perform the following steps:
- Remove the special film protecting the screen (to ensure maximum correct operation of the sensor);
- Enter any letter or number;
- If there is a discrepancy between the button pressed on the gadget screen and the information typed, setting up the touchscreen is necessary.
Basic calibration methods
Two methods are used to bring a sensor-sensor that has been knocked out of its normal position into compliance.
These main methods include:
- Using special programs for the Android system;
- Self-correction.
It should be noted that for many brands (Samsung, HTC, Nokia and other Android devices) the calibration steps are practically no different from each other and are identical.
Manufacturers of Android devices, as a rule, can use two types of sensor:
- Resistive (with a screen made using this technology, all sorts of problems very often arise, so the setting is more in demand here, but such screens are practically not used today - these systems can only be seen in budget or already outdated models);
- Capacitive (used in most gadgets, it is more reliable and of higher quality).
Touchscreen calibration using Android
If you do not have access to the Google Play assortment, the display of your Android device can be configured in another way without any problems.
Step-by-step instructions in this case might look like this:
- Go to the “Settings” menu in the gadget;
- Select “Phone settings;
- Find the inscription “Calibration, press the button;
- A cross target with a dot inside will appear on the screen;
- Click on this center of the target that appears at least three times.
After these steps, the device will automatically remember the touches. Thus, the calibration will be considered completed. After completing the setup procedure, you need to check the operation of the touchscreen by pressing a certain character on the screen, which should appear after its input.
Android screen calibration apps
You can configure the sensor using special software. The necessary software to successfully carry out this process can be found freely and freely available on the Internet.
The programs are quite simple to install and operate. But the most important thing is that you can get a positive and effective result from using almost any of them. In the Google Play store you can find free software applications such as Bubble and many others.
Application
This program has an excellent interface and also has some additional special features. Advantages of the application:
- Bubble is a free program;
- Works great with tablets and smartphones;
- Advertising can be disabled in the settings, or it can be left to encourage developers;
- Excellent graphics;
- The presence in the application of a special display that displays the angle of inclination with the highest accuracy in fractions of a degree;
- Easy to use;
- Possibility to fix the angle with a gesture or click;
- The presence of a sound signal at the zero position of the angle;
- If necessary, the ability to lock the screen orientation (horizontal or vertical);
- Ability to reinstall the application on the SD card;
- Disabling, if necessary, the “sleep” mode while the program is running;
- Using full screen mode.
Using the program is completely easy. To do this, after the initial launch, you need to select the type of device screen orientation in the settings (or set the “Auto” mode) and perform level calibration.
To do this, place the phone horizontally and press the calibration button on the left of the screen for a short time. “Calidbration” should appear on the touchscreen, and then “Wait”. The application will be ready to function when the screen displays a zero degree value.

The application is a program that allows you to configure the screen parameters of a touch device, while increasing its sensitivity and efficiency. Advantages:
- When using a protective film on the touchscreen, this application can significantly improve the sensitivity of the sensor;
- The slowing effect of using a protective film is eliminated;
- When using a device such as a stylus, some kind of tuning of the gadget becomes simply necessary with the help of this program. Using this application, you can enable complete ignoring of even palm touches (after setting, the hand can rest on the screen when using the stylus);
- If you need to use different settings, you can create separate shortcuts to quickly launch the application;
- The application has a free version.
The program is a professional tool for fine-tuning the level on an iPhone or iPodTouch. The application is used to solve ordinary problems or in more complex areas of use where the tilt of the device needs to be measured quite accurately. Advantages:
- The possibility of full-screen mode, which allows you to switch by clicking on the lower and upper arrows located in the middle of the gadget screen;
- Advanced two-way calibration allowing adjustments on surfaces that are far from level. Any direction is calibrated separately in order to obtain the required accuracy;
- Possibility of free download;
Possible calibration problems
If, however, the device is not calibrated using the method chosen for this purpose, or the application used does not give the necessary positive changes, then experts recommend trying another program; fortunately, there are quite a lot of them, software in this direction is very diverse. You can also try “Hard reboot” or in other words rebooting the device.
The last option for calibration is to contact a service center. A similar problem with the device screen can be caused not only by incorrect settings, but also by more serious reasons. In particular, in hardware failure of device elements or the presence of manufacturing defects. In this case, it is more advisable to contact specialists to troubleshoot the problem.
It should also be noted that, together with screen calibration, the gadget may need to check and adjust the screen sensitivity parameters for its subsequent high-quality operation.
Power Clean is a popular tool for optimizing the performance of Android devices. The main characteristic feature of this cleaning wizard…
Smartphones and tablets running Android OS have a similar problem for many users...
The use of touch screens on mobile devices has significantly expanded their functionality and made it possible to get rid of numerous physical buttons that were necessary for entering text and performing other tasks. However, even with so many advantages, the sensor may lose accuracy, which negatively affects the comfortable operation of the device. Let's look at the concept of calibrating the Android screen and methods for doing it.
Definition of “screen calibration”
Calibration refers to adjusting the touch screen in relation to how it perceives the touch of your fingers or stylus. The procedure is designed to improve the accuracy of determining the point of contact based on certain actions performed by a person.
Will be useful
The usual procedure of this kind is carried out by the appearance of circles on the display of the device, which should be clicked. The data obtained allows the system to identify areas that have increased or decreased sensitivity, as well as areas where the touch location does not coincide with the displayed element. As a result, the software regulates deviations from the norm and corrects shortcomings.
Problems with the sensor
In a newly purchased device, the sensor is well configured and responds correctly to human touch. Over time, the accuracy of the work deteriorates, errors and inconsistencies appear. Knowing when to calibrate is easy. It is accompanied by the following problems:
- Periodic sensor activation. For example, out of three clicks on the display, two or one were detected. Clearly visible when typing.
- Recognition of some types of actions disappears. The touch screen is very functional, it supports multiple simultaneous touches, stretching with fingers, and swiping. A sign of a problem may be incorrect recognition of one of the interaction options.
- Incorrect determination of the point of contact. For example, one menu item was selected, and the adjacent one opened.
- After interacting with the display, you have to wait quite a long time for a response.
- Deterioration in touch recognition when working with a stylus or vice versa - with a finger.
- If , then a clear sign will be the interruption of the stripe when drawing a line.
It is important to know
Touch screen calibration will help resolve all of the above issues. To perform the operation, you do not need any special skills or the involvement of a specialist.
Causes of malfunction
The main reason for a situation where calibration is needed is long-term use of the device. On higher quality screens, the procedure is required less often, on lower quality screens – more often.
Prolonged inactivity of a mobile device can also cause malfunctions. Sometimes calibration is necessary immediately after purchase because the initial adjustment was not performed correctly. Changing the touchscreen definitely requires subsequent configuration.
note
An additional reason for calibration could be malicious code that got onto the phone through an unverified application, or a system failure in the firmware itself.
Sometimes the user incorrectly configures the sensitivity settings, which affects touch recognition.
It should be understood that the reasons for the inaccurate operation of the sensor do not always lie in the system. This There may be severe wear on the display, cracks, bubbles under the protective film, etc. Calibration using software methods will not help here; you will have to use other options to solve the problem.
How to calibrate the screen on Android?
Performing display calibration Available both using built-in operating system tools and third-party applications. Let's consider each option in more detail.
Mobile device settings
Since calibration is an integral part of using a touchscreen, in many versions of Android developers have implemented the function directly into the settings.
To use this method, you must:
- Open the settings of your phone or tablet, go to the “Screen” section.
- In the window that opens, find the item “Screen calibration” or similar.
- After starting the procedure, you will need to click on the dots that appear on the display and drag them.
- upon completion of the adjustment.


It is important to know
The option may be present in other sections or may be completely absent. If it cannot be detected, you should use other methods presented below.

Will be useful
During setup, it is better to place the smartphone on a flat horizontal surface.
Engineering menu
In this hidden section, more serious settings that require certain knowledge are carried out. This method is suitable for those who did not find the corresponding item in the regular menu and do not want to install third-party software to carry out the procedure.
There are two ways to get to the engineering menu for subsequent calibration of the Android screen:
- Through a special code:
- Open the standard dialing application.
- Enter a combination of numbers and characters: *#*#3646633#*#* or *#*#4636*#*. There is no need to press the call button after the last character. There are other codes that are suitable for little-known Chinese-made devices. You can find them on thematic forums.
- Via the application:
- 1. Visit the Play Market and install the MTK Engineering Mode program.
- 2. Launch the application, click on the “Android Settings” button.
- Open the “Hardware Testing” tab.
- Find and click “Sensor”.
- From the list in the new window, select “Sensor Calibration”.
- In the utility menu, clear old presets by clicking “Clear calibration”.
- Select the line “Do calibration (20% tolerance)” to set the maximum sensitivity of the touch screen or “Do calibration (40% tolerance)” to set a lower sensitivity.
- Saving the settings is not required; just exit to the desktop by pressing the “Back” button several times.
- Reboot the device.
- and launch the application.
- Press the “CALIBRATE” button.
- Perform the following steps step by step: single tap, double tap, long press, swipe (moving your finger to the side), pinch, zoom (touch the screen with two closed fingers and spread them apart).
- Close the program window after the “Calibration successful” notification appears.
- Install and open the application.
- Place your phone or tablet on a table or other flat surface.
- In the list that opens, select “Display Calibration”.
- Wait for the calibration process to complete. In this case, there is no need to perform different types of touches; the system itself will determine the current configuration and any inaccuracies. The progress of the automatic setup will be displayed in a pop-up window.

After successfully entering the engineering menu, you must perform the following steps:


When the operating system will start, inaccuracies in the sensor operation should disappear.
note
The engineering menu method has an advantage over using the corresponding section from the phone settings, so it is recommended to use it if the previous option did not help.
Third Party Applications
The use of third-party software is justified if there is no calibration item in the phone settings or if it is impossible to get into the engineering menu. The procedure will be discussed in detail using the two most effective applications as examples, since they operate using different system and hardware methods.
Instructions for use:


If using Touchscreen Calibration does not produce noticeable results, your current device may need to use other calibration methods that are used in the app.
The process of working with Quick TuneUp is as follows:


In this case, the glass does not necessarily have to have deep cracks; sometimes it can simply sag due to wear or other factors. Eliminated
Calibrating the sensor of a mobile device is one of the priority points in setup. It is clear that incorrect operation of the screen when calling a command or procedure, pressing buttons or links is at best irritating and a waste of time, so it is better to initially spend a few minutes to customize the screen depending on your needs. This is done quite simply.
When and why is sensor calibration required?
Today, you can find two types of screens in Android devices - resistive and capacitive. The first type is used in outdated devices, and all modern gadgets use the second type, since it is more reliable in operation.
Based on this, it is easy to conclude that resistive screens require sensor calibration settings more often (about once every 2-3 months).
Nevertheless, we can also give a list of situations when the question of how to calibrate the sensor on Android will have to be resolved first. There may be several reasons. Among them are the following:
- mechanical damage to the screen;
- ingress of moisture and dust;
- sticker or removal of protective glass and film coating;
- buying a used device second-hand, etc.

How to calibrate a sensor on Android: basic methods
As for the calibration itself, this can be done in several ways:
- make the necessary settings yourself using the Android operating system;
- calibrate the sensor using specialized utilities;
- return the device to a service center.
Each of these methods has its own advantages and disadvantages, which will be discussed in more detail below.
Manual calibration using Android
In the simplest case, the problem of how to calibrate the sensor on a tablet or smartphone can be solved simply.

To conduct a preliminary test on the device, you need to use the settings menu, where you select the tilt sensitivity section. The new menu has a special testing button, which you need to press.
The calibration setting is located in the phone (tablet) settings section, where there is a corresponding line. When you enter this menu, a cross with a red dot inside will appear on the screen, which you should click on as accurately as possible (3-4 times is enough), then save the settings changes and check the gadget’s functionality. If you notice that some controls are not functioning correctly, the adjustment should be repeated.

In addition, you can adjust not only the pressing force or the accuracy of hitting a point on the screen, but also completely customize any sequence of actions (stretching the image, single or double click, dragging the screen, etc.).
Please note that the built-in program for the sensor of Android devices, depending on the version of the operating system itself, may be located in another menu, for example in the display settings. Also, setting the pointer speed settings is mostly done in the language and input section, so be careful.
Using specialized utilities
If the sensor calibration program is not found in the system menu or causes some difficulties in use, you can use the installation of additional utilities, among which the most popular are the following:
- Bubble;
- TOPON;
- GPS Status & Toolbox;
- Clinometer and the like.

In any case, you can go to the official Google Play service to search for the required utility there. If the programs for Android found there do not suit the user in some way, something similar can be found on the Internet, only then they will have to be installed manually, allowing the use of installations from unknown sources. In addition, you can even install special utilities for the same Windows systems (together with an Android emulator) and configure them using them.
Contacting the service center
Programs for Android systems are good. But what to do if none of the above methods gives the desired result? Apparently, the problem is that there is a serious breakdown in the device itself, which is why the use of software methods does not work.
In this case, the problem of how to calibrate the sensor on Android can only be solved by taking the gadget to an authorized or private service center. Naturally, this will entail financial costs, but specialists will be able to identify and eliminate the cause of the problem. Besides, it all depends on what exactly is broken. In this case, as is already clear, internal intervention in the components of the device itself will be used.
What's the result?
That, in fact, is all that concerns how to calibrate the sensor on Android. If we talk about the preferred method, in the simplest case it is best to use the built-in tools of mobile devices. If their use does not produce results or accurate calibration cannot be performed for some reason, you should try to use third-party applications.
Do not forget that not everything and not always depends on the software. As already mentioned, the impossibility of using such methods may be due precisely to the breakdown of the device, and here it is impossible to do without the intervention of specialists. In addition, the device may still be under warranty, and you shouldn’t disassemble it yourself (you could lose it). Finally, if the owner of the gadget does not have the knowledge necessary to carry out repairs or maintenance, there is also no point in trying to experiment with the device.
Otherwise, provided that everything is in order with the device itself, we recommend turning to third-party utilities, since most of them allow for more fine-tuning, and some also have built-in testing modules, allowing the user to set the recommended parameters upon completion of the test.
Although touch devices are very convenient, over time the sensor performance can become less accurate, and this, in many cases, does not depend on the type of screen or the make and model of the device.
In this regard, any such sensor (and screen) sooner or later requires debugging or calibration. This article describes how to calibrate and configure the screen on Android.
The essence of the problem
It is known that while the phone or tablet is new, the quality of the sensor is very high. It responds quickly enough to touches, quite accurately determines the point on which the user pressed, etc. But over time, as the actual life of the device increases, the quality of the sensor significantly decreases, and errors and inaccuracies begin to occur.
How do you know when you need to calibrate the display on your mobile device? Usually, this has to be done when they start errors of the following type appear, significantly interfering with work:
- The sensor does not always work– some actions are not recognized and the device does not respond in any way;
- Some types of actions are not recognized or work poorly, but not all (for example, tapping may work fine, while swiping may not work every time, or vice versa);
- The actual location of where the action took place is not accurately determined(for example, the button that is pressed is not the one you actually touched);
- The waiting time for a response after performing a particular action has increased significantly on the touch screen;
- The display has become worse only when using a stylus, or, on the contrary, only when using a finger;
- In graphical applications, this problem may appear as interruption of the drawn line and so on.
The occurrence of such a problem is, in fact, a normal and natural process, the consequences of which can be quite easily eliminated with basic means, that is, without involving a service.
When does it occur?
Long-term operation of the device– the first reason that the quality of the sensor on a phone or tablet will gradually decrease. This is a normal process that all modern phones are subject to, all the more so the lower the quality of the screen installed on the device. Also, this phenomenon occurs, on the contrary, when a device that was previously actively used is inactive for too long.
In some cases, such screen debugging is required immediately after purchase, since it happens that The sensor was initially configured incorrectly. After changing the display, it is also almost always necessary.
Changes in software settings also affect the quality and speed of the sensor. These could be any viruses or other software problems, or there could be settings, deliberately or accidentally, changed by the user. For example, the sensitivity of the sensor can be changed for ease of use in the phone settings.
But, A decrease in the performance of the device may also occur for other reasons. For example, this happens when scratches and abrasions appear on the screen, a poor-quality protective film is applied or bubbles remain underneath it, etc. In this case, calibration will not be effective enough and the problem will not be resolved.
Definition
What is calibration, and how does it solve the problem of an unresponsive or inaccurate sensor? Calibration is an adjustment of the touch screen made by the device based on user interactions with the touch screen.
The standard calibration procedure is as follows: Dots, circles or crosses appear on the screen in random order and the user must click on them.
Based on this process, the system builds a certain scheme of points and areas on the screen, thus determining which of them are more responsive, which are less, which have higher accuracy, and which have lower accuracy. Based on these diagnostics, the system makes adjustments and troubleshoots.
Carry out calibration with the device you use most often. If you use a stylus more often, then calibrate the screen with it, but if you usually use the phone manually, then calibrate with your finger. This is due to the fact that different objects have different thermal conductivity and the display may react to them slightly differently from a technical point of view.
<Рис.2 Калибровка мультитач>
Calibration Methods
This debugging can be done using several methods. The simplest and most effective of them are described below. If after using one or another method there are no significant changes for the better, then it is advisable to try another method.
Device Settings
Since device calibration is a necessary process, the creators of most Android devices have included this function in the device settings. How to use it?
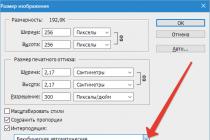
1. Go to Device Settings;
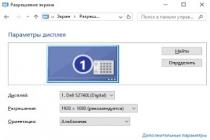
2. Go to the section Screen or Display(may be called differently, depending on the device model, Android version or the nature of Russification;
<Рис.3 Настройки>
3. Go to the section Screen calibration/calibrate the screen or similar (note that on some devices there is no such section at all, this means that debugging will have to be done in a different way);
<Рис.4 Экран>
4. If such a function exists, then after clicking on it a special test will be launched, in which you need to click on certain points as they appear or in a certain order (on different devices the order of the test may vary slightly, but the essence remains the same);

<Рис.5 Тест>
After completing all the necessary steps, the system will show you a notification that the test is finished, now section Settings can be closed.
Sometimes significant improvements in sensor performance are observed immediately after this. But in most cases, the tablet or smartphone needs to be rebooted.
Engineering menu
Engineering menu- this is a special settings section in which you can carry out more complex and more precise debugging and adjustments. In any case, it contains a calibration function, for example, on those devices in which this test is not included in the simple device settings menu.
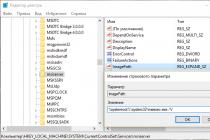
In order to access the engineering menu, you need to perform a number of actions:
1. Open the application Telephone on your device;
2. Dial one of the special numbers (they are different for different devices, on some they all work, so it makes sense to try each code in turn until you come across one that works) - *#*#3646633#*#*, *#*#4636*#*, *#15963#*;
<Рис.6 Вызов меню>
3. There is no need to press the call button; after entering the last character of the suitable combination, the engineering menu will open by itself - go to the Hardware Testing section in the top ribbon;
<Рис. 7 Инженерное меню>
4. Scroll down the menu that opens after this to the item Sensor and move on to it.
<Рис. 8 Сенсор>
5. Now we start the calibration itself - to do this, go to the section Sensor Calibration.
<Рис.9 Настройка>
6. In the calibration menu, find the section Clear Calibration and click on this button to reset the old sensor settings;
<Рис.10 Сброс настроек>
7. Now press the button Do calibration 20%, if you want to set the maximum screen sensitivity and 40% - if a little lower;
<Рис. 11 Запуск>
8. There is no need to make additional saves– just leave the engineering menu by pressing the button Back or Home;
<Рис. 12 Выход>
9. Reboot your device.
After turning your phone back on, the problem should be completely resolved. The sensor should work more clearly. Moreover, this method gives.
Often, the result is better than calibration using a test in the phone settings, therefore it can be carried out even if after the test in the settings the user did not notice a significant improvement in the condition of the sensor.
Using apps
If calibration is not listed in the device settings menu, if the engineering menu does not open (this sometimes happens), or if the quality of the calibration does not suit you, then you can download a special application that will help you debug the sensor. It is distributed free of charge on the Play Market.
Download and install Touchscreen Calibration
In order for this application to appear on your phone, do the following:
- Open the Play Market application on your device;
<Рис. 13 Гугл Плей>
- In the search engine, enter Touchscreen Calibration and open the application with the icon of a phone and a wrench;
- Click the Install button;
<Рис. 14 Скачивание>
After that it will automatically download and install, and a shortcut will be created on the desktop of your device.
<Рис. 15 Иконка>
The app is now installed on your device and you can start using it. It does not take up much memory and is distributed free of charge.
The load on the phone's hardware resources is moderate or minimal (depending on the technical characteristics of the device).
Using Touchscreen Calibration
As mentioned above, the shortcut to launch this application is located on Desktop your device. Launch it from there. It should open right away, since it does not require a large amount of RAM, and therefore runs without freezes or failures.
- In the main menu of the application find the big blue button Calibrate and click on it;
<Рис. 17 Запуск>
Complete all actions suggested by the program– this will be, just like in the first method, a point-by-point test, at the same time, for different types of actions – tap, double tap, long press, etc.;
<Рис. 18 Тест>
After completing all the steps a notification will appear on the screen indicating that the process has completed successfully;
<Рис. 19 Завершение>
Now you can close applications in any familiar way.
Quick TuneUp App
This application is in many ways similar to the previous one. Essentially, they both accomplish the same goals, but use different methods to do so from a hardware and software perspective.
Therefore, if after working in the previous program there were no significant changes in the quality of the sensor, then it makes sense to download this application and try to correct the situation using it.
You need to download this application in the same way as the previous one, just enter a different combination in the search engine in the Play Market, namely Quick TuneUp. After clicking the Install button, the application will automatically download and install on your device. You can find a shortcut to launch it on the main desktop.
<Рис. 21 Ярлык приложения>
2. Find the item in the main menu of the program Display Calibration and click on it;
<Рис. 22 Функционал>
3. Now you need to wait a little, since this process is not presented in the form of a point-by-point test, but in the form of automatic troubleshooting, and then automatic debugging of the screen;
4. When the process starts, A notification will appear on the main screen of the application showing the debugging progress;
<Рис. 23 Процесс калибровки>
When the process is completed, you only need to restart your phone.
After turning it on again, there should be no difficulties with the operation of the sensor.
Other problems
In some cases, errors in the operation of the sensor may be of a different nature. For example, a common situation is when at certain points the screen periodically triggers spontaneously.
This happens when the touch glass of the screen is seriously damaged enough that it bends and at some points fits too tightly to the screen, causing the sensor to trigger.
From the outside, such a problem may not be noticeable at all.. However, it is quite complex and requires correction in a service center. Typically, in such cases, a complete replacement of the display glass is recommended.
It is also worth contacting the service center when none of the listed calibration methods help. This may also indicate that the quality of the sensor has decreased due to damage to the glass or malfunctions in the hardware of the device.