The number of treasure hunters is growing steadily. And although everything has long been dug up, there are still such enthusiasts who want to try their luck and go on the next search for gold, elements of antiquity or coins. This is not strange, because the procedure itself has a peculiar atmosphere and gives each participant a lot of unforgettable emotions. It is enough to charge the batteries, drive away from the city, make a couple of first sweeps of the coil and wait for the sound signal about the find. Here it is, the secret of every treasure hunter's good mood.
Currently, there is a large selection of instruments for finding metals. It's easy to find models on sale that cost less than a hundred dollars. But besides this, there are also expensive products that are sold for over $ 1,000. Does it make sense for a beginner to buy such an expensive device? Of course not. The more expensive the device is, the more difficult it is to set up. Naturally, a novice digger will not be able to figure out all the possibilities of such an invention without having the appropriate experience and minimal skills. Or try to make a simple metal detector with your own hands? After all, this is a completely doable procedure and it is within the power of everyone.
How to make a metal detector with your own hands
Before making a simple metal detector at home, you should deal with how it works.
A metal detector (metal detector, metal scanner, etc.) is a special device for quickly identifying metal objects underground. There are several varieties of such inventions available on the market, which differ in characteristics and capabilities. To a large extent, the key differences lie in detection depth and usability. Naturally, the deeper the device "sees", the more expensive it will cost.
The principle of operation is based on the use of the law of magnetic attraction of objects. The device generates a magnetic field and sends it to a specific area underground. If there is any object with metallic properties, a signal is displayed from it and returns back, notifying the treasure hunter of the find.
To build a high-frequency instrument, you need to collect quality command block... In its capacity, a laptop or radio is used, on which the maximum frequency is AM. Make sure that the wave is "clean" and there are no radio stations on it.
The next step involves creating a search head, which is easy to make from a thin sheet of plywood. Cut out two circles 15 and 10 centimeters in diameter and fasten them tightly together.
Then you need to cut the sticks out of the wood so that the rings are parallel to each other. It is necessary to wrap the plate with an enamelled copper wire, making 10-15 turns. After that, the fake can be attached directly to the block itself. We start the highest frequency. If the procedure is successful, you can hear a soft beep. For clearer playback, it is better to use an external speaker or headphones. It is very easy to install a metal detector according to such instructions. In addition, training videos and diagrams for performing the action can be downloaded on the web.
DIY metal detector: diagram
It is very easy to find circuits of a simple metal detector with support for discrimination. To make a device, you need to stock up:

For making a coil with a diameter of 90 millimeters, you need to wrap cardboard circles with copper wire, making 250 turns. If we are talking about a coil with a diameter of 70 mm, then here you have to make at least 290 turns. As a result, it will be possible to obtain 10 mH.
After you assemble the circuit, you need to make sure that it works. After that, you can start making a printed circuit board, where all the other elements of the metal detector will be installed.
The next step involves preparing the handle. It can be made of cardboard by cutting out three identical blanks in the form of a boomerang. In the handle, you need to cut holes for the batteries, after which three separate ones can often be fixed together with glue. You should also cut out a place for the on / off button. After attaching the circuit, battery and switch, the coil can be completed.
DIY metal detector from DVD discs
 You can make a simple metal detector with your own hands using two CDs and DVDs... The instruction is particularly simple and does not require the use of additional circuits or complex instructions. All that is required for manufacturing is:
Calculator. It doesn't matter what type of such device you come across. You can take the most simple and cheap model;
- Headphones;
- Battery "Krona";
- Glue and a roll of electrical tape;
Sequencing when creating a metal detector from DVDs:
- We take the headphones and cut off the plug.
- Then you need to strip 10 centimeters of insulating wire and halve to get two pairs of wires;
- After that, you should attach one wire from a pair on the disk. If you are using a single-sided disc, attach to the writing side;
- We fix the wires with electrical tape, and connect the rest of the "bare" part to the battery, to the plus and minus contacts.
- The next step is to carefully insulate the bare cable;
- We firmly attach a pre-switched on and charged calculator to the surface of the CD-disk;
- Then you need to put a DVD disc on it, and at the final stage, wrap the structure with electrical tape;
- At the final stage, it is necessary to fix the Krona battery on the surface of the disk;
That's all, the diagram of the simplest, but very effective metal detector is ready. It remains to test it in real conditions and make sure that everything works without failures. Of course, it will not be possible to search for coins at a depth of half a meter with such a device, but nevertheless, for home use it is quite suitable.
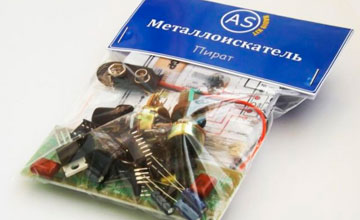
Do-it-yourself Pirate metal detector
 Among homemade metal detectors, it is especially in great demand variant called "Pirate"... Pirate is a pulse metal detector, which is built on a simple and affordable circuit. The design uses several small elements and a small coil. If you equip the device with a coil with a diameter of 280 mm, then it will be able to "see" coins at a depth of 20 centimeters. The device will also find large metal objects at a depth of one and a half meters.
The name "Pirate" (PIRAT) comes from the developers of the scheme - PI - stands for the principle of operation, and RAT - is an abbreviation for "Radio Scott" - the site of the developers.
The homemade device "Pirate" is not capable of discriminating against metals. But to search for large objects will do quite well. Such a device is especially appreciated among novice metal seekers. It's all about ease of use and good search results. You can find circuits and buy accessories for creating a "Pirate" in any market or in a shop of parts for radios and other radio equipment. For the manufacture of such a device, it is not necessary to have a high level of training.
In the end, we can say with confidence that it is quite possible to assemble a metal detector with your own hands at home. To do this, you should study the detailed instructions and understand the manufacturing scheme. It is important to understand that homemade devices are not suitable for more serious searches, such as coins or small antiques. This is due to the small radius of action. In any case, making a metal detector with your own hands will allow you to create a very good device that is suitable for acquiring the initial skills of a real treasure hunter.
Now, perhaps, there is no person who would not know what a metal detector or metal detector is. But let us recall again, this is a device that allows you to determine the hidden location of metals. The metal detector is very popular among amateur archaeologists and treasure hunters. The device is quite expensive, and some models even have an exorbitant price, which is why most radio amateurs prefer to assemble it on their own. In today's article, we will look at how to make a metal detector with your own hands, the principle of operation of the device, popular schemes, as well as assembly and setup features.
Read in the article
How does a metal detector work
A metal detector, or metal detector, is an electronic device consisting of a primary sensor (coil with winding) and a secondary assembly. Devices for detecting metals are divided into several types:
- "Reception-transmission";
- induction;
- impulse;
- generator sets.

Devices of the middle price category are mainly of the "receive-and-transmit" type. The principle of operation of such metal detectors is based on the transmission and reception of electromagnetic waves. The main elements of this type of device are two coils: one is transmitting, and the other is receiving. The first coil transmits electromagnetic waves that freely pass through a neutral medium and which, upon collision with metal objects, are reflected and transmitted to the receiving device. After the reflected signal hits the second coil, the operator is informed by a buzzer that the target has been found.

An induction-type metal detector works on the same principle as a "receive-transmit" device. The main difference between the two is the number of wound coils. An induction metal detector has one coil that sends and receives a signal at the same time. Pulse devices are insensitive to the concentration of salts in the soil and include in their design a coil, the electromagnetic field of which creates eddy currents on the metal surface, which are captured by the detector. This principle of operation reduces the possibility of discrimination, which can complicate the search.

Generator type metal detectors come in different types, but they are all based on an LC generator. They have a low level of sensitivity and are usually designed to find only one type of metal. Also, metal detectors can be divided into three categories:
- common use;
- middle class;
- professional equipment.
Functional and technical parameters of metal detectors
Before choosing and buying a good metal detector, you should clearly define the environment in which the search work will be carried out. It is also necessary to take into account the estimated size of the items sought and the depth of their occurrence. Let's consider the main characteristics that you need to pay special attention to when buying a detector:
- operating principle;
- operating frequency of the device;
- sensitivity;
- ground balancing;
- target designation;
- discriminator;
- additional functions.
The principle of operation and the operating frequency of the detector are the main characteristics that determine the capabilities of the device and show which category it can be classified into (simple soil, middle class or professional). Sensitivity determines the depth of objects with which the device can operate. As a rule, this figure ranges from 100-150 mm to 600-1500 mm. However, there are depth models designed to search for objects at a depth of 5 meters. The discriminator makes it possible to configure the device to search for a specific type of metal. This allows the operator not to be distracted by metallized debris.

What types of metal detectors can you make yourself?
You can purchase a detector at a specialized store or make a DIY metal detector at home. There are schemes that even a novice radio amateur can do. Devices that you can assemble yourself include:
- Butterfly;
- device without microcircuits (IC);
- model "Pirate";
- Terminator 3, etc.
There is information on the Internet that it is supposedly possible to assemble a metal detector from a phone with your own hands. Remember two words - this is fiction. There are some applications, thanks to which it is possible to include a tablet or smartphone in the detector circuit, but it is impossible to make a full-fledged device for searching for metals and their recognition.

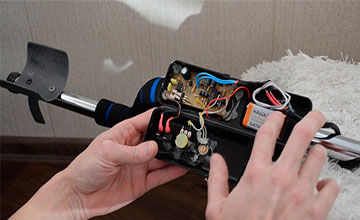
How to assemble a Pirate metal detector with your own hands: detailed instructions
Models of the Pirate series cost about $ 100-300. This cost is due to the device's ability to detect objects at a depth of 200 mm (for small items) and 1500 mm (large items). Consider the features of the assembly and settings of the device for searching for metals, as well as its components.

Materials required to assemble a powerful metal detector with your own hands
To manufacture a metal detector, you will need the following materials and components:
- IC KR 1006VI1 or NE 555 (foreign analogue) to create a transmitting unit;
- transistor IRF 740;
- IC K 157UD2 and transistor ВС 547 for assembly of the receiving unit;
- NPN transistors;
- wire PEV 0.5 to create a coil;
- materials for the manufacture of the body, rods, etc .;
- copper-plated plate for making a printed circuit board;
- wires;
- insulating tape;
- side cutters;
- soldering iron;
- scalpel;
- Screwdriver Set;
- pliers;
- various types of fasteners.

Do-it-yourself metal detector collection: diagrams
At present, there are many schemes for the Pirate metal detector, since some radio amateurs began to modernize them to suit their needs. All options will not be considered, only the most proven and most popular.
Detector circuit on the NE555 microcircuit
The classic scheme of the "Pirate" series metal detector, built on the NE555 IC timer. The operation of the device depends on a comparator, one output of which is connected to the IC pulse generator, the second to the coil, and the output to the speaker. If metal objects are detected, the signal from the coil goes to the comparator, and then to the speaker, which notifies the operator about the presence of the desired objects.

DIY assembly of a metal detector without microcircuits
Unlike the previous circuit, this device uses Soviet-style transistors KT-361 and KT-315 to generate signals (you can use similar radio components).

DIY printed circuit board
The parts have been bought, the diagram is available, and now we need to collect all this. To accommodate radio components, a printed circuit is used, which can be easily made by yourself. To do this, you need a piece of sheet getinax covered with copper electrical foil. Transfer the selected scheme to the workpiece, mark the tracks connecting the parts, and drill holes in the places of their attachment and soldering. Cover the tracks with a protective varnish, and after drying, lower the future board in ferric chloride for etching (removing unprotected areas of copper foil).

After the board is ready, you can install and unsolder the radio components. The next step is to check the circuit using measuring instruments.
Metal detector coil - how to do it yourself
Due to the fact that the Pirate metal detector is a pulse-type device, the accuracy when assembling the coil is unimportant. For the base, you will need a ring with a diameter of about 200 mm, on which you need to wind 25 turns of 0.5 mm PEV wire. To increase the depth of detection of metals, the coil frame should be in the range of 260-270 mm, and the number of turns should be 21-22 rpm. Next, the mandrel with the wire must be well wrapped with insulating tape.
Place the finished coil in a dielectric material housing. To do this, you can use a housing suitable for the size of faulty household appliances "for disposal". By the way, this will protect the coil from mechanical damage while working with the detector. The winding leads must be soldered to a stranded wire with a diameter in the range of 0.5-0.7 mm. It is best to use a twisted pair cable.

Checking and setting up a metal detector
We attach all the components of the device to the rod of the metal detector: the body with the coil, the receiving-transmitting unit and the handle. If the control circuit is assembled correctly, then the adjustment of the device is not required, since it initially has the maximum sensitivity. More fine tuning is done by means of a variable resistor R13. Normal operation of the detector should be ensured with the middle position of the regulator. If you have an oscilloscope, then with its help on the gate of the transistor T2 you need to measure the frequency, which should be 120-150 Hz, and the pulse duration - 130-150 μs.

The video shows the setup of the metal detector.
How to make an underwater metal detector with your own hands
Sometimes prospecting work has to be moved from land to water. What to do in this case, because the electronics will fail? There are, of course, special devices for working underwater, but you can make a deep metal detector with your own hands. To do this, you can take the most common home-made detector and place all the units in hermetically sealed housings. In addition, it is worth slightly modifying the device and installing light indicators instead of sound alarms.

How to make a Terminator 3 metal detector with your own hands: detailed instructions
The Terminator 3 model has long been popular among radio amateurs, and over the many years of its existence, the device has received many improvements. We offer step-by-step instructions on how to make a metal detector yourself at home. The device is characterized by low power consumption, it is possible to adjust it to search for certain types of metal and has good depth characteristics.

Tools
Before making a homemade metal detector, you need to prepare the following tools:
- soldering iron or soldering station;
- solder, tin, rosin;
- pliers, round nose pliers, side cutters;
- Screwdriver Set;
- hacksaw for metal;
- oscilloscopes and other instrumentation.

Scheme, selection of parts and circuit board
To manufacture the control unit, it is necessary to make a circuit board on which all the necessary radio components will be placed. The circuit shown below must be transferred to a getinax plate covered with copper foil and made a circuit board in the same way as described above in the article for the Pirate metal detector. The size of the circuit should be within 104 × 66 mm, and the blank for the board is 10 mm larger on each side.


We will tell you in detail how to prepare a printed circuit board for a metal detector in step-by-step instructions:
| Illustration | Process description |
 | Take a copper foil coated textolite plate. We degrease chemically or mechanically (sanding). |
 | We put the circuit on the plate, cover the tracks with a protective varnish and etch the workpiece (described above, as for the Pirate metal detector). Use a thin drill to drill holes for radio components and mounts to the case. |
 | We place the radio components in accordance with the diagram and carry out the wiring. |
 | This is how the finished Terminator 3 metal detector board will look like. |
Metal detector coil
This is, in fact, the most sensitive part of the device. She is responsible for scanning the space underground. Consider the steps involved in creating a simple metal detector coil:
| Illustration | Process description |
 | On a piece of plywood we outline two circles corresponding to the diameters of the coils - internally and externally. We drive nails along the perimeter of the circle. The outer winding diameter TX must be within 200mm. The coil is made from two folded wires. We wind 30 turns on nails. |
 | We tie the winding around the circumference with threads. We take out the nails, cover the resulting coil with varnish, and after it dries, wrap it with electrical tape and foil. In the same way, we make the inner RX winding, which is half the size of TX and contains 48 turns of wire. |
 | We place the coils in the case and carry out the desoldering of the wires that will be connected to the control unit. |
 | This is how the finished metal detector frame will look like. |
Homemade metal detector: a detailed description of the assembly diagram and setup
We considered in detail the stages of assembling the board and the main elements of the metal detector earlier, now we are facing the most recent and crucial steps: assembling the case and setting up the device.
| Illustration | Process description |
 | We take a suitable box or make the case ourselves. We drill holes for trimmer resistors and a connector. We mount the finished board and regulators in the case. |
 | We close the case, connect the metal detector frame and attach everything to a plastic pipe with a handle. The metal detector is assembled and ready to go. |
The proposed video will help with setting up a metal detector.
Features of a self-assembled metal detector with a metal discrimination scheme
Metal detectors with a simple scheme allow you to detect hidden objects, but in order to find out which ones, you have to work with a shovel. Instead of a gold coin or a military helmet, you can find just a piece of pipe and spend a lot of time on it. To facilitate the task of search engines, detectors began to be equipped with discriminators that allow distinguishing the type of metal and letting various debris through. The simplest methods for determining the types of metals were implemented in old devices and devices of the entry level and had two modes - "all metals" and "non-ferrous". The discrimination function allows the operator to react to a specific amount of phase shift compared to a set (reference) level. At the same time, the device cannot distinguish between non-ferrous metals.
High-range discriminators are used in professional metal detectors. Microprocessor systems used in such devices make it possible to program the device to respond only to certain groups of metals. Discrimination is useful in trashy areas, but reduces the detection depth by 10-20%.

Features of the assembly of a deep metal detector
A deep type of metal detector is a special device capable of detecting objects hidden at a great distance from the earth's surface. It is at a considerable depth that the most interesting and valuable objects can be found. Some models can detect metals from 4 to 6 m underground.
There are two types of deep metal detectors: frame and rod-mounted transceiver. The first type of device is capable of covering a large area of land for scanning. Thus, search speeds up, but negatively affects performance. The second version of the detector works in a small area, but better determines the center of the target. With a similar device, it is good to search in the grass, forest or reeds. Therefore, when choosing the type of metal detector, it is necessary to determine in what conditions the scanning will be carried out.

If you have experience in assembling a metal detector with your own hands, tell others about it! If you have any questions for the author of the article, ask him in the comments.
The dream of finding a treasure is increasingly being replaced in our time by a more realistic program for searching for precious metals in a natural or artificial environment.
In modern conditions, it is very important to find and extract valuable materials found among the waste, or in another uncontrolled environment.
Hardware is an important component of this search technology.
Search and recovery of gold and valuable metals from waste, garbage, in the natural environment is part of the recycling strategy, technology for the effective processing of used materials, including.
Searching for them in the ground or in the mass of industrial and other wastes not only requires the use of equipment, but also stimulates its improvement. Are being created devices of different levels and specializations... There is an interest in such equipment among amateurs and enthusiasts of searching for valuable metals.
 The metal detector is the most important tool for manual metal search in a chaotic natural or artificial environment.
With the help of such a device, you can search not only, but also, silver and other precious metals.
The principle of the device any metal detector based on electromagnetic effects.
This is how a typical metal search technology works:
- Appliance creates an electromagnetic field.
- Metal an object, hidden in a foreign environment, affects such a field when falls within his sphere of influence.
- Appliance catches the effect of the object on the electromagnetic field and signals it.
Most of the metal detector models work on this principle.
The technical differences of such equipment make it possible to obtain more complete information about the fact of detecting a metal object, for example:
- estimate the mass of the find;
- get data about the shape, size and configuration of the object;
- specify the location, including depth.
There is a lot of information on the Internet about metal detectors of varying complexity and design. There you can also brush up on the theory of the electromagnetic field taught in school.
The most simple, primitive metal detectors (usually self-made constructions for searching for gold, silver and other metals of amateur enthusiasts) assembled from finished devices and products using electromagnetic effects.
Many are familiar with a primitive, but quite workable metal detector circuit, in which an electromagnetic field is created by a pulse element of an ordinary calculator.
 The reaction of the generated field on the detected metal objects picks up the simplest household radio... The signal about such a find is sound, quite distinct and understandable.
More complex amateur and professional metal finders keep the logical basis of the technology in the form of three components:
- an electromagnetic field generator;
- a sensor for changes in this field;
- equipment for evaluating the detected anomalies, signaling this.
Devices of different levels of complexity and functional potential can be conditionally divided into groups. Classification based on professionalism and specialization of users - one of the generally recognized:
- amateur equipment, assembled with his own hand and used as a hobby tool or beginners in the search for metals;
- semi-professional equipment necessary for enthusiastic amateurs and fanatics;
- professional metal detectors for those constantly working in this field;
- special devices for metal prospectors in difficult conditions - at depth, under water, with the release of precious metals.
The proliferation of search equipment is such that many devices of this type can be purchased at garden and dacha supply stores.
The apparatus for searching and detecting metal is needed not only in the recycling business, in the search for artifacts and treasures. Numerous security systems, everyone known framework - one of the versions of the technology search for metal. The settings of these frames are focused on finding weapons and similar dangerous items.
Coil
Very important node metal search equipment - coil or frame... This is most often a winding of a special configuration, the task of which is to form an electromagnetic field and catch its reaction to the detection of a metal body foreign to the search environment.
In most designs the coil is placed on a long shaft- a handle for moving it near the search area.
For the amateur making of coils, frames of the most demanded types are sold. The easiest way to make such a purchase is in an online store.
 Many amateurs make the bobbins of the coils on their own... This is done for reasons of cost savings or in the hope of getting a better quality custom design tool.
For this, the means at hand are used.- plastic products, plywood and even filling the assembled winding with construction foam.
The search operator or treasure hunter seeks to find the most effective technique for working with a metal detector, choosing the necessary operating modes for the electronics and the correct techniques for manipulating the coil.
Electronic circuit
The logical element of a metal detector is an electronic circuit. She performs many functions:
- The first task of this component is in creating an electromagnetic signal of the required format, which is converted into a field using a coil.
- The second task of the electronic circuit is analysis of field changes captured by the frame, their processing.
- The third task is giving an informing signal to the operator- sound, light, indications of indicators and devices.
It is best if the person who wants to assemble an electronic circuit independently owns knowledge in radio amateurish business or in electronic technology. Such a master can not only assemble the desired circuit, but also change and improve the design.
Many electronic devices are simple enough even a beginner can build them... The resulting device will be functional without configuration if the assembler has followed the recommendations of the developer of such a scheme.
How to make "Pirate" yourself?
 One of the most popular models of metal detectors designed for hand-made amateurs is the Pirate.
The title, which contains abbreviated details of his device and developer site, wittily reflects the romance of the search for precious metals.
Here the main advantages of this model:
- simplicity of device and assembly;
- low cost of parts and materials;
- sufficient operating parameters;
- recognized convenience for beginners.
The electronic circuitry of this model does not require programming. In the "Pirate" used parts available to everyone, a properly assembled circuit is fully functional.
Design and principle of operation
The design and layout of the Pirate metal detector is traditional for equipment of this kind. It is a barbell, at the lower end of which is installed coil, and at the top - electronic unit with a battery.
The location of the electronic unit should leave room for a comfortable hand hold of the rod.
Some craftsmen prefer that the sound signal of the device is given not by the speaker, but by the headphones. In this case, the headphone cable comes off the electronic unit.
The technology of the device is impulse... This makes it possible to provide very good sensitivity indicators for this class of equipment. Below is a diagram of the electronic unit on microcircuits. 
A similar circuit can be assembled using transistors instead of microcircuits. This version may require additional settings available only to experienced radio technicians. This is why the transistor circuit is less commonly used.
Materials, parts and blanks
In addition to the details and precisely indicated on the circuit diagram of the electronic unit of parts, to build metal detector for gold and other metals you need to prepare some materials and blanks:
- a ready-made board for assembling an electronic circuit or foil material for its self-production;
- power supply in the form of any combination of accumulators or batteries with a total voltage of 12V;
- enamel wire with a cross section of 0.5 - 0.6 mm for the manufacture of a coil;
- stranded copper wire for connections with a cross section of at least 0.75 sq. mm;
- housing for the electronic unit - a plastic container of a suitable size;
- strong enough plastic tube for the rod;
- frame for winding the coil;
- consumables - solder, heat-shrinkable cambric, electrical tape, screws and self-tapping screws, adhesives and sealants.
It is best to make a printed circuit board for assembling an electronic circuit according to the model of the developments presented on the Internet.
Below is the one such sample, suitable for assembling electronics on microcircuits.
Lovers of homemade electronics are engaged in the manufacture of the board, and even then not all. Most of those who want to create a metal detector on their own prefer to buy such a part.
For coil assembly requires a frame or frame that does not contain metallic elements. An amateur craftsman can make such a frame from plywood, plastic, or pick up a similar one in parameters from finished plastic products, for example, dishes. The frame can be purchased ready-made or made by yourself
Recommended coil parameters- 25 turns of enamel wire with a diameter of 0.5 mm on a mandrel with a diameter of 190-200 mm. An increase in diameter by 30% will lead to an increase in the sensitivity of the apparatus, provided that the number of turns is reduced to 20-21.
A plastic coil frame is one of the most common metal detector parts on the market.
The coil manipulation technology is such that this very fragile unit can suffer from impacts on uneven ground, stones, sharp objects. To avoid this the coil on the frame is covered from below with a plastic plate... Such a cymbal not only protects the reel, but also provides a sliding mode on tall grass. The search becomes more intense.
Assembly order and design
 For a successful assembly of a metal detector it is best to follow this procedure:
- PCB manufacturing and electronic circuit assembly;
- selection of a plastic container of a suitable size for it and completion of the assembly of the electronic unit;
- coil manufacturing;
- making a rod of a convenient shape and attaching an electronic unit and a coil to it, making connections to an electronic circuit.
Although the assembly order has no fundamental character. For those who make an apparatus for continuous long-term work in the field of searching for non-ferrous metals and subsequent recycling (recycling for reuse), usability is an important factor.
In this case, the study of the shape of the boom and the layout of the main elements of the apparatus becomes a key factor. Thus, a serious design phase appears in the creation of the device.
It is best to accomplish this step of the job with life-size simulation... This simulation can be done using wooden parts of a suitable shape, for example:
- shovel handle;
- plywood pieces of the desired shape;
- scraps from;
- temporary fasteners made of pieces of wire, nails and ropes.
After making sure that the assembled model of the device will be functional and convenient enough, you can proceed to the decisive assembly. Finished apparatus, usually, does not require configuration, it is completely ready to go. You can start searching for metal by choosing the desired level of sensitivity and the correct tactics for manipulating the coil.
 Assemblers who need to assemble their apparatus as quickly as possible, can use ready-made sets of parts.
The purchase of such a kit allows you to significantly simplify the production of the "Pirate". There is one of the proposals.
Users of the Pirate metal detector, who have skills in radio amateur business, modify the design of this device. That's just several directions such improvements:
- Manufacturing coils with unusual parameters- by size, made of special materials, for example - "twisted pair" cable.
- Arrangement of additional functional systems, for example - indication of the degree of discharge of the battery.
- Manufacturing models for underwater work.
- Supplements electronic circuit, distinguishing between metals(creating a discrimination function).
Simple, inexpensive and reliable metal detector "Pirate" works well in a variety of conditions.
Homemade metal detector - pros and cons
Cheapness, basic advantage self-production of any products, relevant for a metal detector. Here are some more dignity from a homemade device:
- the most appropriate search technology for newbies;
- the possibility of creating a device with a completely individual shape, design and configuration;
- the pleasure of making an efficient, workable appliance on your own.
Like any hobbyist device, a metal detector not devoid of some shortcomings.
 Here are the features of the "Pirate" model noted by users:
- energetic charge consumption power accumulators;
- no discrimination, that is, accurate sensitivity to ferrous, non-ferrous and precious metals;
- limited in comparison with expensive models sensitivity.
Despite the shortcomings, the Pirate model is very popular. This is due to the simplicity of homemade manufacturing and the high performance of an inexpensive device.
Recycling professionals believe that the discrimination potential of a metal detector does not matter much. All the metals found are so valuable that recycling is always justified. Focusing on gold prospecting requires not only equipment, but also considerable experience accompanying knowledge and of course good luck.
Related Videos
The video provides a detailed guide for the manufacture and assembly of the Pirate metal detector with your own hands:
Conclusion
When the metal detector is ready, you can start working. We must be aware that no one of the most perfect apparatus will allow finding only golden hidden objects.
The metal detector will help you find valuable metal, and it is very likely that it will be gold. It is best if the prospective metal and gold prospector has a real understanding of the search technique.
Many features of the operation of finished equipment are very important for those who develop and assemble their own models. You need to have an idea of the technology of work in advance with such equipment - this is the basis of its high-quality design.
The effectiveness of gold prospecting increases with experience. Here the most important elements such experience:
- the correct choice of the design of the metal detector and its high-quality do-it-yourself manufacturing;
- the ability to choose the right search site;
- the ability to use the full potential of the metal detector;
- choosing the right search technology in different conditions;
- modernization of the metal detector.
Correctly assembled and debugged equipment will always help in the search for gold, and this valuable metal will certainly be found.
In contact with
Can be purchased for about $ 100-300. The price of metal detectors is strongly interconnected with their depth of detection, not every metal detector can "see" coins at a depth of 15 cm. In addition, the presence of a metal detector and the type of interface also strongly affects the cost of a metal detector, fashionable metal detectors are sometimes equipped with a display for convenient operation ...
This article will look at an example of assembling a powerful metal detector called Pirat with your own hands. The device is capable of capturing coins underground at a depth of 20 cm.As for large objects, here it is quite real to work at a depth of 150 cm.

Video of working with a metal detector:
This metal detector received this name due to the fact that it is pulse, this is the designation of its first two letters (PI-pulse). Well, RA-T is consonant with the word radioskot - this is the name of the developers' site, where the homemade product was posted. According to the author, the Pirate is assembled very simply and quickly, for this, even basic skills in working with electronics are enough.
The disadvantage of such a device is that it does not have a discriminator, that is, it cannot recognize non-ferrous metals. So working with him in areas contaminated with various kinds of metals will not work.
Materials and tools for assembly:
- microcircuit KR1006VI1 (or its foreign analogue NE555) - a transmitting node is built on it;
- transistor IRF740;
- microcircuit К157UD2 and transistor ВС547 (receiving node is assembled on them);
- wire PEV 0.5 (for winding the coil);
- NPN transistors;
- materials for creating the body, and so on;
- insulating tape;
- soldering iron, wires, other tools.
The rest of the radio components can be seen in the diagram.


You also need to find a suitable plastic box for mounting the electronic circuit. You will also need a plastic tube to create a rod on which the coil is attached.
Metal detector assembly process:
Step one. Create a printed circuit board
The most difficult part of the device is, of course, the electronics, so it is advisable to start with it. First of all, you need to make a printed circuit board. In total, there are several options for boards, depending on the radio elements used. There is a board for the NE555, and there is a board on transistors. All the necessary files for creating a board are in the article. You can also find other board options on the Internet.
Step two. We install electronic elements on the board
Now the board needs to be soldered, all electronic elements are installed exactly as in the diagram. Capacitors can be seen in the picture on the left. These capacitors are film capacitors and have high thermal stability. Thanks to this, the metal detector will work more stably. This is especially true if you use a metal detector in the fall, when it is already quite cold outside at times.


Step three. Metal detector power supply
To power the device, you need a source from 9 to 12 V. It is important to note that the device is rather gluttonous in terms of energy consumption, and this is logical, because it is also powerful. One battery of the crown will not last for a long time, it is recommended to use 2-3 batteries at once, which are connected in parallel. You can also use one powerful battery (best rechargeable).

Step four. Putting together a coil for a metal detector
Due to the fact that this is a pulse metal detector, the accuracy of the coil assembly is not so important here. The optimal diameter is a mandrel 1900-200 mm; in total, you need to wind 25 turns. After the coil is wound, it must be well wrapped on top with electrical tape for insulation. To increase the depth of detection of the coil, you need to wind it on a mandrel with a diameter of about 260-270 mm, and reduce the number of turns to 21-22. In this case, a wire with a diameter of 0.5 mm is used.

After the coil is wound, it must be installed on a rigid case, there should be no metal on it. Here you need to think a little and look for any suitable case in size. It is needed in order to protect the coil from shocks while working with the device.
The leads from the coil are soldered to a stranded wire with a diameter of about 0.5-0.75 mm. Best of all, if it is two, twisted together wires.
Step five. Setting up a metal detector
When assembling exactly according to the scheme, it is not required to adjust the metal detector, it already has the maximum sensitivity. To fine-tune the metal detector, you need to twist the variable resistor R13, you need to achieve rare clicks in the speaker. If this is achieved only at the extreme positions of the resistor, then it is necessary to change the value of the resistor R12. The variable resistor should adjust the device for normal operation in the mid positions.
BEST METAL DETECTOR
Why was the Volksturm named the best metal detector? The main thing is that the scheme is really simple and really working. Of the many metal detector circuits that I personally made, it is here that everything is simple, deep-penetrating and reliable! Moreover, with its simplicity, the metal detector has a good discrimination scheme - the determination of iron or non-ferrous metal is in the ground. The assembly of the metal detector consists in error-free soldering of the board and tuning the coils to resonance and to zero at the output of the input stage on the LF353. There is nothing super complicated here, there would be desire and brains. We look constructive metal detector version and a new improved Volksturm circuit with a description.
Since questions arise during the assembly, in order to save your time and not force you to flip through hundreds of forum pages, here are the answers to the 10 most popular questions. The article is in the process of being written, so some points will be added later.
1. How does this metal detector work and detect targets?
2. How to check if the metal detector board is working?
3. Which resonance to choose?
4. Which capacitors are better?
5. How to tune resonance?
6. How to zero the coils?
7. Which wire for the coils is better?
8. What parts and what can be replaced?
9. What determines the depth of target search?
10. Power supply for the Volksturm metal detector?
The principle of operation of the Volksturm metal detector
I will try in a nutshell about the principle of work: transmission, reception and balance of induction. In the search sensor of the metal detector, 2 coils are installed - transmitting and receiving. The presence of metal changes the inductive coupling between them (including the phase), which affects the received signal, which is then processed by the display unit. Between the first and second microcircuits there is a switch controlled by the pulses of the generator, which is out of phase with respect to the transmitting channel (i.e., when the transmitter is working, the receiver is turned off, and vice versa, if the receiver is turned on, the transmitter rests, and the receiver calmly catches the reflected signal in this pause). So, you turned on the metal detector and it beeps. It's great if it beeps, it means that many nodes are working. Let's figure out why exactly he squeaks. The generator on the u6B constantly generates a tone signal. Then it goes to an amplifier on two transistors, but the low-frequency filter will not open (it will not skip the tone) until the voltage at the u2B output (7th pin) allows it to do so. This voltage is set by changing the mode using this very trash resistor. They need to set such a voltage so that the ULF almost opens and misses the signal from the generator. And the input couple of millivolts from the metal detector coil, after passing through the amplifying stages, will exceed this threshold and it will open completely and the speaker will beep. Now let's trace the passage of the signal, or rather the response signal. On the first stage (1-y1a) there will be a couple of millivolts, up to 50 is possible. On the second stage (7-y1B) this deviation will increase, on the third (1-y2A) there will already be a couple of volts. But without response everywhere at the outputs on zeros.
How to check if the metal detector board is working

In general, the amplifier and the key (CD 4066) are checked with a finger on the RX input pin at the maximum sensor resistance and the maximum background on the speaker. If there is a change in the background when you press your finger for a second, then the key and the opamp work, then we connect the RX coils with the circuit capacitor in parallel, the capacitor on the TX coil in series, put one coil on top of the other and begin to reduce to 0 according to the minimum AC reading on the first leg of the amplifier U1A. Next, we take something large and iron and check whether there is a reaction to metal in the dynamics or not. Let's check the voltage at u2B (7th pin), it should be a thrash regulator, a + -pair of volts should change. If not, the problem is in this op-amp stage. To start checking the board, turn off the coils and turn on the power.
1. There should be a sound when the sensor regulator is at maximum resistance, touch the PX with your finger - if there is a reaction, all the opamp work, if not, check it with your finger starting from u2 and change (examine the harness) of the non-working opamp.
2. The operation of the generator is checked by the frequency meter program. Solder the plug from the headphones to pin 12 of CD4013 (561TM2), prudently releasing p23 (so as not to burn the sound card). Use In-lane in the sound card. We look at the generation frequency, its stability at 8192 Hz. If it is strongly displaced, then it is necessary to solder the capacitor c9, if after it is not clearly distinguished and / or there are many frequency bursts nearby, we replace the quartz.
3. Checked the amplifiers and generator. If everything is in order, but still does not work, change the key (CD 4066).
Which resonance of the coils to choose

Plugging the coil into series resonance increases the coil current and overall circuit consumption. The target detection distance is increased, but this is only on the table. On real ground, the higher the pump current in the coil, the stronger the ground will be felt. It is better to turn on parallel resonance, and raise the flair with input stages. And the batteries will last much longer. Despite the fact that serial resonance is used in all proprietary expensive metal detectors, in Sturm, it is precisely parallel resonance that is needed. Imported, expensive devices have good ground balancing circuitry, so serial can be allowed in these devices.
What capacitors are better to install in the circuit metal detector

The type of capacitor connected to the coil has nothing to do with it, but if you experimentally changed two and saw that the resonance is better with one of them, then just one of the supposedly 0.1 μF actually has 0.098 μF, and the other 0.11. So the difference between them in terms of resonance is obtained. I used Soviet K73-17 and imported green pillows.
How to tune the resonance of the coils metal detector

The coil, as the best option, is obtained from plaster floats, glued with epoxy resin from the ends to the size you need. Moreover, its central part with a piece of the handle of this same grater, which is processed to one wide lug. On the bar, on the other hand, there is a fork of two fastening lugs. This solution allows you to solve the problem of deformation of the coil when tightening the plastic bolt. The slots for the windings are made with a conventional burner, then zero setting and pouring. From the cold end of the TX, we leave 50 cm of the wire, which is not initially poured, but twist a small coil (3 cm in diameter) from it and place it inside the RX, moving and deforming it within small limits, you can achieve an exact zero, but do it better on the street, placing the coil near the ground (as when searching) with the GEB off, if there is one, then finally fill it with resin. Then detuning from the ground works more or less tolerably (with the exception of highly mineralized soil). Such a coil turns out to be light, durable, little subject to thermal deformation, and processed and painted very nice. And one more observation: if the metal detector is assembled with ground balance (GEB) and with the central location of the resistor slider set zero with a very small washer, the GEBa + adjustment range is 80-100 mV. If you set zero with a large object, a coin of 10-50 kopecks. the adjustment range increases to + - 500-600 mV. Do not chase the voltage in the process of tuning the resonance - I have about 40V at 12v power supply with serial resonance. To make discrimination appear, the capacitors in the coils are switched on in parallel (serial connection is only necessary at the stage of selecting the condenders for resonance) - there will be a lingering sound on ferrous metals, and a short one on non-ferrous metals.
Or even easier. We connect the coils in turn to the transmitting TX output. Tuning one into resonance, and tuning it - another. Step by step: We connected, parallel to the coil, poked variable volts with a multimeter at the limit, also a 0.07-0.08 uF capacitor was soldered in parallel to the coil, we look at the readings. Let's say 4 V - very weak, not in resonance with the frequency. They poked parallel to the first capacitor of the second small capacity - 0.01 μF (0.07 + 0.01 = 0.08). We are looking - we have already shown a 7 V voltmeter. Great, we will increase the capacity even more, connect it to 0.02 μF - we look at the voltmeter, and there is 20 V. Great, we go further - we will add a couple of thousand peak capacities. Yeah. Has already begun to fall, roll back. And so to achieve maximum voltmeter readings on the metal detector coil. Then, similarly with the other (receiving) coil. Set to maximum and plug back into the receptacle.
How to zero the coils of a metal detector

To adjust the zero, connect the tester to the first leg of the LF353 and gradually begin to squeeze and stretch the coil. After filling from epoxy - the zero will definitely run away. Therefore, it is not necessary to fill in the entire coil, but leave room for adjustment, and after drying, bring it to zero and fill it completely. Take a piece of twine and tie half of the coil with one turn to the middle (to the central part, the junction of the two coils) insert a piece of a stick into the loop of the twine and then twist it (pull the twine) - the coil will shrink, catching the toe, soak the twine with glue, after almost complete drying again correct the toe by turning the stick a little more and pour in the twine completely. Or more simply: The transmitter is fixed in plastic motionlessly, and the receiving one is placed on the first one by 1 cm, such as wedding rings. On the first pin of U1A there will be a squeak of 8 kHz - you can control it with an AC voltmeter, but better simply with high-impedance headphones. So, the receiving coil of the metal detector must be pushed in, then shifted from the transmitting one until the squeak at the output of the op-amp dies down to a minimum (or the voltmeter reading drops to several millivolts). That's it, the coil is flattened, we fix it.
Which wire for search coils is better

The wire for winding the coils does not matter. Anyone will go from 0.3 to 0.8, you still have to select a little capacity to adjust the circuits to resonance and to a frequency of 8.192 kHz. Of course, a thinner wire is quite suitable, just the thicker it is, the better the quality factor and, as a consequence, the instinct. But if you wind 1 mm, it will be rather heavy to carry. On a sheet of paper, draw a rectangle 15 by 23 cm. Set aside 2.5 cm from the upper and lower left corners, and connect them with a line. We do the same with the upper and lower right corners, but set aside 3 cm each. In the middle of the lower part we put a point and along the point to the left and right at a distance of 1 cm. We take plywood, overlay this sketch and drive in carnations at all points indicated. We take a wire PEV 0.3 and wind 80 turns of wire. But to be honest, it doesn't matter how many turns. All the same, the frequency of 8 kHz will be set to resonance with a capacitor. How much they wound, they wound so much. I wound 80 turns and a capacitor of 0.1 microfarads, if you wind up let's say 50 - the capacity, respectively, will have to be put somewhere 0.13 microfarads. Further, without removing it from the template, we wrap the coil with a thick thread - such as wrapping wiring harnesses. Then we cover the coil with varnish. When dry, remove the spool from the template. Then comes the winding of the coil with insulation - fum tape or electrical tape. Further - the winding of the receiving coil with foil, you can take a tape from electrolytic capacitors. The TX coil can be left unshielded. Remember to leave a GAP of 10 mm in the screen, in the middle of the coil. Next comes the tinned wire wrapping the foil. This wire, together with the initial contact of the coil, will be our mass. And finally, winding the coil with electrical tape. The inductance of the coils is about 3.5mH. The capacity is about 0.1 microfarad. As for pouring epoxy into the coil, I didn’t fill it at all. I just wrapped it tightly with duct tape. And nothing, I spent two seasons with this metal detector without leaving the settings. Pay attention to the moisture insulation of the circuit and the search coils, because you will have to mow on wet grass. Everything must be sealed - otherwise moisture will get in and the setting will float. Sensitivity will deteriorate.
What parts and what can be replaced

Transistors:
BC546 - 3pcs or KT315.
BC556 - 1pc or KT361
Opamp:
LF353 - 1pc or change to the more common TL072.
LM358N - 2 pieces
Digital microcircuits:
CD4011 - 1 piece
CD4066 - 1 piece
CD4013 - 1 piece
Constant resistors, with a power of 0.125-0.25 W:
5.6K - 1pc
430K - 1pc
22K - 3pcs
10K - 1pc
390K - 1pc
1K - 2pcs
1.5K - 1pc
100K - 8pcs
220K - 1pc
130K - 2pcs
56K - 1pc
8.2K - 1pc
Variable resistors:
100K - 1pc
330K - 1pc
Non-polar capacitors:
1nF - 1pc
22nF - 3pcs (22000pF = 22nF = 0.022μF)
220nF - 1pc
1mkF - 2pcs
47nF - 1pc
10nF - 1pc
Electrolytic capacitors:
220μF at 16V - 2pcs
The speaker is miniature.
Quartz resonator at 32768 Hz.
Two super-bright LEDs of different colors.
If you cannot get imported microcircuits, here are domestic counterparts: CD 4066 - K561KT3, CD4013 - 561TM2, CD4011 - 561LA7, LM358N - KR1040UD1. The LF353 microcircuit has no direct analogue, but feel free to install LM358N or better TL072, TL062. It is not at all necessary to install an operational amplifier specifically - LF353, I just raised the gain on U1A by replacing the resistor in the negative feedback circuit 390 kOhm by 1 mOhm - the sensitivity increased significantly by 50 percent, although after this replacement, zero went away, I had to glue it on the coil in a certain place tape a piece of aluminum plate. The Soviet three kopecks feels through the air at a distance of 25 centimeters, and this is when powered by 6 volts, the current consumption without indication is 10 mA. And don't forget about the panels - the convenience and ease of customization will increase significantly. Transistors KT814, Kt815 - in the transmitting part of the metal detector, KT315 in the ULF. It is desirable to select transistors - 816 and 817 with the same gain. Replaceable with any appropriate structure and capacity. In the generator of the metal detector, a special watch quartz is installed at a frequency of 32768 Hz. This is the standard for absolutely all quartz resonators found in any electronic and electromechanical watch. Including wrist and cheap Chinese wall / desktop. Archives with printed circuit board for variant and for (variant with manual detuning from the ground).
What determines the depth of target search
The larger the diameter of the metal detector coil, the deeper the flair. In general, the depth of target detection by a given coil depends primarily on the size of the target itself. But with an increase in the diameter of the coil, a decrease in the accuracy of object detection is observed and even sometimes the loss of small targets. For objects with a coin, this effect is observed with an increase in the size of the coil over 40 cm. Total: a large search coil, has a greater depth of detection and greater capture, but is less accurate at detecting a target than a small one. The large coil is ideal for finding deep and large targets such as treasures and large objects.
According to the shape, the coils are divided into round and elliptical (rectangular). The elliptical coil of a metal detector has better selectivity compared to a round one, because its magnetic field width is smaller and fewer foreign objects fall into its field of action. But the round one has a greater depth of detection and better target sensitivity. Especially on slightly mineralized soils. The round coil is most commonly used when searching with a metal detector.
Coils less than 15 cm in diameter are called small, coils 15-30 cm in diameter are called medium and coils over 30 cm are large. A large coil generates a larger electromagnetic field, so it has a greater detection depth than a small one. Large coils generate a large electromagnetic field and, accordingly, have a large detection depth and coverage when searching. Such coils are used for viewing large areas, but when using them, a problem may arise in heavily littered areas because several targets can be caught in the field of action of large coils and the metal detector will react to a larger target.
The electromagnetic field of a small search coil is also small, so with such a coil it is best to search in areas heavily littered with all sorts of small metal objects. The small coil is ideal for detecting small objects, but has a small coverage area and relatively shallow detection depth.
Medium coils are well suited for general search. This searchcoil size combines sufficient search depth and sensitivity to targets of different sizes. I made each coil about 16 cm in diameter and put both of these coils in a round stand from under an old 15 "monitor. In this version, the search depth of this metal detector will be as follows: 50x70 mm aluminum plate - 60 cm, M5-5 cm nut, coin - 30 cm, bucket - about a meter These values were obtained in air, in the ground will be 30% less.
Metal detector power supply
Separately, the metal detector circuit pulls 15-20 mA, with the coil connected + 30-40 mA, totaling up to 60 mA. Of course, depending on the type of speaker and LED used, this value may vary. The simplest case - the power was taken by 3 (or even two) series-connected lithium-ion batteries from 3.7V mobiles and when charging discharged batteries, when we connect any 12-13V power supply, the charge current starts from 0.8A and drops to 50mA in hour and then you don’t need to add anything at all, although a limiting resistor certainly doesn’t hurt. In general, the simplest option is a 9V crown. But keep in mind that the metal detector will eat it in 2 hours. But for customization, this power option is the most it. Krona under any circumstances will not give out a large current, which can burn something in the board.
Homemade metal detector

And now a description of the process of assembling a metal detector from one of the visitors. Since I have only a multimeter from the instruments, I downloaded the virtual laboratory of O.L. Zapisnykh from the Internet. I assembled an adapter, a simple generator and ran it into an idle oscilloscope. It seems to show some kind of picture. Then I started looking for radio components. Since the seals are mostly laid out in the "lay" format, I downloaded "Sprint-Layout50". I found out what laser-ironing technology for manufacturing printed circuit boards is and how to etch them. I etched the board. By this time, all the microcircuits had been found. I had to buy what I didn't find in my shed. I started soldering jumpers, resistors, sockets of microcircuits, and quartz from a Chinese alarm clock to the board. Periodically checking the resistance on the power rails so that there is no snot. First, I decided to assemble the digital part of the device, as the easiest one. That is, the generator, divider and commutator. Collected. I installed a generator microcircuit (K561LA7) and a divider (K561TM2). Used microcircuits / ear, ripped out of some boards found in the shed. Applied 12V power, controlling the current consumption by ammeter, 561ТМ2 became warm. Replaced 561TM2, applied power - zero emotion. I measure the voltage on the legs of the generator - on 1 and 2 legs 12V. I'm changing 561LA7. I turn it on - at the output of the divider, there is generation on the 13th leg (I watch it on a virtual oscilloscope)! The picture is really not so hot, but in the absence of a normal oscilloscope - it will go. But there is nothing on 1, 2 and 12 legs. So the generator is working, you need to change TM2. I installed the third divider microcircuit - beauty at all outputs is generation! For myself, I concluded that you need to solder the microcircuits as carefully as possible! This completes the first construction step.
Now we are setting up the metal detector board. The "SENS" regulator did not work - the sensitivity, I had to throw out the capacitor C3 after that the sensitivity adjustment worked as it should. I did not like the sound that occurs in the extreme left position of the "THRESH" regulator - the threshold, got rid of it by replacing the resistor R9 with a chain of series-connected resistor of 5.6 kΩ + capacitor at 47.0 μF (negative terminal of the capacitor from the side of the transistor). While there is no LF353 microcircuit, the LM358 has replaced it, with it the Soviet three kopecks feels through the air at a distance of 15 centimeters.

I turned on the search coil for transmission as a serial oscillatory circuit, and for reception as a parallel oscillatory circuit. I set up the first transmitting coil, connected the assembled sensor structure to the metal detector, the oscilloscope parallel to the coil and selected the capacitors according to the maximum amplitude. After that, the oscilloscope connected it to the receiving coil and picked up the capacitors on the RX according to the maximum amplitude. Tuning the contours into resonance takes, if you have an oscilloscope, a few minutes. The TX and RX windings I have each contain 100 turns of wire with a diameter of 0.4. We start mixing on the table, without the case. Just to have two hoops with wires. And in order to make sure that it is working and that it is possible to mix in general, we will separate the coils from each other by half a meter. Then zero will be exactly. Then, putting the coils with an overlap of about 1 cm (like wedding rings) move - move apart. The zero point can be quite accurate and not easy to catch right away. But it is there.
When I raised the gain in the RX path of the MD, it began to work unstably at maximum sensitivity, this was manifested in the fact that after passing over the target and its detection, a signal was issued, but it continued even after when there was no longer any target in front of the search coil, this manifested itself in the form of intermittent and oscillating sound signals. With the help of an oscilloscope, the reason for this was also discovered: when the speaker is working and a slight drop in the supply voltage, "zero" goes away and the MD circuit goes into a self-oscillating mode, which can only be exited by coarsening the threshold of the sound signal. This did not suit me, so I put on the power supply KR142EN5A + a super bright white LED to raise the voltage at the output of the integral stabilizer, I did not have a stabilizer for a higher voltage. This LED can even be used to illuminate the search coil. I connected the speaker to the stabilizer, after which the MD immediately became very obedient, everything began to work as it should. I think Volksturm is really the best DIY metal detector!
Recently, this modification scheme was proposed, which will turn the Volksturm S into a Volksturm SS + GEB. Now the device will have a good discriminator as well as metal selectivity and ground balance, the device is soldered on a separate board and connected instead of capacitors c5 and c4. The revision scheme is also in the archive. Special thanks for the information on assembling and configuring the metal detector to everyone who took part in the discussion and modernization of the circuit, especially helped in the preparation of the material Electrodych, fez, xxx, slavake, ew2bw, redkii and other fellow radio amateurs.